
使用 Python 和 Facenet 在 CPU 上进行实时人脸识别
共 21771字,需浏览 44分钟
· 2022-12-31
在本文中,将介绍一种通过自定义框架构建和使用任何自定义人脸识别模型的简单方法。完成本教程后,你将学习如何使用预训练模型创建具有任意 CPU 的实时人脸识别系统。
官方将人脸识别定义为验证或识别图像中的人脸的问题。但通常有一个问题,我们如何准确识别图像中的人脸?
人脸识别过程可以分为多个步骤。下图是一个人脸识别管道的示例:

人脸识别流程步骤:
人脸检测——检测图像中的一张或多张脸; 特征提取——从图片中检测到的人脸中提取基本特征; 人脸匹配——将人脸匹配到锚人脸特征。
有很多方法可以实现人脸识别管道中的每个步骤。在本文中,我们将重点介绍使用第一个教程中介绍的 MediaPipe 人脸检测模型进行人脸检测的流行深度学习技术、使用 FaceNet 进行特征提取以及使用余弦或欧几里德距离进行人脸匹配。
让我们一步一步地完成这项任务。在每一步中,我们将学习不同的机器学习算法。我将向你展示每一个背后的主要思想。你将学习使用 MediaPipe 人脸检测器和 FaceNet 人脸特征提取器在 Python 中构建你的人脸识别系统。
使用 MediaPipe 进行人脸检测:
我们人脸识别流程的第一步是人脸检测。我们需要先定位图像中的人脸,然后才能尝试将它们区分开!

人脸检测是当今大多数相机使用的一项很棒的功能。例如,当相机可以自动定位人脸时,它可以确保在拍照之前将所有人脸都对焦。
但现在,我们将把它用于另一个目的——找到面部区域,然后将其传递到管道中的另一个步骤“面部特征提取程序”。
这篇文章将使用超轻型 MedaPipe 探测器。但是假设你有兴趣应用提到的任何其他检测方法。
我探索了多个面部检测器。其中包括 MTCNN、Dlib、MediaPipe、pure CNN 以及最近发布的其他一些人脸检测器。
让我们开始吧!
FaceNet人脸特征提取
FaceNet 与其他人脸识别模型类似,是一种用于提取人脸图像特征的深度神经网络。它由谷歌研究人员 Schroff 等人发表。
论文地址:https://arxiv.org/abs/1503.03832
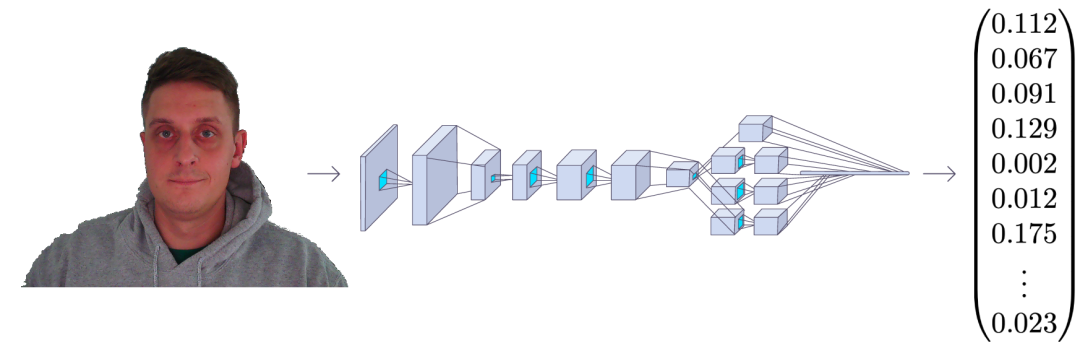
FaceNet 以一张人脸图像作为输入,输出是一个由 128 个数字组成的向量,表示人脸的基本特征。这个向量被称为嵌入,因为来自面部图像的所有相关信息都嵌入到这个向量中。
基本上,FaceNet 采用人脸并将其压缩成 128 个数字的向量。但是如果我们只观察这个向量,我们不可能知道那个人的脸是什么样的。
如今,在机器学习中将高维数据(例如图像)与低维图像(向量嵌入)相关联已成为一种相当普遍的做法。
在一张没见过的图像中识别一个人物A的一种常见方法是,获取图像嵌入并计算与已知人脸A的图片的距离。我们通常使用余弦或欧几里得距离数学公式计算距离。如果计算出的人脸距离与人 物A 的嵌入足够接近,我们就假设这张脸是同一个人的。
听起来很容易,对吧?
’我们通过 FaceNet 输入图像,得到一个向量数,并检查计算出的距离是否足够接近我们拥有的任何已知人脸。
尽管如此,还是有一个问题,FaceNet 如何知道从人脸图像中提取什么东西呢?嵌入向量中的这些数字意味着什么?虽然这不是本教程的目的,但我们可以简要介绍一下,以便我们熟悉它。
为了训练一个人脸识别器,我们需要很多人脸图像。像每个机器学习问题一样,训练通常需要数千张不同的图像。当我们开始训练过程时,模型会为每张图像生成随机向量,这意味着图像是随机分布的。
学习步骤:
随机选择一个锚点图像; 随机选择同一个人的正样本图像作为基础图像; 随机选择与主图像不同的人的负样本图像; 调整 FaceNet 神经网络参数,使正样本比负样本更靠近锚点。
我们重复这四个步骤,直到不再需要更改或这些更改非常小以至于没有影响。训练完成后,同一个人的所有面孔在距离上都彼此靠近,而与不同的面孔相距很远。
你可能会问,嵌入向量中的数字是什么意思?事实上,我们不知道这些数字代表什么,也很难解释它们。我们知道这些特征对于人脸识别来说似乎是必不可少的,而且它确实有效。
如果你是软件开发人员,你可以将人脸匹配器视为一个哈希函数。它将同一个人的面部映射到坐标系中嵌入是哈希码的相同位置。
让我们来看看我们的代码。我专门为面部识别编写了整个对象,我们将与引擎对象一起使用。这个对象有它需要做的一切,从运行推理、加载锚图像、测量距离、在帧上绘制识别等等;你可以随时添加你需要的功能。
这是faceNet.py完整的对象代码:
# faceNet.py
import cv2import cv2
import stow
import typing
import numpy as np
import onnxruntime as ort

class FaceNet:
    """FaceNet class object, which can be used for simplified face recognition
    """
    def __init__(
        self,
        detector: object,
        onnx_model_path: str = "models/faceNet.onnx",
        anchors: typing.Union[str, dict] = 'faces',
        force_cpu: bool = False,
        threshold: float = 0.5,
        color: tuple = (255, 255, 255),
        thickness: int = 2,
        ) -> None:

        """Object for face recognition
        Params:
            detector: (object) - detector object to detect faces in image
            onnx_model_path: (str) - path to onnx model
            force_cpu: (bool) - if True, onnx model will be run on CPU
            anchors: (str or dict) - path to directory with faces or dictionary with anchor names as keys and anchor encodings as values
            threshold: (float) - threshold for face recognition
            color: (tuple) - color of bounding box and text
            thickness: (int) - thickness of bounding box and text
        """

        if not stow.exists(onnx_model_path):
            raise Exception(f"Model doesn't exists in {onnx_model_path}")

        self.detector = detector
        self.threshold = threshold
        self.color = color
        self.thickness = thickness

        providers = ['CUDAExecutionProvider', 'CPUExecutionProvider']

        providers = providers if ort.get_device() == "GPU" and not force_cpu else providers[::-1]

        self.ort_sess = ort.InferenceSession(onnx_model_path, providers=providers)

        self.input_shape = self.ort_sess._inputs_meta[0].shape[1:3]

        self.anchors = self.load_anchors(anchors) if isinstance(anchors, str) else anchors

    def normalize(self, img: np.ndarray) -> np.ndarray:

        """Normalize image
        Args:
            img: (np.ndarray) - image to be normalized
        Returns:
            img: (np.ndarray) - normalized image
        """

        mean, std = img.mean(), img.std()
        return (img - mean) / std

    def l2_normalize(self, x: np.ndarray, axis: int = -1, epsilon: float = 1e-10) -> np.ndarray:

        """l2 normalization function
        Args:
            x: (np.ndarray) - input array
            axis: (int) - axis to normalize
            epsilon: (float) - epsilon to avoid division by zero
        Returns:
            x: (np.ndarray) - normalized array
        """

        output = x / np.sqrt(np.maximum(np.sum(np.square(x), axis=axis, keepdims=True), epsilon))
        return output

    def detect_save_faces(self, image: np.ndarray, output_dir: str = "faces"):

        """Detect faces in given image and save them to output_dir
        Args:
            image: (np.ndarray) - image to be processed
            output_dir: (str) - directory where faces will be saved
        Returns:
            bool: (bool) - True if faces were detected and saved
        """

        face_crops = [image[t:b, l:r] for t, l, b, r in self.detector(image, return_tlbr=True)]

        if face_crops == []:
            return False

        stow.mkdir(output_dir)

        for index, crop in enumerate(face_crops):
            output_path = stow.join(output_dir, f"face_{str(index)}.png")
            cv2.imwrite(output_path, crop)
            print("Crop saved to:", output_path)

        self.anchors = self.load_anchors(output_dir)

        return True


    def load_anchors(self, faces_path: str):

        """Generate anchors for given faces path
        Args:
            faces_path: (str) - path to directory with faces
        Returns:
            anchors: (dict) - dictionary with anchor names as keys and anchor encodings as values
        """

        anchors = {}
        if not stow.exists(faces_path):
            return {}

        for face_path in stow.ls(faces_path):
            anchors[stow.basename(face_path)] = self.encode(cv2.imread(face_path.path))

        return anchors

    def encode(self, face_image: np.ndarray) -> np.ndarray:
        """Encode face image with FaceNet model
        Args
            face_image: (np.ndarray) - face image to be encoded

        Returns:
            face_encoding: (np.ndarray) - face encoding
        """
        face = self.normalize(face_image)
        face = cv2.resize(face, self.input_shape).astype(np.float32)

        encode = self.ort_sess.run(None, {self.ort_sess._inputs_meta[0].name: np.expand_dims(face, axis=0)})[0][0]
        normalized_encode = self.l2_normalize(encode)

        return normalized_encode

    def cosine_distance(self, a: np.ndarray, b: typing.Union[np.ndarray, list]) -> np.ndarray:

        """Cosine distance between wectors a and b
        Args:
            a: (np.ndarray) - first vector
            b: (np.ndarray) - second list of vectors
        Returns:
            distance: (float) - cosine distance
        """

        if isinstance(a, list):
            a = np.array(a)

        if isinstance(b, list):
            b = np.array(b)

        return np.dot(a, b.T) / (np.linalg.norm(a) * np.linalg.norm(b))

    def draw(self, image: np.ndarray, face_crops: dict):

        """Draw face crops on image
        Args:
            image: (np.ndarray) - image to be drawn on
            face_crops: (dict) - dictionary with face crops as values and face names as keys
        Returns:
            image: (np.ndarray) - image with drawn face crops
        """

        for value in face_crops.values():
            t, l, b, r = value["tlbr"]
            cv2.rectangle(image, (l, t), (r, b), self.color, self.thickness)
            cv2.putText(image, stow.name(value['name']), (l, t - 10), cv2.FONT_HERSHEY_SIMPLEX, 0.9, self.color, self.thickness)

        return image

    def __call__(self, frame: np.ndarray) -> np.ndarray:

        """Face recognition pipeline
        Args:
            frame: (np.ndarray) - image to be processed
        Returns:
            frame: (np.ndarray) - image with drawn face recognition results
        """

        face_crops = {index: {"name": "Unknown", "tlbr": tlbr} for index, tlbr in enumerate(self.detector(frame, return_tlbr=True))}
        for key, value in face_crops.items():
            t, l, b, r = value["tlbr"]
            face_encoding = self.encode(frame[t:b, l:r])
            distances = self.cosine_distance(face_encoding, list(self.anchors.values()))
            if np.max(distances) > self.threshold:
                face_crops[key]["name"] = list(self.anchors.keys())[np.argmax(distances)]

        frame = self.draw(frame, face_crops)

        return frame
我不会一步一步地处理这个对象;我将在我的 YouTube 视频教程中介绍这一点。但我必须提到,这里我们正在加载.onnx模型,我们可以使用faceNet/convert_to_onnx.py脚本进行转换:
# faceNet/convert_to_onnx.py
import os
import tensorflow as tf
import tf2onnx
from architecture import InceptionResNetV2

if __name__ == '__main__':
    """ weights can be downloaded from https://drive.google.com/drive/folders/1scGoVCQp-cNwKTKOUqevCP1N2LlyXU3l?usp=sharing
    Put facenet_keras_weights.h5 file in model folder
    """
    facenet_weights_path = "models/facenet_keras_weights.h5"
    onnx_model_output_path = "models/faceNet.onnx"

    if not os.path.exists(facenet_weights_path):
        raise Exception(f"Model doesn't exists in {facenet_weights_path}, download weights from \
            https://drive.google.com/drive/folders/1scGoVCQp-cNwKTKOUqevCP1N2LlyXU3l?usp=sharing")

    faceNet = InceptionResNetV2()
    faceNet.load_weights(facenet_weights_path)

    spec = (tf.TensorSpec(faceNet.inputs[0].shape, tf.float32, name="image_input"),)
    tf2onnx.convert.from_keras(faceNet, output_path=onnx_model_output_path, input_signature=spec)
view raw
首先,你必须从代码中的给定链接下载权重并将它们放在模型文件夹中。然后使用python 运行 faceNet/convert_to_onnx.py代码,它应该将模型转换为.onnx格式。
有了模型后,我们可以打开main.py脚本并使用以下代码运行网络摄像头实时人脸识别:
# main.py
from utils import FPSmetric
from engine import Engine
from faceDetection import MPFaceDetection
from faceNet.faceNet import FaceNet

if __name__ == '__main__':
    facenet = FaceNet(
        detector = MPFaceDetection(),
        onnx_model_path = "models/faceNet.onnx",
        anchors = "faces",
        force_cpu = True,
    )
    engine = Engine(webcam_id=0, show=True, custom_objects=[facenet, FPSmetric()])

    # save first face crop as anchor, otherwise don't use
    while not facenet.detect_save_faces(engine.process_webcam(return_frame=True), output_dir="faces"):
        continue

    engine.run()
正如我所提到的,要提取人脸嵌入,首先,在定义 FaceNet 对象时,我们需要在帧上定位人脸。
然后我们告诉模型我们保存的模型的路径。然后我们给它保存anchors的路径;它必须是带有面部裁剪的图像。例如,我在我裁剪的脸所在的图像“Rokas.png”上有我的。这意味着模型将加载此锚点并在找到匹配项时显示我的名字。
接下来,我们需要创建一个引擎对象,负责处理图像、视频或网络摄像头流;我选择处理网络摄像头。使用“show”参数,我告诉对象在屏幕上显示此帧。
另外,我添加了一个 FPSmetric 来了解人脸识别的工作速度。
最后,我必须将我的“facenet”对象传递给“custom_objects”参数。在这里,我们可以添加更多,“pencil sketch”、“background removal”或其他我们想要的实体。
现在,如果我们没有将裁剪保存在光盘上,我创建了一个函数来抓取第一个网络摄像头帧,如果它在其中找到一张人脸,它就会裁剪并保存它:
while not facenet.detect_save_faces(engine.process_webcam(return_frame=True), output_dir="faces"):
    continue
保存anchor face后,它移动到处理每一帧的“engine.run()”函数,我们应该看到与我下图类似的结果:
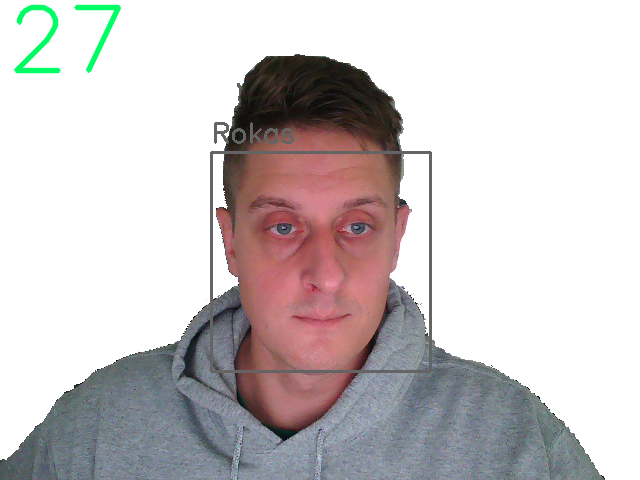
我们可以清楚地看到左上角的 FPS 和我脸上的一个正方形,上面有锚图像的名称。太棒了!
结论:
最后,我们创建了一个可以在我们的 CPU 上进行实时人脸识别的系统,它的运行速度在 30 fps 左右,这对我们来说已经足够了!
GitHub地址:https://github.com/pythonlessons/background_removal