
使用 Tektoncd Operator 管理 Tekton 组件
 Tektoncd Operator
| CRD | 描述 |
|---|---|
TektonConfig | 配置要安装和管理的 Tekton 组件。 |
TektonPipeline | 配置安装管理 Tekton Pipeline 组件。 |
TektonTrigger | 配置安装管理 Tekton Trigger 组件。 |
TektonDashboard | 配置安装管理 Tekton Dashboard 组件。 |
TektonResult | 配置安装管理 Tekton Result 组件。 |
TektonAddon | 配置安装管理插件,目前仅支持 Openshift。 |
安装
安装 Tektoncd Operator 有多种方式。
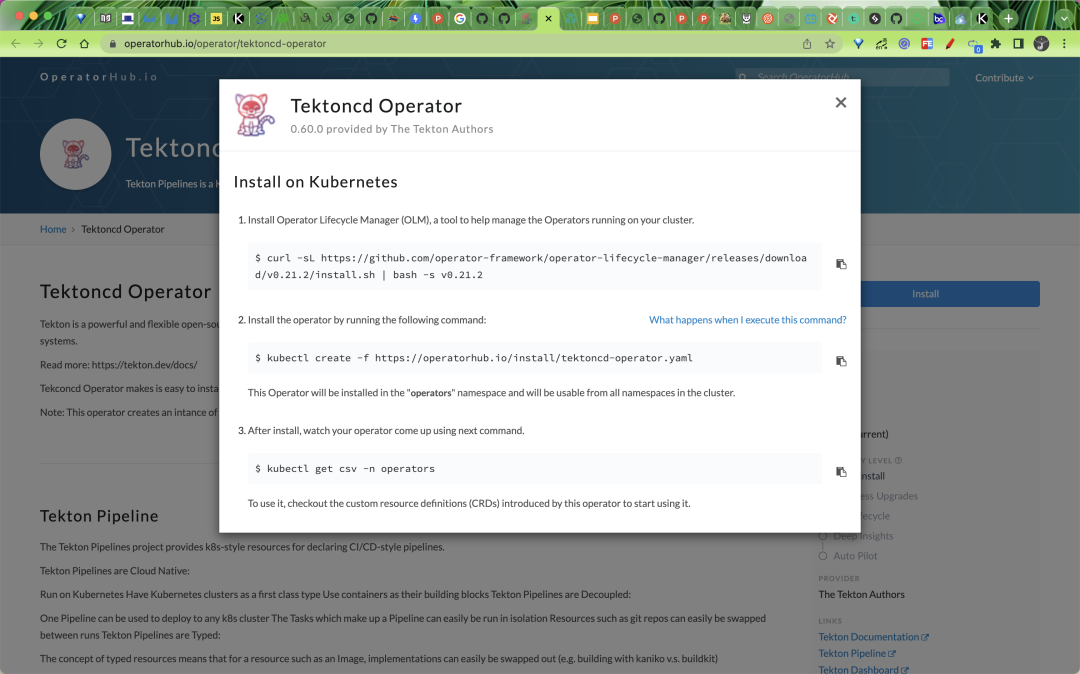
从 Operator Hub 安装
可以直接前往 Operator Hub 页面 https://operatorhub.io/operator/tektoncd-operator 进行安装,其生命周期将由 Operator Lifecycle Manager (OLM) 进行管理。
使用资源清单文件安装
可以直接从 Github Release 页面 https://github.com/tektoncd/operator/releases 获取资源清单文件,使用这种方式安装,需要自己管理 Operator 的生命周期。
直接使用下面的命令进行安装即可。
$ kubectl apply -f https://storage.googleapis.com/tekton-releases/operator/latest/release.yaml
由于官方使用的镜像是 gcr 的镜像,所以正常情况下我们是获取不到的,如果你的集群由于某些原因获取不到镜像,可以使用下面的资源清单文件:
$ kubectl apply -f https://my-oss-testing.oss-cn-beijing.aliyuncs.com/k8s/tekton/operator/release.v0.60.0.yml
默认情况下 Tektoncd Operator 创建的对象会使用 gcr 的镜像,比如 Tekton Pipelines 控制器的镜像,可以通过环境变量 IMAGE_PIPELINES_TEKTON_PIPELINES_CONTROLLER 来指定对应的镜像,如下所示的环境变量是覆盖默认的 gcr 镜像的配置方式:
- name: IMAGE_PIPELINES_PROXY
  value: cnych/tekton-operator-proxy-webhook:v0.60.0
- name: IMAGE_JOB_PRUNER_TKN
  value: cnych/tekton-operator-pruner-tkn:v0.60.0
- name: IMAGE_PIPELINES_TEKTON_PIPELINES_CONTROLLER
  value: cnych/tekton-controller:v0.37.2
- name: IMAGE_PIPELINES_WEBHOOK
  value: cnych/tekton-webhook:v0.37.2
- name: IMAGE_PIPELINES_ARG__ENTRYPOINT_IMAGE
  value: cnych/tekton-entrypoint:v0.37.2
- name: IMAGE_PIPELINES_ARG__GIT_IMAGE
  value: cnych/tekton-git-init:v0.37.2
- name: IMAGE_PIPELINES_ARG__IMAGEDIGEST_EXPORTER_IMAGE
  value: cnych/tekton-imagedigestexporter:v0.37.2
- name: IMAGE_PIPELINES_ARG__KUBECONFIG_WRITER_IMAGE
  value: cnych/tekton-kubeconfigwriter:v0.37.2
- name: IMAGE_PIPELINES_ARG__NOP_IMAGE
  value: cnych/tekton-nop:v0.37.2
- name: IMAGE_TRIGGERS_TEKTON_TRIGGERS_CONTROLLER
  value: cnych/tekton-triggers-controller:v0.20.1
- name: IMAGE_TRIGGERS_WEBHOOK
  value: cnych/tekton-triggers-webhook:v0.20.1
- name: IMAGE_TRIGGERS_TEKTON_TRIGGERS_CORE_INTERCEPTORS
  value: cnych/tekton-triggers-interceptors:v0.20.1
- name: IMAGE_TRIGGERS_ARG__EL_IMAGE
  value: cnych/tekton-triggers-eventlistenersink:v0.20.1
上面的方式会创建一个名为 tekton-operator 的命名空间,其中包含一个 Operator 和一个 Webhook 的 Pod:
$ kubectl get pods -n tekton-operator
NAME                                       READY   STATUS    RESTARTS   AGE
tekton-operator-9d747548b-67t7m            2/2     Running   0          9m42s
tekton-operator-webhook-6cc769b85d-fssq9   1/1     Running   0          9m42s
安装 Operator 后,就可以安装所需的 Tekton 组件,例如 Tekton Pipeline、Tekton Triggers。
每个 Tekton 组件都有一个自定义资源,用于安装和管理组件。
$ kubectl get crd |grep tekton |grep operator
tektonchains.operator.tekton.dev                    2022-07-25T00:51:07Z
tektonconfigs.operator.tekton.dev                   2022-07-25T00:51:07Z
tektondashboards.operator.tekton.dev                2022-07-25T00:51:07Z
tektonhubs.operator.tekton.dev                      2022-07-25T00:51:07Z
tektoninstallersets.operator.tekton.dev             2022-07-25T00:51:07Z
tektonpipelines.operator.tekton.dev                 2022-07-25T00:51:07Z
tektonresults.operator.tekton.dev                   2022-07-25T00:51:07Z
tektontriggers.operator.tekton.dev                  2022-07-25T00:51:07Z
其中 TektonConfig 是创建其他组件的顶级 CRD。所以我们只需创建具有所需配置的 TektonConfig 对象即可,它将会帮助我们安装相应的其他组件。
TektonConfig 将根据传递给它的配置文件创建 TektonPipeline、TektonTriggers 和其他组件 CR 对象,其中有一个 profile 的字段,可以用于确定要安装的所有组件。
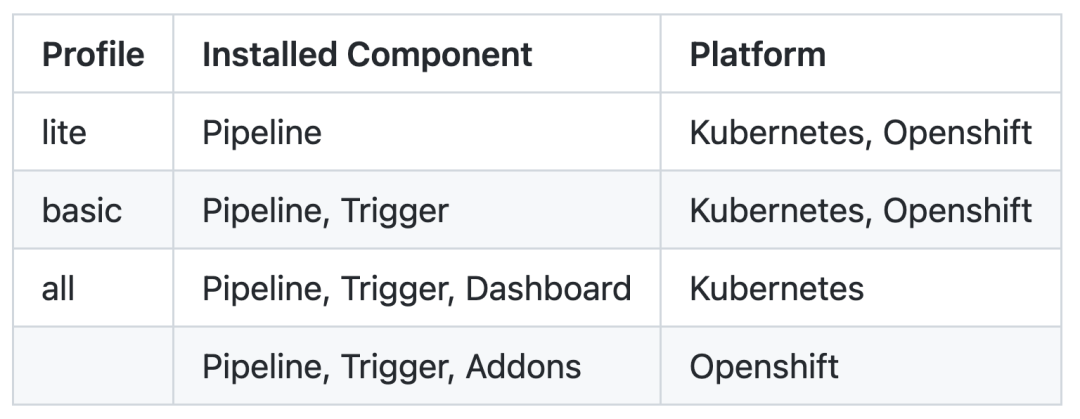
Tektoncd Operator 内置了 3 个 profile:lite、all、basic。
all:此配置文件将安装所有组件basic:此配置文件将仅安装 TektonPipeline 和 TektonTrigger 组件lite:此配置文件将仅安装 TektonPipeline 组件
比如我们要安装 pipelines、triggers 和 dashboard,可以使用 all 这个 profile 进行安装,如下资源清单所示:
# tekton-operator-profile-all.yaml
apiVersion: operator.tekton.dev/v1alpha1
kind: TektonConfig
metadata:
  name: config
spec:
  profile: all
  targetNamespace: tekton-pipelines
  pruner:
    resources:
      - pipelinerun
      - taskrun
    keep: 100
    schedule: "0 8 * * *"
其中 targetNamespace 用来指定安装 Tekton 组件的命名空间,默认为 tekton-pipelines,pruner 为 Tekton 资源提供自动清理功能。
resources:指定可以自动清理的资源keep:清理时要保留的最大资源数schedule:清理资源的频率
直接安装上面的资源对象即可:
$ kubectl apply -f tekton-operator-profile-all.yaml
$ kubectl get tektonconfig
NAME     VERSION   READY   REASON
config   v0.60.0   True
上面的 TektonConfig 对象我们配置的 profile 为 all,会自动为我们创建 tektonpipelines、tektontriggers、tektondashboard 组件对象:
$ kubectl get tektonpipelines
NAME       VERSION   READY   REASON
pipeline   v0.37.0   True
$ kubectl get tektontriggers
NAME      VERSION   READY   REASON
trigger   v0.20.1   True
$ kubectl get tektondashboard
NAME        VERSION   READY   REASON
dashboard   v0.27.0   True
上面的这几个 cr 对象创建后就会自动创建对应的组件,如下所示:
$ kubectl get pods -n tekton-pipelines
NAME                                                 READY   STATUS             RESTARTS   AGE
tekton-dashboard-84dc6f966b-g8flx                    0/1     ImagePullBackOff   0          3m48s
tekton-operator-proxy-webhook-7587596c79-ld8vm       1/1     Running            0          30m
tekton-pipelines-controller-78bc48896b-sd9fk         1/1     Running            0          30m
tekton-pipelines-webhook-5f48c855b4-js54q            1/1     Running            0          30m
tekton-triggers-controller-668b94cb5b-ggbk7          1/1     Running            0          27m
tekton-triggers-core-interceptors-66b7ddd78c-pq7gb   1/1     Running            0          27m
tekton-triggers-webhook-c8fd7755d-rknch              1/1     Running            0          27m
由于 dashboard 组件的镜像没有对应的覆盖的环境变量,所以需要我们手动进行修改:
$ kubectl edit deploy tekton-dashboard -n tekton-pipelines

......
    image: cnych/tekton-dashboard:v0.28.0
......
Dashboard 的服务默认通过 ClusterIP 方式进行暴露,我们可以手动创建一个 Ingress 对象或者修改 Service 为 NodePort 方式进行暴露。
$ kubectl get svc -n tekton-pipelines
NAME                                TYPE        CLUSTER-IP       EXTERNAL-IP   PORT(S)                              AGE
tekton-dashboard                    ClusterIP   10.102.221.101   <none>        9097/TCP                             28m
tekton-operator-proxy-webhook       ClusterIP   10.96.175.155    <none>        443/TCP                              33m
tekton-pipelines-controller         ClusterIP   10.99.0.85       <none>        9090/TCP,8008/TCP,8080/TCP           33m
tekton-pipelines-webhook            ClusterIP   10.106.195.14    <none>        9090/TCP,8008/TCP,443/TCP,8080/TCP   33m
tekton-triggers-controller          ClusterIP   10.99.84.154     <none>        9000/TCP                             30m
tekton-triggers-core-interceptors   ClusterIP   10.97.83.136     <none>        8443/TCP                             30m
tekton-triggers-webhook             ClusterIP   10.108.88.140    <none>        443/TCP                              30m
测试
Tekon 的组件安装完成后,接下来我们来运行一个简单的 Pipeline。
首先创建一个如下所示的 Task 任务,下面的任务中会在 bash 容器中去执行 echo "Hello, world!" 的命令。
# hello-task.yaml
apiVersion: tekton.dev/v1beta1
kind: Task
metadata:
  name: hello
spec:
  steps:
    - name: hello
      image: bash:latest
      command:
        - echo
      args:
        - "Hello, world!"
用同样的方式再创建一个 goodbye 的任务,只需要将上面的 echo 内容修改为 goodbye 即可。
然后就可以定义一个 Pipeline 流水线了,如下所示:
# hello-goodbye-pipeline.yaml
apiVersion: tekton.dev/v1beta1
kind: Pipeline
metadata:
  name: hello-goodbye-pipeline
spec:
  tasks:
    - name: hello
      taskRef:
        name: hello
    - name: goodbye
      runAfter:
        - hello
      taskRef:
        name: goodbye
通过 taskRef 引用对应的 Task 对象。
直接创建上面的资源对象即可:
$ kubectl get pipeline
NAME                     AGE
hello-goodbye-pipeline   24s
$ kubectl get task
NAME      AGE
goodbye   101s
hello     107s
要执行该流水线,我们还需要创建一个 PipelineRun 的对象才会真正执行。
# hello-goodbye-pipeline-run.yaml
apiVersion: tekton.dev/v1beta1
kind: PipelineRun
metadata:
  generateName: hello-goodbye-pipeline-
spec:
  pipelineRef:
    name: hello-goodbye-pipeline
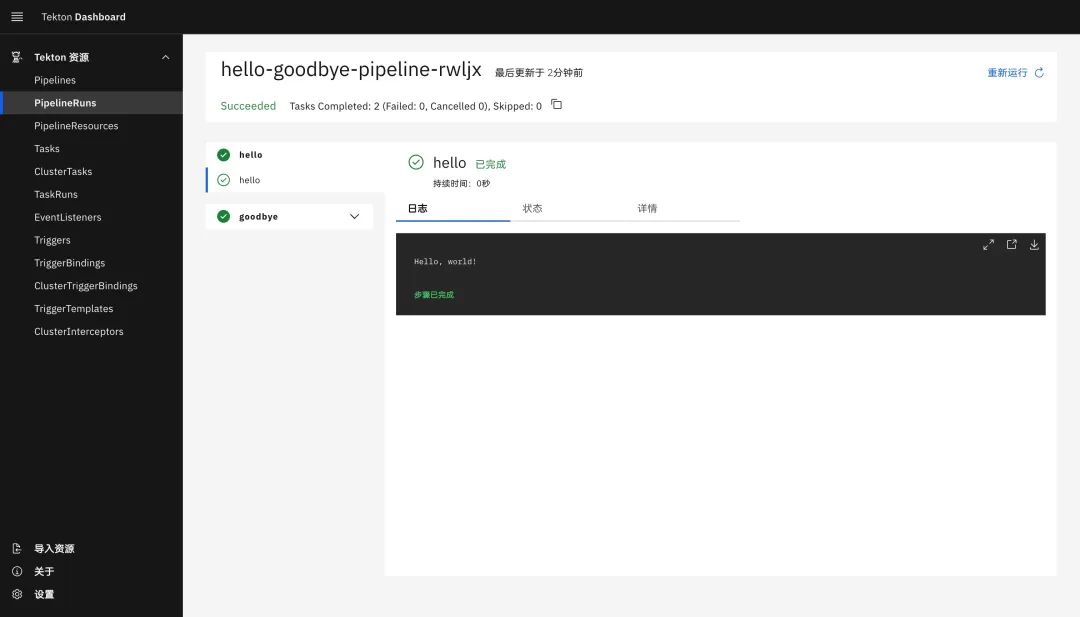
创建上面的资源即可,需要注意我们这里使用的 generateName 属性,需要使用 kubectl create 命令进行创建。正常创建后很快就会按照上面 Pipeline 的描述去执行两个任务了。
要想卸载 Tekton 我们也只需要将定义的 TektonConfig 对象删除即可。
如果不想使用 TektonCD Operator 内置的几个 profile,我们也可以自己手动去分别配置不同组件的 CR 实例,另外 TektonCD Operator 现阶段提供的可配置方式并不多,特别是对于国内用户来说镜像这个老大难的问题,只能通过环境变量去全局覆盖 Operator,还有部分镜像压根没有覆盖,如果是在国内使用并且不能使用 gcr 镜像的话可能体验就不是那么顺畅了。