
凑个热闹之美团 YOLOv6 ORT/MNN/TNN/NCNN C++推理部署
共 30237字,需浏览 61分钟
· 2022-06-28

极市导读
本文主要讲解了美团6月24开源的YOLOv6在不同推理引擎的C++工程化过程,包含了ORT、MNN、NCNN和TNN下的推理处理,以及不同推理框架下模型转换需要注意的问题。 >>加入极市CV技术交流群,走在计算机视觉的最前沿
0. 前言
昨天美团开源了YOLOv6,又是一个YOLO系列的新作。此时距离YOLOX开源差不多刚好一年的时间。之前捏过很多YOLO系列的推理例子,比如YOLOv3、YOLOv4、YOLOv5、YOLOX、YOLOR和YOLOP等等。虽然最近已经没有在做detection方向了,但作为YOLO系列的老粉了,出来凑个热闹应该总是可以的。所以,这次也来凑凑YOLO系列的热闹,给出几个不同的推理引擎的例子,包括ONNXRuntime、MNN、NCNN和TNN,以及简单记录下模型的转换过程。总的来说,YOLOv6 的 C++推理,都是些重复性的工作,没什么太大的难度,刚好趁着周末,顺手捏一捏。这篇文章不会记录地很详细,只讲几个要点。
1. ONNX 和 TNN 模型转换
经过尝试,直接转换出来的ONNX和TNN模型文件在推理时,结果一切正常,不需要修改 YOLOv6 的 Detect 源码,使用官方提供的 deploy/ONNX/export_onnx.py 直接转换即可。但是 NCNN 和 MNN 都需要修改 Detect 的源码进行特殊处理才可正常推理。所以 ONNX 和 TNN 放在这一节讲,MNN 和 NCNN 的模型转换放在下一小节讲。
首先下载源码:
git clone --depth=1 https://github.com/meituan/YOLOv6.git然后稍微修改下 export_onnx.py,源码是没有添加 onnxsim的,作为基操,我们把它添加上,修改后如下:
#!/usr/bin/env python3
# -*- coding:utf-8 -*-
import argparse
import time
import sys
import os
import torch
import torch.nn as nn
import onnx
import onnxsim
import onnxruntime as ort

ROOT = os.getcwd()
if str(ROOT) not in sys.path:
    sys.path.append(str(ROOT))

from yolov6.models.yolo import *
from yolov6.models.effidehead import Detect
from yolov6.layers.common import *
from yolov6.utils.events import LOGGER
from yolov6.utils.checkpoint import load_checkpoint

if __name__ == '__main__':
    parser = argparse.ArgumentParser()
    parser.add_argument('--weights', type=str, default='./yolov6s.pt', help='weights path')
    parser.add_argument('--img-size', nargs='+', type=int, default=[640, 640], help='image size')  # height, width
    parser.add_argument('--batch-size', type=int, default=1, help='batch size')
    parser.add_argument('--half', action='store_true', help='FP16 half-precision export')
    parser.add_argument('--inplace', action='store_true', help='set Detect() inplace=True')
    parser.add_argument('--device', default='0', help='cuda device, i.e. 0 or 0, 1, 2, 3 or cpu')
    args = parser.parse_args()
    args.img_size *= 2 if len(args.img_size) == 1 else 1  # expand
    print(args)
    t = time.time()
    apply_simplify = True  # 增加onnxsim

    # Check device
    cuda = args.device != 'cpu' and torch.cuda.is_available()
    device = torch.device('cuda:0' if cuda else 'cpu')
    assert not (device.type == 'cpu' and args.half), '--half only compatible with GPU export, i.e. use --device 0'
    # Load PyTorch model
    model = load_checkpoint(args.weights, map_location=device, inplace=True, fuse=True)  # load FP32 model
    for layer in model.modules():
        if isinstance(layer, RepVGGBlock):
            layer.switch_to_deploy()
    # Input
    img = torch.zeros(args.batch_size, 3, *args.img_size).to(device)  # image size(1,3,320,192) iDetection
    # Update model
    if args.half:
        img, model = img.half(), model.half()  # to FP16
    model.eval()
    for k, m in model.named_modules():
        if isinstance(m, Conv):  # assign export-friendly activations
            if isinstance(m.act, nn.SiLU):
                m.act = SiLU()
        elif isinstance(m, Detect):
            m.inplace = args.inplace
    y = model(img)  # dry run
    # ONNX export
    h, w = args.img_size
    export_file = args.weights.replace('.pt', f'-{h}x{w}.onnx')  # filename 增加size标记
    try:
        LOGGER.info('\nStarting to export ONNX...')
        torch.onnx.export(model, img, export_file, verbose=False, opset_version=12,
                          training=torch.onnx.TrainingMode.EVAL,
                          do_constant_folding=True,
                          input_names=['image_arrays'],
                          output_names=["outputs"],
                          )
        # Checks
        onnx_model = onnx.load(export_file)  # load onnx model
        onnx.checker.check_model(onnx_model)  # check onnx model
        LOGGER.info(f'ONNX export success, saved as {export_file}')
    except Exception as e:
        LOGGER.info(f'ONNX export failure: {e}')
    if apply_simplify:  # 增加的onnxsim部分
        print(f'{export_file} simplifying with onnx-simplifier {onnxsim.__version__}...')
        try:
            onnx_model = onnx.load(export_file)  # load onnx model
            onnx_model, check = onnxsim.simplify(onnx_model, check_n=3)
            assert check, 'simplifying check failed'
            onnx.save(onnx_model, export_file)
        except Exception as e:
            print(f'{export_file} simplifier failure: {e}')
    # Running ORT check 增加ORT验证
    sess = ort.InferenceSession(export_file)
    print(f"ORT Loaded {export_file} !")
    for _ in sess.get_inputs(): print(f"Input: {_}")
    for _ in sess.get_outputs(): print(f"Output: {_}")
    print("ORT Check Done !")

    # Finish
    LOGGER.info('\nExport complete (%.2fs)' % (time.time() - t))
预训练好的pt模型文件可以从官方提供的链接下载,放在 YOLOv6 的根目录下,直接转换就行:
PYTHONPATH=. python3 ./deploy/ONNX/export_onnx.py --weights yolov6n.pt --img 640 --batch 1
PYTHONPATH=. python3 ./deploy/ONNX/export_onnx.py --weights yolov6n.pt --img 320 --batch 1
PYTHONPATH=. python3 ./deploy/ONNX/export_onnx.py --weights yolov6s.pt --img 640 --batch 1
PYTHONPATH=. python3 ./deploy/ONNX/export_onnx.py --weights yolov6s.pt --img 320 --batch 1
PYTHONPATH=. python3 ./deploy/ONNX/export_onnx.py --weights yolov6t.pt --img 640 --batch 1
这个过程比较顺利,暂时没发现什么坑。接下来转换为 TNN 模型文件,命令如下:
convert2tnn# python3 ./converter.py onnx2tnn ./tnn_models/yolov6/yolov6t-640x640.onnx -o ./tnn_models/yolov6/ -v v1.0 -optimize -align
convert2tnn# python3 ./converter.py onnx2tnn ./tnn_models/yolov6/yolov6s-640x640.onnx -o ./tnn_models/yolov6/ -v v1.0 -optimize -align
convert2tnn# python3 ./converter.py onnx2tnn ./tnn_models/yolov6/yolov6n-640x640.onnx -o ./tnn_models/yolov6/ -v v1.0 -optimize -align
convert2tnn# python3 ./converter.py onnx2tnn ./tnn_models/yolov6/yolov6s-320x320.onnx -o ./tnn_models/yolov6/ -v v1.0 -optimize -align
convert2tnn# python3 ./converter.py onnx2tnn ./tnn_models/yolov6/yolov6n-320x320.onnx -o ./tnn_models/yolov6/ -v v1.0 -optimize -align
TNN模型的转换需要用到 tnn-convert,如何使用tnn-convert就不展开了,感兴趣的同学可以看我之前写的一篇文章,传送门:
tnn-convert搭建简记-YOLOP转TNN5:https://zhuanlan.zhihu.com/p/431418709
2. MNN 和 NCNN 模型转换
NCNN 和 MNN 都需要修改 Detect 的源码进行特殊处理才可正常推理。MNN其实也可以直接转,但是转出来的模型文件虽然能推理,但是在decode完之后,结果很奇怪,所以我最后决定将MNN的模型文件转换采用和NCNN同样的处理方式。其实很多写的关于YOLO系列的部署文章都有提到过,该系列在部署时主要的一个问题就是如何处理 Detect Head 中关于 decode 部分的逻辑。这部分代码在 YOLOv6中长这样:
    def forward(self, x):
        z = []
        for i in range(self.nl):
            # ...
            if self.training:
                # ...
            else:
                y = torch.cat([reg_output, obj_output.sigmoid(), cls_output.sigmoid()], 1)
                bs, _, ny, nx = y.shape
                y = y.view(bs, self.na, self.no, ny, nx).permute(0, 1, 3, 4, 2).contiguous()
                if self.grid[i].shape[2:4] != y.shape[2:4]:
                    d = self.stride.device
                    yv, xv = torch.meshgrid([torch.arange(ny).to(d), torch.arange(nx).to(d)])
                    self.grid[i] = torch.stack((xv, yv), 2).view(1, self.na, ny, nx, 2).float()
                if self.inplace:
                    y[..., 0:2] = (y[..., 0:2] + self.grid[i]) * self.stride[i]  # xy
                    y[..., 2:4] = torch.exp(y[..., 2:4]) * self.stride[i] # wh
                else:
                    xy = (y[..., 0:2] + self.grid[i]) * self.stride[i]  # xy
                    wh = torch.exp(y[..., 2:4]) * self.stride[i]  # wh
                    y = torch.cat((xy, wh, y[..., 4:]), -1)
                z.append(y.view(bs, -1, self.no))
        return x if self.training else torch.cat(z, 1)
这部分虽然有些框架可以直接支持导出,但会产生大量的胶水op,所以一个可选的做法是,只导出decode之前的Raw部分的内容,在C++侧做decode。另外,我们可以看到,decode部分存在一个5维度的操作:
y = y.view(bs, self.na, self.no, ny, nx).permute(0, 1, 3, 4, 2).contiguous()
这部分在NCNN中应该是不支持的(按照我对ncnn::Mat的理解,它有c,h,w三个维度,并假设b=1,所以可以处理<=4维的张量),也不能直接导出。所以,这个5维的处理,我们也要做相应的修改。至于MNN,其实可以直接转换这部分decode的逻辑,但是我在推理时,发现出来的结果不太对,于是决定采用NCNN同样的处理方式,就是只导出decode前的部分,把decode放在c++侧处理,后来验证了这样做可以得到正常的推理结果。
那么,这段 Detect Head 的逻辑到底要怎么改呢?长话短说,我直接放一个我修改后的代码吧:
models/effidehead.py修改之后
class Detect(nn.Module):
    # ...
    def forward(self, x):
        z = []
        for i in range(self.nl):
            # ...
            if self.training:
                # ...
            else:  # 修改之后长这样
                x[i] = torch.cat([reg_output, obj_output, cls_output], 1)
                bs, _, ny, nx = x[i].shape
                # x(bs,255,20,20) to x(bs,1,20,20,85=80+5) (bs,na,ny,nx,no=nc+5=4+1+nc)
                # x[i] = x[i].view(bs, self.na, self.no, ny, nx).permute(0, 1, 3, 4, 2).contiguous()
                x[i] = x[i].view(bs, self.na, 85, -1).permute(0, 1, 3, 2).contiguous()  # (b,self.na,20x20,85) for NCNN
                x[i] = x[i].view(bs, -1, 85)
        return torch.cat(x, dim=1)  # (b,?,85)
这里,我们把原来的5维操作修改成4维操作,因为导出时,实际的no(num_outputs=85)、na(num_anchors=1)的值都是可以事先计算出来的,通过看 YOLOv6 中的 configs 文件夹中的配置文件,我们也可以确定实际上 na一直为1,而 ny,nx是每个特征图的大小,对于固定的输入shape,各个特征图的ny,nx也是固定的。为了变成4维操作,我们可以把原来在最后的两个维度(ny,nx)直接拉平,按照行主序的线性内存来理解,这样是可行的。于是有:
x[i] = x[i].view(bs, self.na, 85, -1).permute(0, 1, 3, 2).contiguous()  # (b,self.na,20x20,85) for NCNN
x[i] = x[i].view(bs, -1, 85)
最后,在返回结果值之前,我们再做一个合并处理,这样就不需要在c++解码的时候单独对每个特征图都做一遍,合并后,只要对一个大的输出做decode就可以了。
return torch.cat(x, dim=1) # (b,?,85)
这样修改之后,export_onnx.py的代码不用变,还是用原来的命令行直接导出就可以了(我在文件名增加了-for-ncnn作为后缀方便区分)。
还是先导出为 ONNX:
PYTHONPATH=. python3 ./deploy/ONNX/export_onnx.py --weights yolov6n.pt --img 640 --batch 1
PYTHONPATH=. python3 ./deploy/ONNX/export_onnx.py --weights yolov6n.pt --img 320 --batch 1
PYTHONPATH=. python3 ./deploy/ONNX/export_onnx.py --weights yolov6s.pt --img 640 --batch 1
PYTHONPATH=. python3 ./deploy/ONNX/export_onnx.py --weights yolov6s.pt --img 320 --batch 1
PYTHONPATH=. python3 ./deploy/ONNX/export_onnx.py --weights yolov6t.pt --img 640 --batch 1
模型文件为:
yolov6 ls -lh | grep yolov6 | grep for-ncnn | grep onnx
-rw-r--r--  1 yanjunqiu  staff    16M Jun 25 12:52 yolov6n-320x320-for-ncnn.onnx
-rw-r--r--  1 yanjunqiu  staff    16M Jun 25 12:51 yolov6n-640x640-for-ncnn.onnx
-rw-r--r--  1 yanjunqiu  staff    66M Jun 25 12:53 yolov6s-320x320-for-ncnn.onnx
-rw-r--r--  1 yanjunqiu  staff    66M Jun 25 12:52 yolov6s-640x640-for-ncnn.onnx
-rw-r--r--  1 yanjunqiu  staff    57M Jun 25 12:53 yolov6t-640x640-for-ncnn.onnx
用netron打开来看,发现decode那部分已经没有了:

带decode的onnx,用netron打开是长这样的:
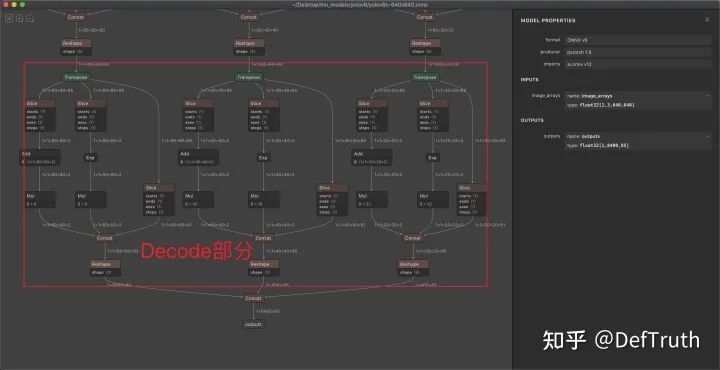
可以发现两者有很明显的区别,不带decode的图,在输出部分要简单很多。
接下来,就是按常规流程将ONNX转换成NCNN和MNN模型,命令行如下:
onnx2ncnn yolov6/yolov6s-320x320-for-ncnn.onnx yolov6/yolov6s-320x320-for-ncnn.param yolov6/yolov6s-320x320-for-ncnn.bin
ncnnoptimize yolov6/yolov6s-320x320-for-ncnn.param yolov6/yolov6s-320x320-for-ncnn.bin yolov6/yolov6s-320x320-for-ncnn.opt.param yolov6/yolov6s-320x320-for-ncnn.opt.bin 0
一切正常。转换为MNN模型的命令为:
YOLOv6 MNNConvert -f ONNX --modelFile yolov6n-640x640-for-ncnn.onnx --MNNModel yolov6n-640x640.mnn --bizCode MNN
Start to Convert Other Model Format To MNN Model...
[15:19:09] /Users/yanjunqiu/Desktop/third_party/library/MNN/tools/converter/source/onnx/onnxConverter.cpp:30: ONNX Model ir version: 6
Start to Optimize the MNN Net...
inputTensors : [ image_arrays, ]
outputTensors: [ outputs, ]
Converted Success!
也是一切正常。
3. ONNX 和 TNN 模型 C++ 推理
ONNX和TNN的模型都是带decode的,因此在后处理时简单些,不用生成anchor了。模型推理直接输出的维度是(1,n,85),这个n表示总共输出的anchors个数,85的含义是:
85=5+80=cxcy(2)+cwch(2)+obj_conf(1)+cls_conf(80)由于输出的坐标就已经是归一化后的cx,cy和cw,ch,所以后处理就很简单了,直接转换成x1,y1,x2,y2格式就行。逻辑大概如下:
    float cx = offset_obj_cls_ptr[0];
    float cy = offset_obj_cls_ptr[1];
    float w = offset_obj_cls_ptr[2];
    float h = offset_obj_cls_ptr[3];
    float x1 = ((cx - w / 2.f) - (float) dw_) / r_;
    float y1 = ((cy - h / 2.f) - (float) dh_) / r_;
    float x2 = ((cx + w / 2.f) - (float) dw_) / r_;
    float y2 = ((cy + h / 2.f) - (float) dh_) / r_;
详细的推理代码就不展开了,会在文章最后放出。
4. NCNN 和 MNN 模型 C++ 推理
NCNN和MNN的模型文件没有导出decode部分,因此后处理复杂一点。后处理主要包括2部分,一是生成anchors,二是根据生成的anchors和输出的原始信息解码坐标。YOLOv6 的anchors生成逻辑其实和YOLOX基本是一致的,就是每个feature map上每个锚点生成一个anchor框,做过detection算法的同学应该很多理解这句话的意思,我也就不啰嗦了。直接放代码吧。
generate_anchors函数主要逻辑
void NCNNYOLOv6::generate_anchors(const int target_height,
                                  const int target_width,
                                  std::vector<int> &strides,
                                  std::vector<YOLOv6Anchor> &anchors)
{
  for (auto stride: strides)
  {
    int num_grid_w = target_width / stride;
    int num_grid_h = target_height / stride;
    for (int g1 = 0; g1 < num_grid_h; ++g1)
    {
      for (int g0 = 0; g0 < num_grid_w; ++g0)
      {
        YOLOv6Anchor anchor;
        anchor.grid0 = g0;
        anchor.grid1 = g1;
        anchor.stride = stride;
        anchors.push_back(anchor);
      }
    }
  }
}
坐标解码的主要逻辑
    const int grid0 = anchors.at(i).grid0;
    const int grid1 = anchors.at(i).grid1;
    const int stride = anchors.at(i).stride;

    float dx = offset_obj_cls_ptr[0];
    float dy = offset_obj_cls_ptr[1];
    float dw = offset_obj_cls_ptr[2];
    float dh = offset_obj_cls_ptr[3];

    float cx = (dx + (float) grid0) * (float) stride;
    float cy = (dy + (float) grid1) * (float) stride;
    float w = std::exp(dw) * (float) stride;
    float h = std::exp(dh) * (float) stride;
    float x1 = ((cx - w / 2.f) - (float) dw_) / r_;
    float y1 = ((cy - h / 2.f) - (float) dh_) / r_;
    float x2 = ((cx + w / 2.f) - (float) dw_) / r_;
    float y2 = ((cy + h / 2.f) - (float) dh_) / r_;
详细的推理代码就不展开了,会在文章最后放出。
5. YOLOv6 C++推理的使用例子
首先是放出YOLOv6 的4个推理引擎的C++ 源码,想必大家最关心就是能不能白嫖了。所有的代码都集成进了lite.ai.toolkit(https://github.com/DefTruth/lite.ai.toolkit) 工具箱中,零成本无压力白嫖。
YOLOv6 ONNXRuntime C++ 源码:https://github.com/DefTruth/lite.ai.toolkit/blob/main/lite/ort/cv/yolov6.cpp YOLOv6 MNN C++ 源码:https://github.com/DefTruth/lite.ai.toolkit/blob/main/lite/mnn/cv/mnn_yolov6.cpp YOLOv6 NCNN C++ 源码:https://github.com/DefTruth/lite.ai.toolkit/blob/main/lite/ncnn/cv/ncnn_yolov6.cpp YOLOv6 TNN C++ 源码:https://github.com/DefTruth/lite.ai.toolkit/blob/main/lite/tnn/cv/tnn_yolov6.cpp
对源码感兴趣的同学,可自行选择关心的推理引擎版本进行阅读。接下来,在简单贴几个使用lite.ai.toolkit 工具箱一键调用的例子。
ONNXRuntime版本
#include "lite/lite.h"

static void test_default()
{
  std::string onnx_path = "../../../hub/onnx/cv/yolov6s-640x640.onnx";
  std::string test_img_path = "../../../examples/lite/resources/test_lite_yolov6_1.jpg";
  std::string save_img_path = "../../../logs/test_lite_yolov6_1.jpg";

  // 1. Test Default Engine ONNXRuntime
  auto *yolov6 = new lite::cv::detection::YOLOv6(onnx_path); // default

  std::vector<lite::types::Boxf> detected_boxes;
  cv::Mat img_bgr = cv::imread(test_img_path);
  yolov6->detect(img_bgr, detected_boxes);
  lite::utils::draw_boxes_inplace(img_bgr, detected_boxes);

  cv::imwrite(save_img_path, img_bgr);
  std::cout << "Default Version Detected Boxes Num: " << detected_boxes.size() << std::endl;
  delete yolov6;
}
MNN版本
static void test_mnn()
{
#ifdef ENABLE_MNN
  std::string mnn_path = "../../../hub/mnn/cv/yolov6s-640x640.mnn";
  std::string test_img_path = "../../../examples/lite/resources/test_lite_yolov6_2.jpg";
  std::string save_img_path = "../../../logs/test_lite_yolov6_mnn_2.jpg";

  // 3. Test Specific Engine MNN
  auto *yolov6 = new lite::mnn::cv::detection::YOLOv6(mnn_path);

  std::vector<lite::types::Boxf> detected_boxes;
  cv::Mat img_bgr = cv::imread(test_img_path);
  yolov6->detect(img_bgr, detected_boxes);

  lite::utils::draw_boxes_inplace(img_bgr, detected_boxes);
  cv::imwrite(save_img_path, img_bgr);
  std::cout << "MNN Version Detected Boxes Num: " << detected_boxes.size() << std::endl;
  delete yolov6;
#endif
}
NCNN版本
static void test_ncnn()
{
#ifdef ENABLE_NCNN
  std::string param_path = "../../../hub/ncnn/cv/yolov6s-640x640-for-ncnn.opt.param";
  std::string bin_path = "../../../hub/ncnn/cv/yolov6s-640x640-for-ncnn.opt.bin";
  std::string test_img_path = "../../../examples/lite/resources/test_lite_yolov6_2.jpg";
  std::string save_img_path = "../../../logs/test_lite_yolov6_ncnn_2.jpg";

  // 4. Test Specific Engine NCNN
  auto *yolov6 = new lite::ncnn::cv::detection::YOLOv6(param_path, bin_path);

  std::vector<lite::types::Boxf> detected_boxes;
  cv::Mat img_bgr = cv::imread(test_img_path);
  yolov6->detect(img_bgr, detected_boxes);

  lite::utils::draw_boxes_inplace(img_bgr, detected_boxes);
  cv::imwrite(save_img_path, img_bgr);
  std::cout << "NCNN Version Detected Boxes Num: " << detected_boxes.size() << std::endl;
  delete yolov6;
#endif
}
TNN版本
static void test_tnn()
{
#ifdef ENABLE_TNN
  std::string proto_path = "../../../hub/tnn/cv/yolov6s-640x640.opt.tnnproto";
  std::string model_path = "../../../hub/tnn/cv/yolov6s-640x640.opt.tnnmodel";
  std::string test_img_path = "../../../examples/lite/resources/test_lite_yolov6_2.jpg";
  std::string save_img_path = "../../../logs/test_lite_yolov6_tnn_2.jpg";

  // 5. Test Specific Engine TNN
  auto *yolov6 = new lite::tnn::cv::detection::YOLOv6(proto_path, model_path);

  std::vector<lite::types::Boxf> detected_boxes;
  cv::Mat img_bgr = cv::imread(test_img_path);
  yolov6->detect(img_bgr, detected_boxes);

  lite::utils::draw_boxes_inplace(img_bgr, detected_boxes);
  cv::imwrite(save_img_path, img_bgr);
  std::cout << "TNN Version Detected Boxes Num: " << detected_boxes.size() << std::endl;
  delete yolov6;
#endif
}
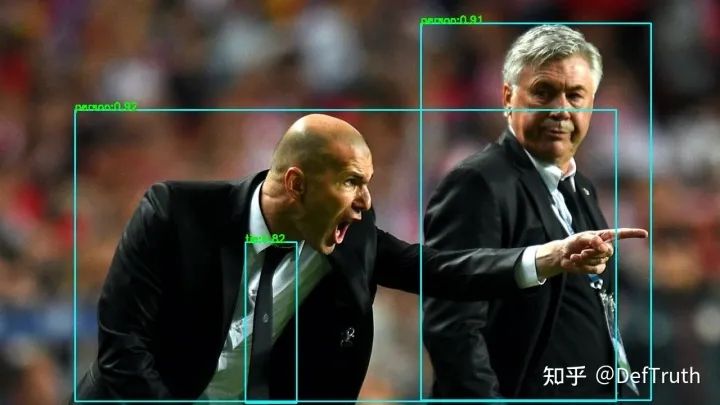
输出的结果如下:

6. 总结
本文主要讲解了美团6月24开源的YOLOv6在不同推理引擎的C++工程化过程,包含了ORT、MNN、NCNN和TNN下的推理处理,以及不同推理框架下模型转换需要注意的问题。并且,所有的代码都集成进了lite.ai.toolkit 工具箱中,零成本无压力白嫖。
YOLOv6 ONNXRuntime C++ 源码 YOLOv6 MNN C++ 源码 YOLOv6 NCNN C++ 源码 YOLOv6 TNN C++ 源码
趁着周末捏美团的这个YOLOv6模型,写完这篇文章的时候,差不多是傍晚6点,时值仲夏,我摸了摸饥肠辘辘的肚子,觉得是时候打开我手机上的美团外卖来下个单了~ 问题来了,那到底吃啥好呢 ...
公众号后台回复“项目实践”获取50+CV项目实践机会~
“
点击阅读原文进入CV社区
收获更多技术干货