 程序源代码
程序源代码


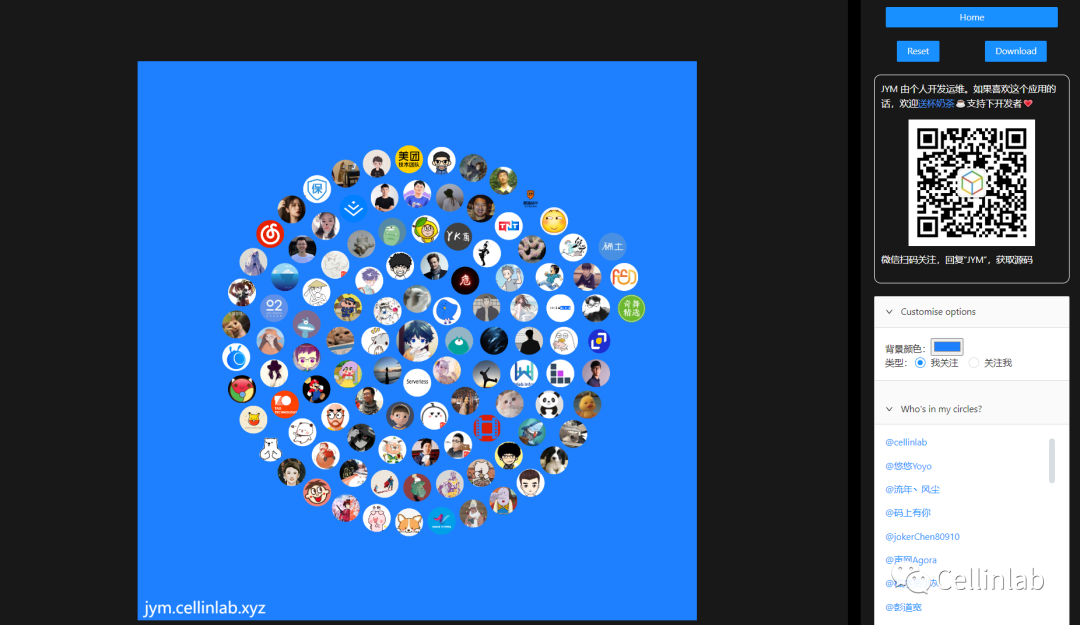
效果预览

功能分析
主要功能: 获取掘金用户 关注用户列表和关注者列表使用 canvas绘制关注用户或关注者的 Circle 图
项目初始化
使用 vite 初始化项目,并且安装依赖 :
npm init @vitejs/app

# √ Project name: ... show-my-jym
# √ Select a framework: » vue
# √ Select a variant: » vue

# Now run:

#   cd show-my-jym
#   npm install
#   npm run dev
引入 Vue-Router :
npm install vue-router@next
一些文件目录约定:
|-src
| |- api 数据请求
| |- assets 静态资源
| |- components 组件
| |- pages 页面
| |- router 路由配置
| |- store vuex 数据
| |- utils 工具方法
路由拆分
基础功能完全可以在一个页面中搞出来,不过为了方便以后有灵感时可以轻松扩展,一开始就对功能进行下简单拆分:
src/routes/index.js:
import { createRouter, createWebHashHistory } from 'vue-router';

const Home = () => import('./pages/Home.vue');
const JymCircle = () => import('./pages/JymCircle.vue');

const routes = [
  {
    path: '/',
    name: 'home',
    component: Home,
  },
  {
    path: '/jymcircle',
    name: 'jymcircle',
    component: JymCircle,
  },
];

const router = createRouter({
  history: createWebHashHistory(),
  routes,
});

export default router;
以及创建对应的页面:
src/pages/Home.vue:
<template>
  <div>
    Home
  </div>
</template>
src/pages/JymCircle.vue:
<template>
  <div>
    JymCircle
  </div>
</template>
在 main.js 中引入路由:
src/main.js:
import { createApp } from 'vue';
import App from './App.vue';

import router from './router/index';

createApp(App)
  .use(router)
  .mount('#app');
在 App.vue 中加入跳转路由:
src/App.vue:
<template>
  <div>
    <router-link to="/">Home</router-link>
    <router-link to="/jymcircle">JymCircle</router-link>
  </div>
  <router-view></router-view>
</template>
UI 库 和 效率依赖
为了快速开发,引入 Ant Design of Vue 和 SaSS:
npm install ant-design-vue --save

npm install sass -D
数据准备
关键接口分析
我关注的用户列表
地址 https://api.juejin.cn/user_api/v1/follow/followees?user_id=${USER_ID}&cursor=0&limit=20关注我的用户列表
地址 https://api.juejin.cn/user_api/v1/follow/followers?user_id=${USER_ID}&cursor=0&limit=20
接口封装
因为这里网络请求比较简单,所以直接使用原生的 Fetch API:
src/api/user.js:
const BASE_URL = 'https://xxxx.cellinlab.xyz';

async function getUserList (params) {
  return new Promise((resolve, reject) => {
    const url = `${BASE_URL}/api/juejin/userlist`;

    fetch(url, {
      method: 'POST',
      body: JSON.stringify(params),
      headers: {
        'Content-Type': 'application/json'
      },
    })
    .then(res => res.json())
    .then(data => {
      resolve(data);
    })
    .catch(err => {
      reject(err);
    });
  });
}

export {
  getUserList,
};
数据渲染
基础绘制封装
为了方便操作,对 canvas 的一些基础操作进行了简单封装(注意,这里的封装仅仅满足当前应用功能,具体业务中使用还需要更好的设计):
绘制圆形图片
src/utils/canvas.js:
/**
 * drawCircleImage
 * @param {*} ctx
 * @param {*} x
 * @param {*} y
 * @param {*} radius
 * @param {*} image
 */
function drawCircleImage (ctx, x, y, radius, image) {
  ctx.save();

  let size = 2 * radius;
  ctx.moveTo(x, y);
  ctx.arc(x, y, radius, 0, 2 * Math.PI);
  ctx.clip();
  ctx.drawImage(image, x - radius, y - radius, size, size);

  ctx.restore();
}
设置背景颜色
src/utils/canvas.js:
/**
 * setBackground
 * @param {*} ctx
 * @param {*} color
 */
function setBackground (ctx, color) {
  ctx.fillStyle = color;
  ctx.fillRect(0, 0, ctx.canvas.width, ctx.canvas.height);
}
绘制文字
src/utils/canvas.js:
/**
 * drawFont
 * @param {*} ctx
 * @param {*} x
 * @param {*} y
 * @param {*} text
 * @param {*} bgColor
 * @param {*} font
 * @param {*} color
 */
function drawFont (ctx, x, y, text, bgColor, font = '45px "微软雅黑"', color = '#ffffff') {
  ctx.save();

  ctx.font = font;
  ctx.fillStyle = color;
  if (bgColor == color) {
    ctx.fillStyle = '#000000';
  }
  ctx.fillText(text, x, y);

  ctx.restore();
}
加载图片
src/utils/canvas.js:
/**
 * loadImage
 * @param {*} url
 * @param {*} style
 * @returns
 */
function loadImage (url, style = 'border-radius: 50%;') {
  return new Promise((resolve, reject) => {
    let image = new Image(100, 100);
    image.style = style;
    image.setAttribute('crossOrigin', 'Anonymous');
    image.onload = () => {
      resolve(image);
    }
    image.onerror = () => {
      reject(new Error('load image error'));
    }
    image.src = `${url}?t=${new Date().getTime()}`;
  });
}
数据处理
为了快速计算图像位置,对数据计算进行了简单封装:
src/utils/poloygon.js:
function getCirclePoints(center, radius, sides) {
  var points = [];
  for (var i = 0; i < sides; i++) {
    points.push(getCirclePoint(center, radius, sides, i));
  }
  return points;
}
function getCirclePoint(center, radius, sides, i) {
  var angle = (i / sides) * Math.PI * 2;
  return {
    x: center.x + radius * Math.cos(angle),
    y: center.y + radius * Math.sin(angle)
  };
}

export {
  getCirclePoints,
};
渲染逻辑
async function draw () {
  const hideMessage = message.loading('Data rendering...', 0);

  const canvas = document.getElementById('canvas');
  const ctx = canvas.getContext('2d');
  const { width, height } = ctx.canvas;

  // 设置背景色
  setBackground(ctx, bgColor.value);

  // 用户在中心
  if (userinfo.value) {
    ctx.save();
    const { width, height } = ctx.canvas;
    // 转换坐标
    ctx.translate(width / 2, height / 2);

    const { avatar_large } = userinfo.value;
    const img = await loadImage(avatar_large);
    drawCircleImage(ctx, 0, 0, 60, img);

    let circle_radius = 120;
    let circle_num = 1;
    let user_count = 8;
    let circlePoints = getCirclePoints({x: 0, y: 0}, circle_radius, circle_num * user_count);
    // 关注列表环绕
    for (let i = 1; i < userlist.length; i++) {
      const { avatar_large } = userlist[i];
      if (avatar_large.includes('passport')) {
        if (circlePoints.length == 0) {
          circle_num++;
          circlePoints = getCirclePoints({x: 0, y: 0}, circle_radius + (circle_num -1) * 100, circle_num * user_count - circle_num);
        }
        const {x, y} = circlePoints.pop();
        const img = await loadImage(avatar_large);
        drawCircleImage(ctx, x, y, 40, img);
      }
    }
    ctx.restore();
  }

  drawFont(ctx, 20, height - 20, 'jym.cellinlab.xyz', bgColor.value);
  hideMessage();
}

