
浅谈图像分割调优:一个服饰分割项目的完整记录
共 5720字,需浏览 12分钟
· 2022-06-08
点击下方卡片,关注“新机器视觉”公众号
重磅干货,第一时间送达
以下文章来源于:FlyEgle@知乎
作者:FlyEgle
原文链接:https://zhuanlan.zhihu.com/p/518113377
编辑:江大白
本文仅用于学术分享,如有侵权,请联系后台作删文处理

一、序
很久没有写过博客了,最近忙于做项目,闭了后简单写一下心得体会。近期主要是在做服饰场景相关的项目,今天简单写写其中做的一个服饰分割。
二、背景
主要场景就是对模特进行服饰抠图,要求边缘处理相对平滑,扣取召回和准确率比较高,能够覆盖95%以上的场景case。同时需要考虑模型FLOPs以及结构便宜性,便于后期有压缩的需求。
三、模型选择
有考虑过如下三种模型:
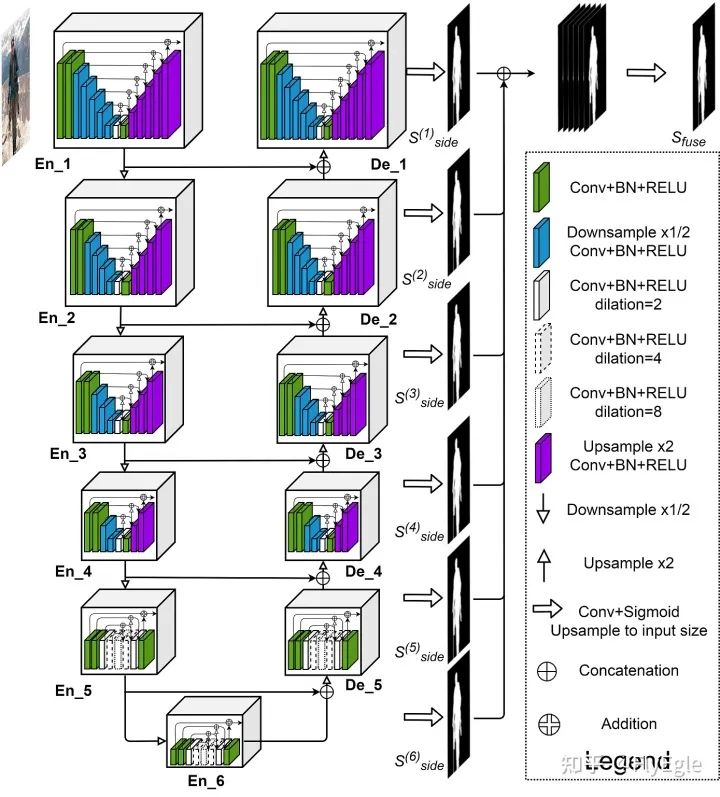
DeepLabV3 U2Net HRNet-seg
这里DeepLabV3有空洞卷积存在,对于细致的扣图,效果不是很好,更加适用于连通性比较强的物体分割以及多类别分割。 HRNet-seg存在一个问题,最后输出的featuremap分别是[1/4, 1/8, 1/16, 1/32],虽然是有不断的高低分辨率的交互,但是1/4还是有点捉襟见肘,会影响一些小的pixel,空洞以及边缘效果。所以做了简单的修该如下:
FPN+upsmaple形式

upsmaple+cat

相对来说FPN的收敛速度会更快一些,计算量更小,性能略高,相比原始HRseg的输出来说,细致化了很多。
3. U2net的计算量要比HRnet-fpn更小,同时,U2net更加注重刻画细节。由于场景只有一个类别,所以U2Net不太需要考虑类别的关系,对于模型本身来说更加适配。
4. 有尝试过修改U2net,包括增加attention,增加refine Module,多监督约束以及修改结构等,不过最终都比较鸡肋了,写paper还是可以的,从实际case效果上看几乎无差。也尝试过x2,x4channel,性能上也没明显提升。
不过对于专一场景来说,模型本身不是重点。
四、损失设计
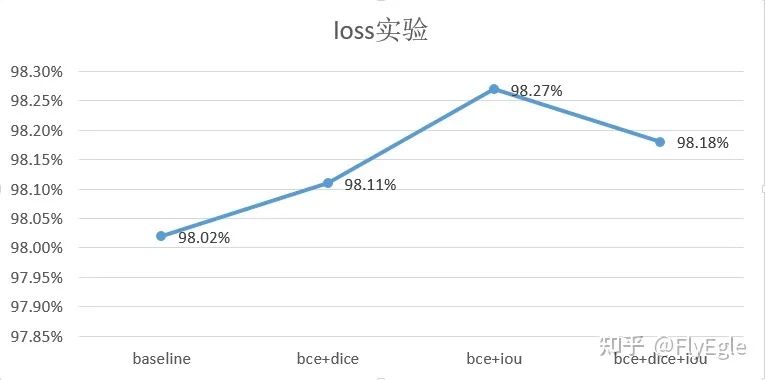
任务只要求区分前景和背景,自然可以理解为二分类或者是1分类问题,所以基础loss的选择就可以是softmax+CE(二分类),sigmoid+bce(前景)。sigmoid相比softmax对于边缘效果更佳友好(可以调节阈值),为了保证连通区域,采用了bce+3*dice作为baseline损失。
这里在320x320尺寸下,做了一些对比实验,可以看到bce+iou指标最高,不过case by case的话视觉效果没有bce+dice好。降低dice的系数,也是因为有时候dice过强忽略了bce判别正负样本的情况。
也尝试过一些其他的loss,如focalloss,tv, L1等损失组合,意义不是很大, 代码如下:
# ----------------- DICE Loss--------------------
class DiceLoss(nn.Module):
    def __init__(self):
        super(DiceLoss, self).__init__()

    def forward(self, logits, targets, mask=False):
        num = targets.size(0)
        smooth = 1.

        probs = torch.sigmoid(logits)
        m1 = probs.view(num, -1)
        m2 = targets.view(num, -1)
        intersection = (m1 * m2)

        score = 2. * (intersection.sum(1) + smooth) / (m1.sum(1) + m2.sum(1) + smooth)
        score = 1 - score.sum() / num
        return score

# -------------------- BCELoss -----------------------
class BCELoss(nn.Module):
    """binary bceloss with sigmoid"""
    def __init__(self):
        super(BCELoss, self).__init__()

    def forward(self, inputs, targets, weights=None, mask=False):
        assert len(inputs.shape) == 4, "inputs shape must be NCHW"
        if len(targets.shape) != 4:
            targets = targets.unsqueeze(1).float()
        else:
            targets = targets.float()
        if mask:
            inputs  = inputs * targets
        losses = F.binary_cross_entropy_with_logits(inputs, targets, weights)
        return losses


# ----------------- DICE+BCE Loss--------------------
class DiceWithBCELoss(nn.Module):
    def __init__(self, weights, mining=False):
        super(DiceWithBCELoss, self).__init__()
        self.dice_loss = DiceLoss()
        if mining:
            self.bce_loss = BalanceCrossEntropyLoss()
        else:
            self.bce_loss = BCELoss()
        self.weights = weights

    def forward(self, preds, targets):
        bceloss = self.bce_loss(preds, targets)
        diceloss = self.dice_loss(preds, targets)
        return self.weights['bce'] * bceloss + self.weights['dice']*diceloss
五、训练优化
1. 分辨率
baseline模型的训练尺寸为320x320,随之提升到了640x640,这里采用两种方法,一个是from strach训练一个是load 320的pretrain 进行训练。相比于strach,pretrain的效果会更好,随着数据的迭代和累积,不断的采用上一个最好效果的weights来做下一次训练模型的pretrain,最终训练尺寸为800x800。
尝试过采用更大的分辨率960和1024来进行训练,在个人的场景上基本没有显著提升。(ps: 1024尺寸下的bs太小了,加了accumulate grad后性能下降的明显)
2. 数据增强
数据增强采用基本都是常规的,随机crop,随机翻转,随机旋转,随机blur,这里colorjitter会影响性能就没有用了。
def build_transformers(crop_size=(320, 320)):
    if isinstance(crop_size, int):
        crop_size = (crop_size, crop_size)

    data_aug = [
        # RandomCropScale(scale_size=crop_size, scale=(0.4, 1.0)),
        RandomCropScale2(scale_size=crop_size, scale=(0.3, 1.2), prob=0.5),
        RandomHorizionFlip(p=0.5),
        RandomRotate(degree=15, mode=0),
        RandomGaussianBlur(p=0.2),
    ]

    to_tensor = [
        Normalize(normalize=True, mean=IMAGENET_DEFAULT_MEAN, std=IMAGENET_DEFAULT_STD),
        ToTensor(channel_first=True)
    ]

    final_aug = data_aug + to_tensor
    return Compose(final_aug)
比较重要的一点的是randomcrop,调整了crop的区域为[0.3,1.2],一方面是因为crop区域太小,容易忽视整体性,另一方面是crop大一些可以相应的对应大分辨率。要注意的是,crop的区域是需要包含前景,可以通过设定前景占比来进行调整,也可以理解为手动balance数据。
class RandomCropScale2:
    """RandomCrop with Scale the images & targets, if not crop fit size, need to switch the prob to do reisze to keep the over figure
        scale_size :  (list) a sequence of scale
        scale      :  default is (0.08, 1.0),  crop region areas
        ratio      :  default is (3. / 4., 4. / 3.), ratio for width / height
    Returns:
        scale_image : (ndarray) crop and scale image
        scale_target: (ndarray) crop and scale target, shape  is same with image
    """
    def __init__(self, scale_size, scale=(0.08, 1.0), ratio=(3. / 4., 4. / 3.), prob=0.5):
        self.scale_size = scale_size
        self.scale = scale
        self.ratio = ratio

        # self.prob = np.random.uniform(0, 1) > prob
        self.prob = prob
        self.scale_func = Scale(self.scale_size)

        # center crop
        # self.centercrop = CenterCrop(self.scale_size)

        if (self.scale[0] > self.scale[1]) or (self.ratio[0] >  self.ratio[1]):
            warnings.warn("Scale and ratio  should be of kind (min, max)")

    def _isBG(self, tgts):
        """If the targets all is 0, 0 is background
        """
        if np.sum(tgts) == 0:
            return True
        else:
            return False

    # TODO: fix empty bug
    def _crop_imgs(self, imgs, tgts):
        height, width, _ = imgs.shape
        area =  height * width

        for _ in range(10):
            target_area = area * np.random.uniform(self.scale[0], self.scale[1])
            aspect_ratio = np.random.uniform(self.ratio[0], self.ratio[1])

            w = int(round(math.sqrt(target_area * aspect_ratio)))
            h = int(round(math.sqrt(target_area / aspect_ratio)))

            if 0 < w < width and 0 < h < height:
                random_y = np.random.randint(0, height - h + 1)
                random_x = np.random.randint(0, width - w + 1)

                crop_image = imgs[random_y:random_y+h, random_x:random_x+w]
                crop_target = tgts[random_y:random_y+h, random_x:random_x+w]

                if not self._isBG(crop_target):
                    crop_image, crop_target = self.scale_func(crop_image, crop_target)
                    return crop_image, crop_target

            # switch prob or center crop
            if np.random.uniform(0, 1) > self.prob:
                # center crop
                in_ratio = float(width) / float(height)
                if in_ratio < min(self.ratio):
                    w = width
                    h = int(round(w / min(self.ratio)))
                elif in_ratio > max(self.ratio):
                    h = height
                    w = int(round(h * max(self.ratio)))
                else:
                    w = width
                    h = height

                # navie center crop
                crop_x = max((width - w) // 2, 0)
                crop_y = max((height  - h) // 2, 0)
                imgs = imgs[crop_y:crop_y+height,  crop_x:crop_x+width]
                tgts = tgts[crop_y:crop_y+height, crop_x:crop_x+width]

            # scale
            crop_image, crop_target = self.scale_func(imgs, tgts)
            return crop_image, crop_target


    def __call__(self, imgs, tgts):
        crop_image, crop_target = self._crop_imgs(imgs, tgts)
        return crop_image, crop_target
3. 数据
这个就仁者见仁智者见智了,查缺补漏就好,一般新数据,我会用模型过滤一遍,卡个0.98或者0.99的miou,小于这个阈值的用于训练,大于阈值的采样训练。
训练这里采用的是ADAMW优化器,1e-2的weights decay,5e-4到1e-4调整学习率,视情况而定。(ADAMW偶尔会出现nan的问题,要查找是否数据有nan,如果没有大概率是因为有bn导致的数值溢出,可以调小LR或者更换优化器)采用了CircleLR进行衰减,效果还算ok,跑相同300个epoch,比CosineLR要好一点点。最终场景验证数据可以到达99%+的miou。
六、边缘优化
Sigmoid训练后,可以简单的卡个阈值来进行边缘平滑处理,可以二值也可以过渡。
output[output >= thre] = 1 or None
output[output < thre] = 0
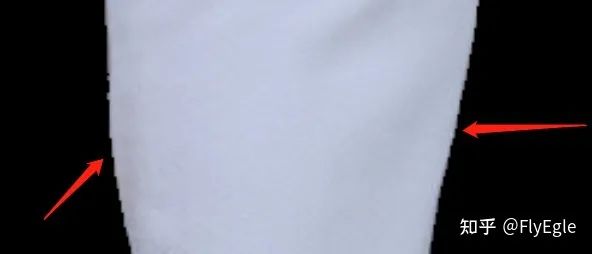
粗看边缘还算可以,但是细看就发现锯齿很明显了,还需要进一步处理,这里简单做了一个算法,缩放现有的mask(这里缩放可以用contour,也可以用腐蚀,也可以用shapely),把原始图像做blur,把外圈的blur贴回来。
def edgePostProcess(mask, image):
    """Edge post Process
    Args:
        mask: a ndarray map, value is [0,255], shape is (h, w, 3)
        image: a ndarray map, value is 0-255, shape  is(h, w, 3)
    Returns:
        outputs: edge blur image
    """
    mask[mask==255] = 1
    mask = getShrink(mask)

    image = image * mask
    image[image==0] = 255
    blur_image = cv2.GaussianBlur(image, (5, 5), 0)
    new_mask = np.zeros(image.shape, np.uint8)
    contours, hierachy = cv2.findContours(
        mask[:,:,0],
        cv2.RETR_EXTERNAL,
        cv2.CHAIN_APPROX_SIMPLE
    )
    cv2.drawContours(new_mask, contours, -1, (255, 255, 255), 5)
    output = np.where(new_mask==np.array([255, 255, 255]), blur_image, image)
    return output
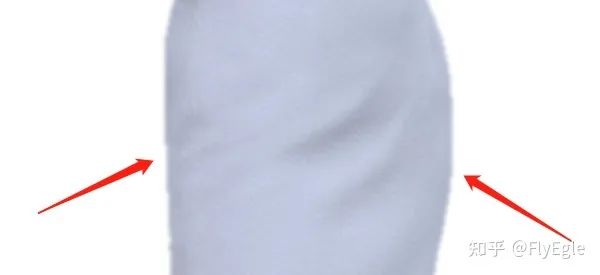
其实可以看到,边缘只是blur了,但是贴到白背景上可以发现视觉效果会好很多,这也是欺骗人眼的一个方法。
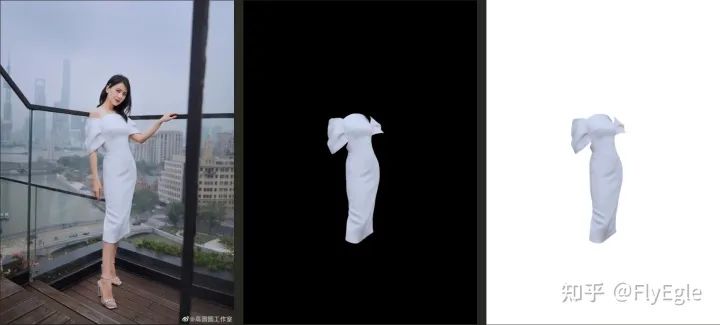
放一张高圆圆的照片吧,看一下分割后的结果
七、代码
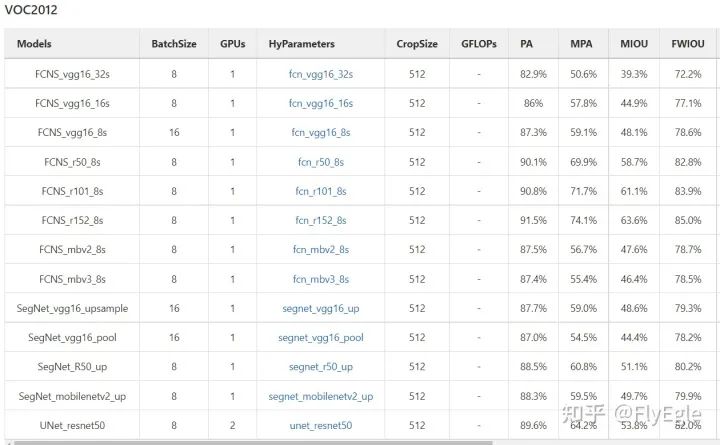
这套代码框架写了个把个月,包括了FCNs,SegNets,DeepLab,UNet,U2Net,HRNet等一些常用模型的实现,loss,aug,lrshedule等,以及VOC上的一些pretrain。整体代码简单明了,模块分明,如果有需要后面可以考虑开源。
本文仅做学术分享,如有侵权,请联系删文。