 小白学视觉
小白学视觉


点击上方“小白学视觉”,选择加"星标"或“置顶”
重磅干货,第一时间送达

将其与 OpenCV 等库的图像处理能力相结合,如今在数小时内构建实时对象检测系统原型要容易得多。在本指南中,我们将尝试向您展示如何开发用于简单对象检测应用程序的子系统,以及如何将所有这些组合在一起。
我知道你们中的一些人可能会想,为什么我们要使用Python,在某种程度上,它对于实时应用程序来说不是太慢了吗。
大多数计算重操作,如预测或图像处理,都是通过PyTrand和OpenCV来执行的,它们都使用C++在场景后面实现这些操作,因此,如果我们在这里使用C++或Python,则不会有太大的差别。
输入的视频源可以是任何内容,从网络摄像头读取,或解析现有视频,或从连接到网络的外部摄像头。在此示例中,我们将展示如何从 youtube 或网络摄像头读取视频流。
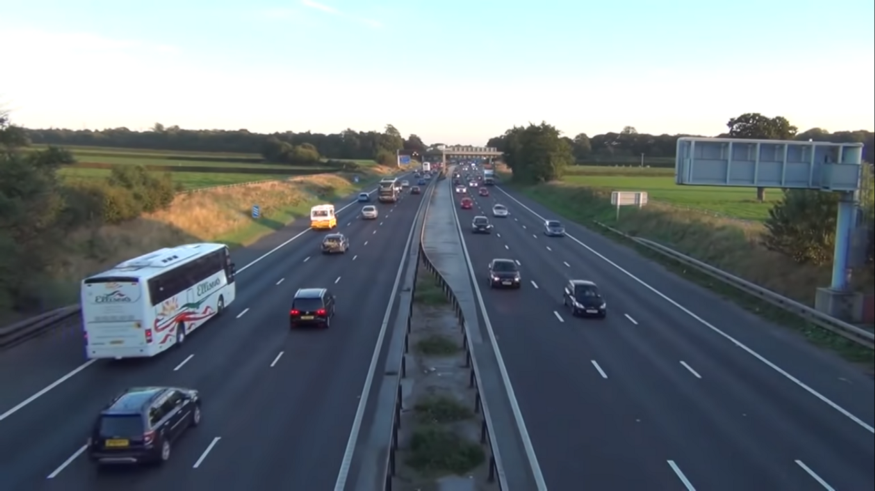
你们可能不想出去创建新视频,而是使用许多在线可用的视频。在这种情况下,你们可以从 youtube 读取视频流。
import cv2 # opencv2 package for python.import pafy # pafy allows us to read videos from youtube.URL = "https://www.youtube.com/watch?v=dQw4w9WgXcQ" #URL to parseplay = pafy.new(self._URL).streams[-1] #'-1' means read the lowest quality of video.assert play is not None # we want to make sure their is a input to read.stream = cv2.VideoCapture(play.url) #create a opencv video stream.
import cv2stream = cv2.VideoCapture(0) # 0 means read from local camera.
如果你们正在构建将部署在服务器上的应用程序,摄像机拥有一个自己的 IP 地址,你可以从中访问视频流。
import cv2camera_ip = "rtsp://username:password@IP/port"stream = cv2.VideoCapture(camera_ip)
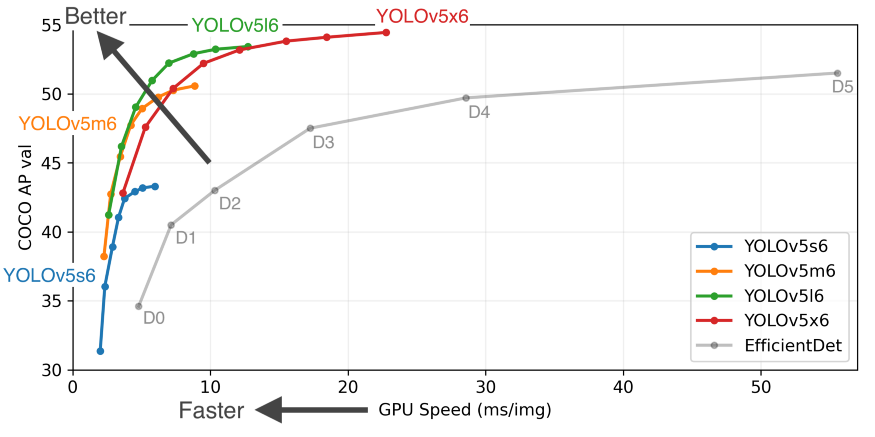
有许多不错的对象检测模型,每个模型都有其优点和缺点。为了简单起见,我们将使用YoloV5,因为它为我们提供了对我们的实时应用程序至关重要的快速应用。你们还可以查看其他模型,例如 FasterRCNN。
我们可以直接从 PyTorch hub 加载模型,第一次运行代码可能需要几分钟,因为它会从互联网上下载模型,但下次它将直接从磁盘加载。
from torch import hub # Hub contains other models like FasterRCNNmodel = torch.hub.load( \'ultralytics/yolov5', \'yolov5s', \pretrained=True)
我们可以说“解析一个视频流,从一帧开始”。那么让我们看看如何对单个帧进行评分和解析。我们用来执行应用的设备对我们的应用速度产生了巨大的影响,现代深度学习模型在使用 GPU 时效果最好,因此如果你们有一个带有 CUDA 内核的 GPU,它将大大提高您的性能。根据经验,即使是单个 GPU 的系统也可以达到每秒 45-60 帧,而 CPU 最多只能提供 25-30 帧。
"""The function below identifies the device which is availabe to make the prediction and uses it to load and infer the frame. Once it has results it will extract the labels and cordinates(Along with scores) for each object detected in the frame."""def score_frame(frame, model):device = 'cuda' if torch.cuda.is_available() else 'cpu'model.to(device)frame = [torch.tensor(frame)]results = self.model(frame)labels = results.xyxyn[0][:, -1].numpy()cord = results.xyxyn[0][:, :-1].numpy()return labels, cord
一旦我们对帧进行了评分,在将帧写入输出流之前,我们需要在帧上绘制识别的对象及其框。为此,我们可以使用 OpenCV 的图像处理工具包。
"""The function below takes the results and the frame as input and plots boxes over all the objects which have a score higer than our threshold."""def plot_boxes(self, results, frame):labels, cord = resultsn = len(labels)x_shape, y_shape = frame.shape[1], frame.shape[0]for i in range(n):row = cord[i]# If score is less than 0.2 we avoid making a prediction.if row[4] < 0.2:continuex1 = int(row[0]*x_shape)y1 = int(row[1]*y_shape)x2 = int(row[2]*x_shape)y2 = int(row[3]*y_shape)bgr = (0, 255, 0) # color of the boxclasses = self.model.names # Get the name of label indexlabel_font = cv2.FONT_HERSHEY_SIMPLEX #Font for the label.cv2.rectangle(frame, \(x1, y1), (x2, y2), \bgr, 2) #Plot the boxescv2.putText(frame,\classes[labels[i]], \(x1, y1), \label_font, 0.9, bgr, 2) #Put a label over box.return frame
现在我们将它们整合到一个调用函数中,在循环中执行整个操作,让我们回顾一下我们的主要功能必须执行以成功运行应用程序的步骤。
创建视频流输入。 加载模型。 当输入可用时,阅读下一帧。 对框架进行评分以获取标签和坐标。 在检测到的对象上绘制框。 将处理后的帧写入输出视频流。
"""The Function below oracestrates the entire operation and performs the real-time parsing for video stream."""def __call__(self):player = self.get_video_stream() #Get your video stream.assert player.isOpened() # Make sure that their is a stream.#Below code creates a new video writer object to write our#output stream.x_shape = int(player.get(cv2.CAP_PROP_FRAME_WIDTH))y_shape = int(player.get(cv2.CAP_PROP_FRAME_HEIGHT))four_cc = cv2.VideoWriter_fourcc(*"MJPG") #Using MJPEG codexout = cv2.VideoWriter(out_file, four_cc, 20, \(x_shape, y_shape))ret, frame = player.read() # Read the first frame.while rect: # Run until stream is out of framesstart_time = time() # We would like to measure the FPS.results = self.score_frame(frame) # Score the Frameframe = self.plot_boxes(results, frame) # Plot the boxes.end_time = time()fps = 1/np.round(end_time - start_time, 3) #Measure the FPS.print(f"Frames Per Second : {fps}")out.write(frame) # Write the frame onto the output.ret, frame = player.read() # Read next frame.
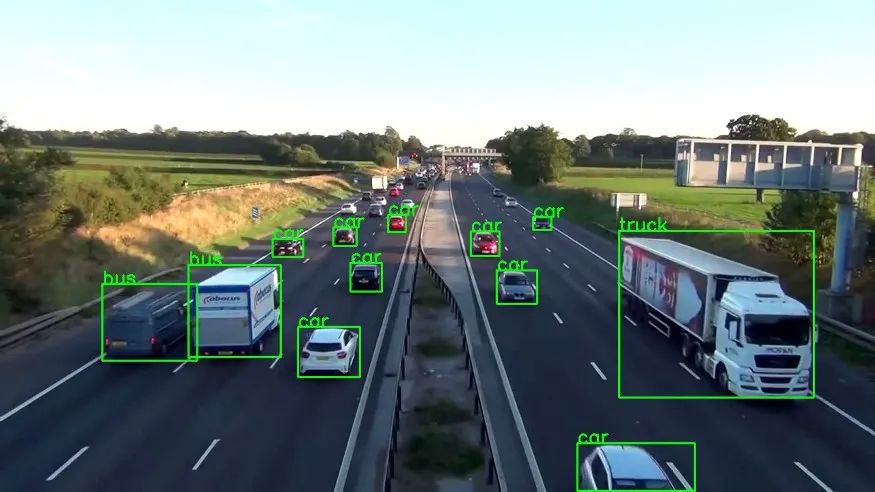
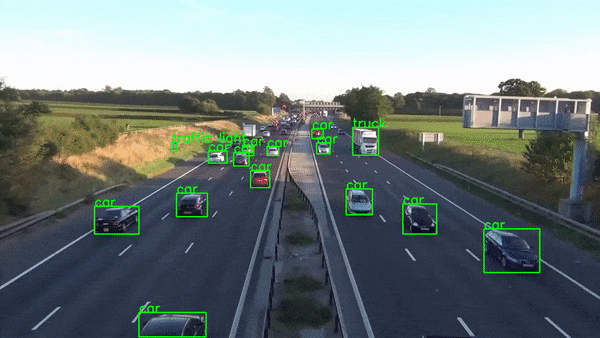
你们应该将所有这些组件打包到一个类中,该类可以与你们希望将输出流写入其中的 URL 和输出文件一起调用。最终效果如下:
当然,生产级实时应用程序比这复杂得多,但本文并不打算教授这一点。它是为了展示 Python 的惊人力量,它使我们能够在数小时内构建如此复杂的应用程序原型。
Github代码链接:https://github.com/akash-agni
下载1:OpenCV-Contrib扩展模块中文版教程 在「小白学视觉」公众号后台回复:扩展模块中文教程,即可下载全网第一份OpenCV扩展模块教程中文版,涵盖扩展模块安装、SFM算法、立体视觉、目标跟踪、生物视觉、超分辨率处理等二十多章内容。 下载2:Python视觉实战项目52讲 在「小白学视觉」公众号后台回复:Python视觉实战项目,即可下载包括图像分割、口罩检测、车道线检测、车辆计数、添加眼线、车牌识别、字符识别、情绪检测、文本内容提取、面部识别等31个视觉实战项目,助力快速学校计算机视觉。 下载3:OpenCV实战项目20讲 在「小白学视觉」公众号后台回复:OpenCV实战项目20讲,即可下载含有20个基于OpenCV实现20个实战项目,实现OpenCV学习进阶。 交流群
欢迎加入公众号读者群一起和同行交流,目前有SLAM、三维视觉、传感器、自动驾驶、计算摄影、检测、分割、识别、医学影像、GAN、算法竞赛等微信群(以后会逐渐细分),请扫描下面微信号加群,备注:”昵称+学校/公司+研究方向“,例如:”张三 + 上海交大 + 视觉SLAM“。请按照格式备注,否则不予通过。添加成功后会根据研究方向邀请进入相关微信群。请勿在群内发送广告,否则会请出群,谢谢理解~