 字节流动
字节流动


前言
在上一篇文章中,给小伙伴们介绍了如何使用Camera2类实现预览拍照等功能《Android:Camera2开发详解(上):实现预览、拍照、保存照片等功能》
本篇文章是在上篇文章的基础之上,在预览的时使用Camera2自带的人脸检测功能实时检测人脸位置,并通过一个自定义view显示在预览画面上
实现思路
布局中使用 AutoFitTextureView 代替 TextureView。AutoFitTextureView 继承自 TextureView,能够根据传入的宽高值调整自身大小。目的是使预览画面不变形,否则在人脸坐标转换的时候会出现比较大的误差,这个后文中会提到
在创建预览会话的时候,开启人脸检测
在预览会话的状态回调中可以得到检测到的人脸信息
将检测到的人脸坐标进行相应的转换,并传递给FaceView
自定义一个FaceView,接收人脸位置并实时绘制出来
具体实现步骤
注:由于本文是在上篇文章基础之上,故省略了很多相同的代码,完整代码在文末给出
一、定义一个AutoFitTextureView,并在布局中使用
/**
 * A {@link TextureView} that can be adjusted to a specified aspect ratio.
 */
public class AutoFitTextureView extends TextureView {

    private int mRatioWidth = 0;
    private int mRatioHeight = 0;

    public AutoFitTextureView(Context context) {
        this(context, null);
    }

    public AutoFitTextureView(Context context, AttributeSet attrs) {
        this(context, attrs, 0);
    }

    public AutoFitTextureView(Context context, AttributeSet attrs, int defStyle) {
        super(context, attrs, defStyle);
    }

    /**
     * Sets the aspect ratio for this view. The size of the view will be measured based on the ratio
     * calculated from the parameters. Note that the actual sizes of parameters don't matter, that
     * is, calling setAspectRatio(2, 3) and setAspectRatio(4, 6) make the same result.
     *
     * @param width  Relative horizontal size
     * @param height Relative vertical size
     */
    public void setAspectRatio(int width, int height) {
        if (width < 0 || height < 0) {
            throw new IllegalArgumentException("Size cannot be negative.");
        }
        mRatioWidth = width;
        mRatioHeight = height;
        requestLayout();
    }

    @Override
    protected void onMeasure(int widthMeasureSpec, int heightMeasureSpec) {
        super.onMeasure(widthMeasureSpec, heightMeasureSpec);
        int width = MeasureSpec.getSize(widthMeasureSpec);
        int height = MeasureSpec.getSize(heightMeasureSpec);
        if (0 == mRatioWidth || 0 == mRatioHeight) {
            setMeasuredDimension(width, height);
        } else {
            if (width < height * mRatioWidth / mRatioHeight) {
                setMeasuredDimension(width, width * mRatioHeight / mRatioWidth);
            } else {
                setMeasuredDimension(height * mRatioWidth / mRatioHeight, height);
            }
        }
    }
}
布局中使用
    <com.cs.camerademo.view.AutoFitTextureView
        android:id="@+id/textureView"
        android:layout_width="match_parent"
        android:layout_height="wrap_content" />

    <com.cs.camerademo.view.FaceView
        android:id="@+id/faceView"
        android:layout_width="match_parent"
        android:layout_height="match_parent" />
AutoFitTextureView 能够根据设置的宽高调整自身大小,防止画面出现拉伸的情况。如果画面出现拉伸的话,会导致人脸坐标在转换的时候出现较大的误差,不能精确的绘制出人脸位置
二、在上篇文章中Camera2Helper的基础上添加人脸检测相关的代码
class Camera2HelperFace(val mActivity: Activity, private val mTextureView: AutoFitTextureView) {
    companion object {
        const val PREVIEW_WIDTH = 1080          //预览的宽度
        const val PREVIEW_HEIGHT = 1440         //预览的高度
        const val SAVE_WIDTH = 720              //保存图片的宽度
        const val SAVE_HEIGHT = 1280            //保存图片的高度
    }

    private var mFaceDetectMode = CaptureResult.STATISTICS_FACE_DETECT_MODE_OFF //人脸检测模式
    private var openFaceDetect = true                                           //是否开启人脸检测
    private var mFaceDetectMatrix = Matrix()                                    //人脸检测坐标转换矩阵
    private var mFacesRect = ArrayList<RectF>()                                 //保存人脸坐标信息
    private var mFaceDetectListener: FaceDetectListener? = null                 //人脸检测回调

     ... ...

}
为了跟上一篇文章区别,这里将类名改为了Camera2HelperFace,并将构造方法里的第二个参数改为AutoFitTextureView
我们定义了一个 mFaceDetectMatrix ,它是一个 Matrix 对象,用于对人脸坐标进行转换
注:相机检测到的人脸坐标与我们看到的屏幕坐标并不是同一个坐标系,所以必须通过转换后才能使用
注意!这里我将预览的宽高设为了 1080 * 1440 ,为什么要这样设置,上篇文章中不是设置的 720 * 1280 吗?这个问题下面会给出答案
三、 在初始化的方法中,根据预览尺寸重新调整TextureView的大小
    /**
     * 初始化
     */
    private fun initCameraInfo() {

        ... ...

        //根据预览的尺寸大小调整TextureView的大小,保证画面不被拉伸
        val orientation = mActivity.resources.configuration.orientation
        if (orientation == Configuration.ORIENTATION_LANDSCAPE)
            mTextureView.setAspectRatio(mPreviewSize.width, mPreviewSize.height)
        else
            mTextureView.setAspectRatio(mPreviewSize.height, mPreviewSize.width)

        if (openFaceDetect)
            initFaceDetect()   //初始化人脸检测相关参数

         ... ...

        openCamera()
    }
这里根据预览尺寸和屏幕方向对mTextureView重新设置了宽高值,保证画面不被拉伸
如果开启人脸检测的话,初始化人脸检测相关参数
四、初始化人脸检测相关信息
/**
* 初始化人脸检测相关信息
*/
private fun initFaceDetect() {
val faceDetectCount = mCameraCharacteristics.get(CameraCharacteristics.STATISTICS_INFO_MAX_FACE_COUNT) //同时检测到人脸的数量
val faceDetectModes = mCameraCharacteristics.get(CameraCharacteristics.STATISTICS_INFO_AVAILABLE_FACE_DETECT_MODES) //人脸检测的模式
mFaceDetectMode = when {
faceDetectModes.contains(CaptureRequest.STATISTICS_FACE_DETECT_MODE_FULL) -> CaptureRequest.STATISTICS_FACE_DETECT_MODE_FULL
faceDetectModes.contains(CaptureRequest.STATISTICS_FACE_DETECT_MODE_SIMPLE) -> CaptureRequest.STATISTICS_FACE_DETECT_MODE_FULL
else -> CaptureRequest.STATISTICS_FACE_DETECT_MODE_OFF
}
if (mFaceDetectMode == CaptureRequest.STATISTICS_FACE_DETECT_MODE_OFF) {
mActivity.toast("相机硬件不支持人脸检测")
return
}
val activeArraySizeRect = mCameraCharacteristics.get(CameraCharacteristics.SENSOR_INFO_ACTIVE_ARRAY_SIZE) //获取成像区域
val scaledWidth = mPreviewSize.width / activeArraySizeRect.width().toFloat()
val scaledHeight = mPreviewSize.height / activeArraySizeRect.height().toFloat()
val mirror = mCameraFacing == CameraCharacteristics.LENS_FACING_FRONT
mFaceDetectMatrix.setRotate(mCameraSensorOrientation.toFloat())
mFaceDetectMatrix.postScale(if (mirror) -scaledWidth else scaledWidth, scaledHeight)
if (exchangeWidthAndHeight(mDisplayRotation, mCameraSensorOrientation))
mFaceDetectMatrix.postTranslate(mPreviewSize.height.toFloat(), mPreviewSize.width.toFloat())
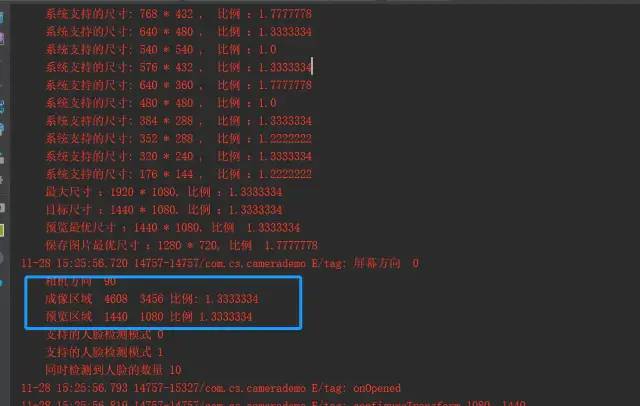
log("成像区域 ${activeArraySizeRect.width()} ${activeArraySizeRect.height()} 比例: ${activeArraySizeRect.width().toFloat() / activeArraySizeRect.height()}")
log("预览区域 ${mPreviewSize.width} ${mPreviewSize.height} 比例 ${mPreviewSize.width.toFloat() / mPreviewSize.height}")
for (mode in faceDetectModes) {
log("支持的人脸检测模式 $mode")
}
log("同时检测到人脸的数量 $faceDetectCount")
}首先,我们获取到相机硬件所支持的人脸检测模式和同时最大检测到的人脸数
相机支持的人脸检测模式分为3种:
STATISTICS_FACE_DETECT_MODE_FULL :
完全支持。返回人脸的矩形位置、可信度、特征点(嘴巴、眼睛等的位置)、和 人脸IDSTATISTICS_FACE_DETECT_MODE_SIMPLE:
支持简单的人脸检测。返回的人脸的矩形位置和可信度。STATISTICS_FACE_DETECT_MODE_OFF:
不支持人脸检测
注 :我的手机支持的人脸检测模式是STATISTICS_FACE_DETECT_MODE_SIMPLE,但是在实践过程中发现,我得到的人脸可信度值全部都是1,而正常范围应该是 0~100。
实践结果与源码中描述的STATISTICS_FACE_DETECT_MODE_SIMPLE模式下能返回可信度值不一致,对此我也存在疑问,如果有小伙伴清楚这个问题的话可以留言讨论~
通过mCameraCharacteristics.get(CameraCharacteristics.SENSOR_INFO_ACTIVE_ARRAY_SIZE) 获取到相机的成像区域。这句就比较关键了,什么是成像区域呢?源码中是这样描述的:
This is the rectangle representing the size of the active region of the sensor
//这是表示传感器活动区域大小的矩形
也就是说,这块矩形区域是相机传感器不捕捉图像数据时使用的范围。检测人脸所得到的坐标也正是基于此矩形的。
当我们拿到了这块矩形后,又知道预览时的矩形(即AutoFitTextureView的大小),这样我们就能找出这两块矩形直接的转换关系(即 mFaceDetectMatrix),从而就能够将传感器中的人脸坐标转换成预览页面中的坐标。
这里解释一下为什么要把预览尺寸设置为 1080 * 1440
首先,我们要知道相机的成像区域与我们上显示的预览区域是相对独立的。而我们通过系统给的 api 得到的人脸位置信息就是基于这个成像区域的,我们需要通过这两个区域之前的转换关系把人脸位置信息进行转换后才能正确地绘制在预览区域上。
通过log可以看到我的手机后置摄像头成像区域是 4608 * 3456,宽高比是 1.3333334。这时,如果我们将预览区域设置为 720 * 1080 的话,宽高比为 1.7777778。
因为这两者的宽高比不一致,这会导致人脸坐标在转换后显示的时候与实际预览到的人脸不重合(会有压缩)。
所以我们将预览宽高设置为 1080 * 1440 ,与相机成像区域的宽高比一致,这样我们得到的人脸矩形的比例与预览效果中的实际人脸是一致的
通过对相机成像区域和预览区域的大小以及不同的摄像头,对转换关系(即 mFaceDetectMatrix )进行赋值
五、创建预览会话时设置人脸检测功能
    /**
     * 创建预览会话
     */
    private fun createCaptureSession(cameraDevice: CameraDevice) {

        val captureRequestBuilder = cameraDevice.createCaptureRequest(CameraDevice.TEMPLATE_PREVIEW)

        ... ...

         //设置人脸检测
        if (openFaceDetect && mFaceDetectMode != CaptureRequest.STATISTICS_FACE_DETECT_MODE_OFF)
            captureRequestBuilder.set(CaptureRequest.STATISTICS_FACE_DETECT_MODE, CameraCharacteristics.STATISTICS_FACE_DETECT_MODE_SIMPLE)

        // 为相机预览,创建一个CameraCaptureSession对象
        cameraDevice.createCaptureSession(arrayListOf(surface, mImageReader?.surface), object : CameraCaptureSession.StateCallback() {
          ... ...
        }, mCameraHandler)
    }
六、在预览会话的回调函数中对检测到的人脸进行处理,并将结果回调给Activity
 private val mCaptureCallBack = object : CameraCaptureSession.CaptureCallback() {

        override fun onCaptureCompleted(session: CameraCaptureSession, request: CaptureRequest?, result: TotalCaptureResult) {
            super.onCaptureCompleted(session, request, result)
            if (openFaceDetect && mFaceDetectMode != CaptureRequest.STATISTICS_FACE_DETECT_MODE_OFF)
                handleFaces(result)
        }
         ... ...
    }

    /**
     * 处理人脸信息
     */
    private fun handleFaces(result: TotalCaptureResult) {
        val faces = result.get(CaptureResult.STATISTICS_FACES)
        mFacesRect.clear()

        for (face in faces) {
            val bounds = face.bounds
            val left = bounds.left
            val top = bounds.top
            val right = bounds.right
            val bottom = bounds.bottom

            val rawFaceRect = RectF(left.toFloat(), top.toFloat(), right.toFloat(), bottom.toFloat())
            mFaceDetectMatrix.mapRect(rawFaceRect)

            val resultFaceRect = if (mCameraFacing == CaptureRequest.LENS_FACING_FRONT)
                rawFaceRect
            else
                RectF(rawFaceRect.left, rawFaceRect.top - mPreviewSize.width, rawFaceRect.right, rawFaceRect.bottom - mPreviewSize.width)

            mFacesRect.add(resultFaceRect)

            log("原始人脸位置: ${bounds.width()} * ${bounds.height()}   ${bounds.left} ${bounds.top} ${bounds.right} ${bounds.bottom}   分数: ${face.score}")
            log("转换后人脸位置: ${resultFaceRect.width()} * ${resultFaceRect.height()}   ${resultFaceRect.left} ${resultFaceRect.top} ${resultFaceRect.right} ${resultFaceRect.bottom}   分数: ${face.score}")
        }

        mActivity.runOnUiThread {
            mFaceDetectListener?.onFaceDetect(faces, mFacesRect)
        }
        log("onCaptureCompleted  检测到 ${faces.size} 张人脸")
    }
当我们拿到检测到的人脸信息后,通过转换关系mFaceDetectMatrix 对其做相应的转换。还需要根据前后摄像头做不同的转换处理
将转换后的人脸信息通过回调函数传递出去
注意!在实践过程中,我发现这一系列的人脸坐标转换是存在误差的。当我们的预览尺寸与成像尺寸越接近,误差越小。所以,建议在相机支持的尺寸列表中尽量选取与成像尺寸最接近的大小来使用,以减小误差。
关于转换存在误差这个问题,如果小伙伴们有更好的解决方式或者思路,欢迎留言交流讨论。
七、自定义一个FaceView,接收人脸位置信息,并绘制出来
class FaceView : View {
    lateinit var mPaint: Paint
    private var mCorlor = "#42ed45"
    private var mFaces: ArrayList<RectF>? = null

    constructor(context: Context) : super(context) {
        init()
    }

    constructor(context: Context, attrs: AttributeSet?) : super(context, attrs) {
        init()
    }

    constructor(context: Context, attrs: AttributeSet?, defStyleAttr: Int) : super(context, attrs, defStyleAttr) {
        init()
    }

    private fun init() {
        mPaint = Paint()
        mPaint.color = Color.parseColor(mCorlor)
        mPaint.style = Paint.Style.STROKE
        mPaint.strokeWidth = TypedValue.applyDimension(TypedValue.COMPLEX_UNIT_DIP, 1f, context.resources.displayMetrics)
        mPaint.isAntiAlias = true
    }


    override fun onDraw(canvas: Canvas) {
        super.onDraw(canvas)
        mFaces?.let {
            for (face in it) {
                canvas.drawRect(face, mPaint)
            }
        }
    }

    fun setFaces(faces: ArrayList<RectF>) {
        this.mFaces = faces
        invalidate()
    }
}
实现效果
demo 地址:https://github.com/smashinggit/Study
作者:Smashing丶
链接:https://www.jianshu.com/p/331af6dc2772
-- END --
进技术交流群,扫码添加我的微信:Byte-Flow

获取视频教程和源码
推荐:
全网最全的 Android 音视频和 OpenGL ES 干货,都在这了

