
ES03# Elasticsearch性能调优点梳理
共 6455字,需浏览 13分钟
· 2022-04-10
引言
本文主要梳理了Elasticsearch集群常见优化点,就一些主要项能够在实践中指导使用,本文主要内容有:
JVM参数调优 系统参数调优 写性能调优点 读性能调优点 分片均衡优化案例
1.参数设置
修改jvm参数可以通过config/jvm.options.d/jvm.options调整,不建议直接修改config/jvm.options,通过-Xms和-Xmx设置。
-Xms15g
-Xmx15g
2.参数大小
设置JVM堆内存配置机器内存一半,JVM内存配置不超过32G
备注:参见官方文档
https://www.elastic.co/guide/en/elasticsearch/reference/current/advanced-configuration.html#set-jvm-options
1.文件描述符限制
1.1 设置最大文件数
设置用户的打开的最多文件数,将account换成实际用户。
命令:vim /etc/security/limits.conf
内容:如下修改
# End of file
account soft nofile 65535
account hard nofile 65535
* soft nofile 65535
* hard nofile 65535
1.2 查看文件描述符
输入:
GET _nodes/stats/process?filter_path=**.max_file_descriptors
输出:
{
  "nodes" : {
    "UsN0qcWUTC68THnK0N9wLA" : {
      "process" : {
        "max_file_descriptors" : 1048576
      }
    },
    //...
}
备注:参见官方文档
https://www.elastic.co/guide/en/elasticsearch/reference/current/setting-system-settings.html

https://www.elastic.co/guide/en/elasticsearch/reference/current/file-descriptors.html
2.关闭系统交换区
2.1 执行禁用命令
命令:sudo swapoff -a
2.2 设置swappiness
将swappiness设置为1,通常情况下不交换,只在紧急情况允许少量交换。
swappiness=0 仅在内存不足的情况下,当剩余空闲内存低于vm.min_free_kbytes limit时,使用交换空间 swappiness=1 内核版本3.5及以上、Red Hat内核版本2.6.32-303及以上,进行最少量的交换,而不禁用交换
修改vim /etc/sysctl.conf,添加如下内容,添加后执行sysctl -p让其生效。
vm.swappiness=1
2.3 锁定地址空间
为了提高数据访问和操作效率,将进程使用的地址空间锁定在物理内存中,防止交换到swap空间。
1.开启内存锁
修改config/elasticsearch.yml中的bootstrap.memory_lock参数
bootstrap.memory_lock: true
2.检查锁是否开启
输入:
GET _nodes?filter_path=**.mlockall
输出:
{
  "nodes" : {
    "m8c-TdL1RbK1M7goGTCTUQ" : {
      "process" : {
        "mlockall" : true
      }
    },
    "-3lP6pM8SHq1-ulpGQybWQ" : {
      "process" : {
        "mlockall" : true
      }
    },
    "6HCT0tLPQ7uKoJPnYPlO1A" : {
      "process" : {
        "mlockall" : true
      }
    }
  }
}
3.给ES用户授权
修改/etc/security/limits.conf,添加如下内容。
# allow user 'elasticsearch' mlockall
elasticsearch soft memlock unlimited
elasticsearch hard memlock unlimited
备注:参见官方文档
https://www.elastic.co/guide/en/elasticsearch/reference/current/setup-configuration-memory.html
3.虚拟内存限制
系统参数max_map_count限制一个进程拥有的虚拟内存数量,默认值为65536。
修改vim /etc/sysctl.conf,添加如下内容,添加后执行sysctl -p让其生效。
vm.max_map_count=262144
备注:参见官方文档
https://www.elastic.co/guide/en/elasticsearch/reference/current/vm-max-map-count.html
4.进程数量限制
操作系统对每个用户创建进程的限制, 官方建议为Elasticsearch user至少设置4096,可以调整的更大一些
命令:ulimit -u 655350
或
修改 vim /etc/security/limits.conf
* soft nproc 655350
5.系统优化其他点
文件系统缓存会缓存I/O操作,确保至少物理内存的一半 使用好的硬件,例如:SSD硬盘 单节点数据建议控制在2TB,最大不超过5TB 搜索性能要求搞得尽可能SSD,按照1:10配置内存磁盘
备注:参见官方文档
https://www.elastic.co/guide/en/elasticsearch/reference/current/max-number-of-threads.html1.多线程批量请求
批量写入: 具体一次写入多少document,需要测试给出。例如:建一个索引,单节点单分片,不断调整写入数量测试100,200,800,1000...等
多线程: 需要关注服务端返回的TOO_MANY_REQUESTS (429) 异常
2.增加refresh_interval间隔
写入过程:数据写入时,先保存在Index buffer,满足refresh_interval为间隔时长后,定期清空buffer,生成segment供检索。
增加refresh_interval时长,比如:30秒,可以避免生成过多的segment。
{
  "index": {
    "refresh_interval": "30s",
}
3.增加indexing buffer缓存区
Indexing缓存区用于存储新的document,当缓存区满了后会写入segment落盘,index_buffer_size默认为整个堆内存的10%,min_index_buffer_size指定缓存区允许的最小值,默认为48mb。
修改elasticsearch.yml添加参数
indices.memory.index_buffer_size: 30%
indices.memory.min_index_buffer_size: 96mb
4.设置副数量为零
在初始化第一次加载的时候设置副本为0,加载完成后再调整副本数量。如果日志类场景可以考虑将副本设置为0,提升性能的同时会牺牲
可靠性。
{
  "index": {
    "number_of_replicas": "0"
  }
}
5.使用文档自增ID
如果自己设置文档ID,ElasticSearch会校验在分片中是否重复,避免不必要的校验使用自增ID。
6.分区均衡
设置合理的分片数确保均匀分布到所有数据节点上,通过参数index.routing.allocation.total_share_per_node限定每个索引在每个节点上可分配的主分片数,例如等于平均数或者略大于平均数。
{
  "index": {
    "routing": {
      "allocation": {
        "total_shards_per_node": "2"
      }
    }
  }
}
7.Translog配置
降低写磁盘的频率
Index.translog.durability:事务日志,默认request每次请求都会落盘,修改为async,异步写入 index.translog.sync_interval: 设置为60s,每分钟执行一次 Index.translog.flush_threshod_size: 默认512M,可以适当调大一些,当translog超过该值触发flush
8.Bulk/线程池/队列设置
客户端设置
单个bulk请求体不要太大,官方建议5~15M 单个bulk请求超时足够长,建议60s以上 写入段尽量将数据轮训到不同的节点,使用负载均衡
服务端设置
服务端线程池设置为核数+1 队列大小适当增加,也需要注意过大会成为 GC 的负担
elasticsearch.yml配置
## Threadpool Settings ##

# Search pool
threadpool.search.type: fixed
threadpool.search.size: 20
threadpool.search.queue_size: 100

# Bulk pool
threadpool.bulk.type: fixed
threadpool.bulk.size: 60
threadpool.bulk.queue_size: 300

# Index pool
threadpool.index.type: fixed
threadpool.index.size: 20
threadpool.index.queue_size: 100

# Indices settings
indices.memory.index_buffer_size: 30%
indices.memory.min_index_buffer_size: 96mb

# Cache Sizes
indices.fielddata.cache.size: 15%
indices.fielddata.cache.expire: 6h
indices.cache.filter.size: 15%
indices.cache.filter.expire: 6h

# Indexing Settings for Writes
index.refresh_interval: 30s
index.translog.flush_threshold_ops: 50000
9.额外优化项
9.1 不检索的字段
只聚合不搜索的字段,index设置为false。
{
  "mappings": {
    "properties": {
      "foo": {
        "type": "integer",
        "index": false
      }
    }
  }
}
9.2 不适用dynamic mapping
对字符串不要使用默认的dynamic mapping,字段数量过多,对性能产生比较大的影响
{
  "mappings": {
    "dynamic": false,
    "properties": {}
  }
}
9.3 关闭_source
关闭_source,减少IO操作
"mappings": {
    "_source": {
        "enabled": false
    }
}
10.索引示例
{
  "index": {
    "lifecycle": {
      "name": "xxx_log_store"
    },
    "routing": {
      "allocation": {
        "total_shards_per_node": "2"
      }
    },
    "refresh_interval": "30s",
    "number_of_shards": "30",
    "translog": {
      "sync_interval": "60s",
      "durability": "async"
    },
    "number_of_replicas": "0",
    "mappings": {
      "dynamic": false,
      "properties": {}
    }
  }
}
备注:参见官方文档
Indexing buffer setting
https://www.elastic.co/guide/en/elasticsearch/reference/current/indexing-buffer.html
Tune for indexing speed
https://www.elastic.co/guide/en/elasticsearch/reference/current/tune-for-indexing-speed.html
Tune for disk usage
https://www.elastic.co/guide/en/elasticsearch/reference/current/tune-for-disk-usage.html
1.文档建模
避免嵌套类型的数据,查询速度会慢几倍
避免父子类型的数据,查询速度慢几百倍
2.禁用脚本
尽量将数据先行计算,然后保存到ElasticSearch中,避免使用查询脚本Script,可以使用ingest Pipeline并入需要的字段
3.禁用通配符
禁止使用*开头的通配符查询,性能会很差
4.注意分片数量
一个查询访问每一个分片,分片过多,开销增加
5.基于时间的索引
在索引的名字中增加时间信息,按照每天/每周/每月的方式进行划分,将只读的索引进行force merge减少segment的数量
6.使用Filter Context
尽量使用Filter Context,利用缓存机制,减少不必要的算分
备注:参见官方文档
https://www.elastic.co/guide/en/elasticsearch/reference/current/tune-for-search-speed.html
下面案例中ES集群中有15个节点,索引只有30个主分片,没有设置副本。通过设置total_shards_per_node(每个节点中最多分片数)不同的值,观察主分片在各个节点的均衡情况。
1.没有设置total_shards_per_node
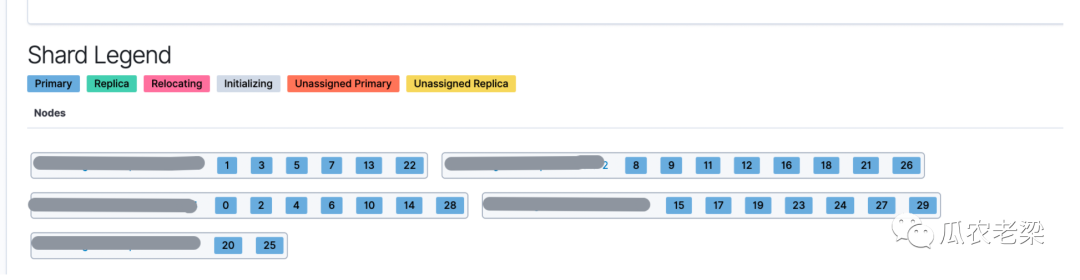
备注:上图为没有设置total_shards_per_node参数,30个分片被分布在5个节点中,节点最多分片8,最少分片2,分片不均衡。
2.设置total_shards_per_node=3
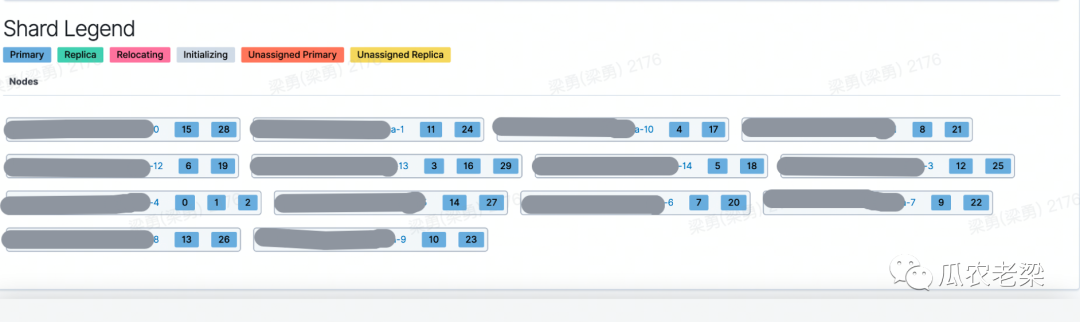
备注:当设置total_shards_per_node=3时,30个分片被分布在14个节点中,节点最多分片数3,最少分片数2,分片比较均衡。
3.设置total_shards_per_node=2
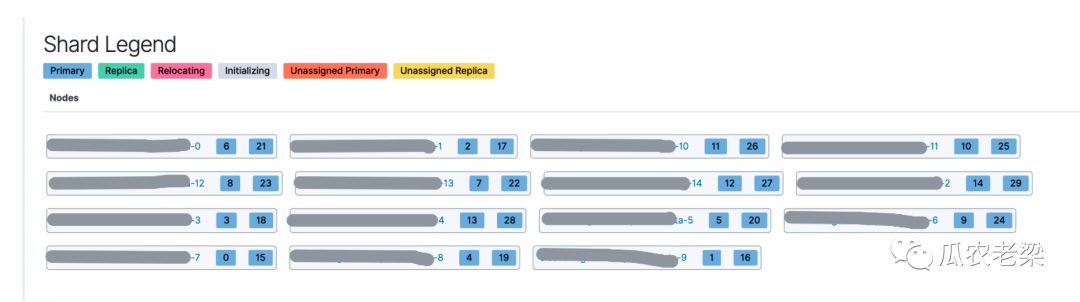
备注:当设置total_shards_per_node=2时,30个分片被分布在15个节点中,每个节点分片数均为2,分片均衡。
4.性能情况
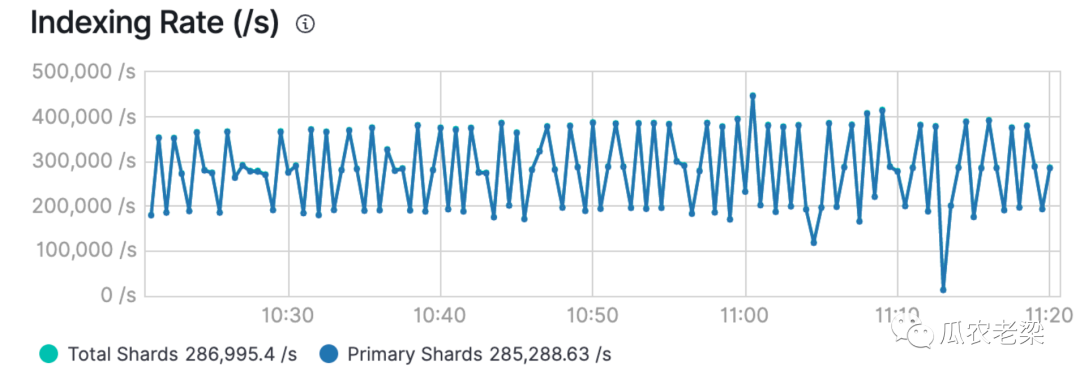
备注:当分片分配均衡时,写入性能也非常高,下图为28.5万/秒。当严重不均衡时,性能不足其一半。