
LRU 缓存-keep-alive 实现原理
共 7979字,需浏览 16分钟
· 2021-12-16
本文首发于政采云前端团队博客:LRU 缓存-keep-alive 实现原理
https://www.zoo.team/article/lru-keep-alive
前言
相信大部分同学在日常需求开发中或多或少的会有需要一个组件状态被持久化、不被重新渲染的场景,熟悉 vue 的同学一定会想到 keep-alive 这个内置组件。
那么什么是 keep-alive 呢?
keep-alive 是 Vue.js 的一个 内置组件。它能够将不活动的组件实例保存在内存中,而不是直接将其销毁,它是一个抽象组件,不会被渲染到真实 DOM 中,也不会出现在父组件链中。简单的说,keep-alive用于保存组件的渲染状态,避免组件反复创建和渲染,有效提升系统性能。keep-alive 的 max 属性,用于限制可以缓存多少组件实例,一旦这个数字达到了上限,在新实例被创建之前,已缓存组件中最久没有被访问的实例会被销毁掉,而这里所运用到的缓存机制就是 LRU 算法。
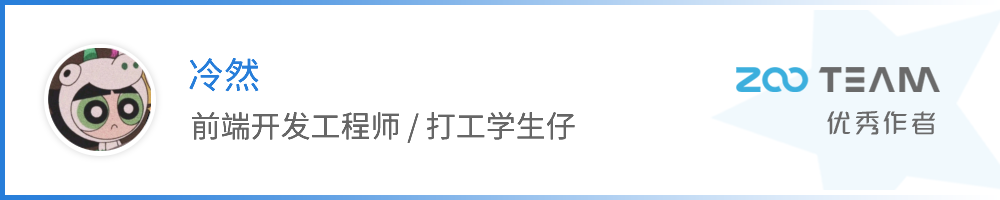
LRU 缓存淘汰算法
LRU( least recently used)根据数据的历史记录来淘汰数据,重点在于保护最近被访问/使用过的数据,淘汰现阶段最久未被访问的数据
LRU的主体思想在于:如果数据最近被访问过,那么将来被访问的几率也更高
新数据插入到链表尾部; 每当缓存命中(即缓存数据被访问),则将数据移到链表尾部 当链表满的时候,将链表头部的数据丢弃。
实现LRU的数据结构
经典的 LRU 一般都使用 hashMap + 双向链表。考虑可能需要频繁删除一个元素,并将这个元素的前一个节点指向下一个节点,所以使用双链接最合适。并且它是按照结点最近被使用的时间顺序来存储的。如果一个结点被访问了, 我们有理由相信它在接下来的一段时间被访问的概率要大于其它结点。
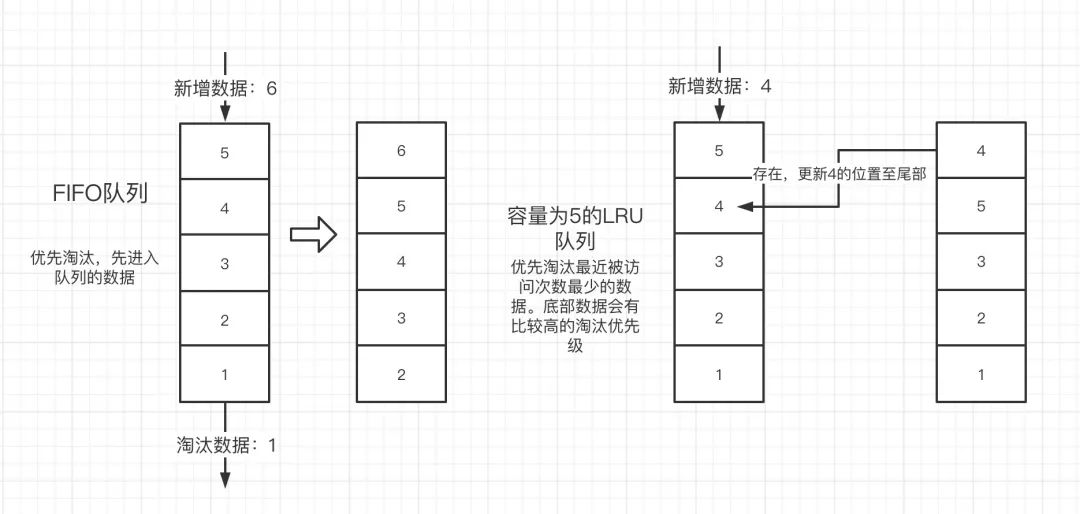
不过既然已经在 js 里都已经使用 Map 了,为何不直接取用现成的迭代器获取下一个结点的 key 值(keys().next())
// ./LRU.ts
export class LRUCache {
capacity: number; // 容量
cache: Map<number, number | null>; // 缓存
constructor(capacity: number) {
this.capacity = capacity;
this.cache = new Map();
}
get(key: number): number {
if (this.cache.has(key)) {
let temp = this.cache.get(key) as number;
//访问到的 key 若在缓存中,将其提前
this.cache.delete(key);
this.cache.set(key, temp);
return temp;
}
return -1;
}
put(key: number, value: number): void {
if (this.cache.has(key)) {
this.cache.delete(key);
//存在则删除,if 结束再提前
} else if (this.cache.size >= this.capacity) {
// 超过缓存长度,淘汰最近没使用的
this.cache.delete(this.cache.keys().next().value);
console.log(`refresh: key:${key} , value:${value}`)
}
this.cache.set(key, value);
}
toString(){
console.log('capacity',this.capacity)
console.table(this.cache)
}
}
// ./index.ts
import {LRUCache} from './lru'
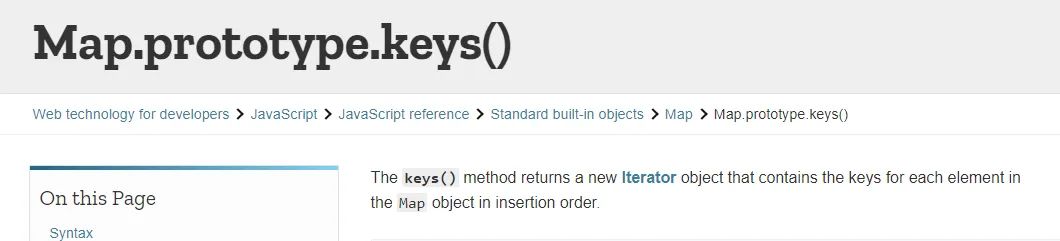
const list = new LRUCache(4)
list.put(2,2) // 入 2,剩余容量3
list.put(3,3) // 入 3,剩余容量2
list.put(4,4) // 入 4,剩余容量1
list.put(5,5) // 入 5,已满 从头至尾 2-3-4-5
list.put(4,4) // 入4,已存在 ——> 置队尾 2-3-5-4
list.put(1,1) // 入1,不存在 ——> 删除队首 插入1 3-5-4-1
list.get(3) // 获取3,刷新3——> 置队尾 5-4-1-3
list.toString()
// ./index.ts
import {LRUCache} from './lru'
const list = new LRUCache(4)

list.put(2,2)   // 入 2,剩余容量3
list.put(3,3)   // 入 3,剩余容量2
list.put(4,4)   // 入 4,剩余容量1
list.put(5,5)   // 入 5,已满    从头至尾      2-3-4-5
list.put(4,4)   // 入4,已存在 ——> 置队尾      2-3-5-4
list.put(1,1)   // 入1,不存在 ——> 删除队首 插入1  3-5-4-1
list.get(3)     // 获取3,刷新3——> 置队尾      5-4-1-3
list.toString()
结果如下:
vue 中 Keep-Alive
原理
使用 LRU 缓存机制进行缓存,max 限制缓存表的最大容量 根据设定的 include/exclude(如果有)进行条件匹配,决定是否缓存。不匹配,直接返回组件实例 根据组件 ID 和 tag 生成缓存 Key ,并在缓存对象中查找是否已缓存过该组件实例。如果存在,直接取出缓存值并更新该 key 在 this.keys 中的位置(更新 key 的位置是实现 LRU 置换策略的关键) 获取节点名称,或者根据节点 cid 等信息拼出当前组件名称 获取 keep-alive 包裹着的第一个子组件对象及其组件名
源码分析
初始化 keepAlive 组件
const KeepAliveImpl: ComponentOptions = {
  name: `KeepAlive`,
  props: {
    include: [String, RegExp, Array],
    exclude: [String, RegExp, Array],
    max: [String, Number],
  },
  setup(props: KeepAliveProps, { slots }: SetupContext) {
    // 初始化数据
    const cache: Cache = new Map();
    const keys: Keys = new Set();
    let current: VNode | null = null;
    // 当 props 上的 include 或者 exclude 变化时移除缓存
    watch(
      () => [props.include, props.exclude],
      ([include, exclude]) => {
      include && pruneCache((name) => matches(include, name));
      exclude && pruneCache((name) => !matches(exclude, name));
      },
      { flush: "post", deep: true }
    );
    // 缓存组件的子树 subTree
    let pendingCacheKey: CacheKey | null = null;
    const cacheSubtree = () => {
      // fix #1621, the pendingCacheKey could be 0
      if (pendingCacheKey != null) {
        cache.set(pendingCacheKey, getInnerChild(instance.subTree));
      }
    };
    // KeepAlive 组件的设计,本质上就是空间换时间。
    // 在 KeepAlive 组件内部,
    // 当组件渲染挂载和更新前都会缓存组件的渲染子树 subTree
    onMounted(cacheSubtree);
    onUpdated(cacheSubtree);
    onBeforeUnmount(() => {
    // 卸载缓存表里的所有组件和其中的子树...
    }
    return ()=>{
      // 返回 keepAlive 实例
    }
  }
}

return ()=>{
  // 省略部分代码,以下是缓存逻辑
  pendingCacheKey = null
  const children = slots.default()
  let vnode = children[0]
  const comp = vnode.type as Component
  const name = getName(comp)
  const { include, exclude, max } = props
  // key 值是 KeepAlive 子节点创建时添加的,作为缓存节点的唯一标识
  const key = vnode.key == null ? comp : vnode.key
  // 通过 key 值获取缓存节点
  const cachedVNode = cache.get(key)
  if (cachedVNode) {
    // 缓存存在,则使用缓存装载数据
    vnode.el = cachedVNode.el
    vnode.component = cachedVNode.component
    if (vnode.transition) {
      // 递归更新子树上的 transition hooks
      setTransitionHooks(vnode, vnode.transition!)
    }
      // 阻止 vNode 节点作为新节点被挂载
      vnode.shapeFlag |= ShapeFlags.COMPONENT_KEPT_ALIVE
      // 刷新key的优先级
      keys.delete(key)
      keys.add(key)
  } else {
      keys.add(key)
      // 属性配置 max 值,删除最久不用的 key ,这很符合 LRU 的思想
      if (max && keys.size > parseInt(max as string, 10)) {
        pruneCacheEntry(keys.values().next().value)
      }
    }
    // 避免 vNode 被卸载
    vnode.shapeFlag |= ShapeFlags.COMPONENT_SHOULD_KEEP_ALIVE
    current = vnode
    return vnode;
}
将组件移出缓存表
// 遍历缓存表
function pruneCache(filter?: (name: string) => boolean) {
  cache.forEach((vnode, key) => {
    const name = getComponentName(vnode.type as ConcreteComponent);
    if (name && (!filter || !filter(name))) {
      // !filter(name) 即 name 在 includes 或不在 excludes 中
      pruneCacheEntry(key);
    }
  });
}
// 依据 key 值从缓存表中移除对应组件
function pruneCacheEntry(key: CacheKey) {
  const cached = cache.get(key) as VNode;
  if (!current || cached.type !== current.type) {
    /* 当前没有处在 activated 状态的组件
     * 或者当前处在 activated 组件不是要删除的 key 时
     * 卸载这个组件
    */
    unmount(cached); // unmount方法里同样包含了 resetShapeFlag
  } else if (current) {
    // 当前组件在未来应该不再被 keepAlive 缓存
    // 虽然仍在 keepAlive 的容量中但是需要刷新当前组件的优先级
    resetShapeFlag(current);
    // resetShapeFlag
  }
  cache.delete(key);
  keys.delete(key);
}
function resetShapeFlag(vnode: VNode) {
  let shapeFlag = vnode.shapeFlag; // shapeFlag 是 VNode 的标识
   // ... 清除组件的 shapeFlag
}
keep-alive案例
本部分将使用 vue 3.x 的新特性来模拟 keep-alive 的具体应用场景
在 index.vue 里我们引入了 CountUp 、timer 和 ColorRandom 三个带有状态的组件
在容量为 2 的
// index.vue

import { ref } from "vue"
import CountUp from '../components/CountUp.vue'
import ColorRandom from '../components/ColorRandom.vue'
import Timer from '../components/Timer.vue'
const tabs = ref([    // 组件列表
  {
    title: "ColorPicker",
    comp: ColorRandom,
  },
  {
    title: "timer1",
    comp: Timer,
  },
  {
    title: "timer2",
    comp: Timer,
  },
  {
    title: "CountUp",
    comp: CountUp,
  },
])
const currentTab = ref(tabs.value[0]) // tab 默认展示第一个组件
const tabSwitch = (tab) => {
  currentTab.value = tab
}
</script>

  keep-alive demo belowdiv>
  <div class="tab-group">
    <button
    v-for="tab in tabs"
    :key="tab"
    :class="['tab-button', { active: currentTab === tab }]"
    @click="tabSwitch(tab)"
  >
    {{ tab.title }}
  button>
  div>
  <keep-alive max="2">

    <component
      v-if="currentTab"
      :is="currentTab.comp"
      :key="currentTab.title"
      :name="currentTab.title"
    />
  keep-alive>
</template>
缓存状态
缓存流程如下:

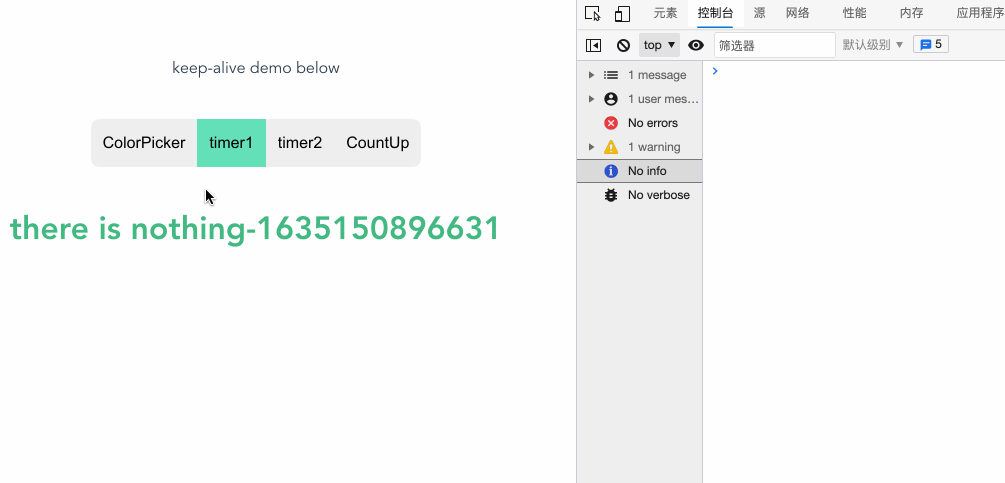
可以看到被包裹在 keep-alive 的动态组件缓存了前一个组件的状态。
通过观察 vue devtools 里节点的变化,可以看到此时 keepAlive 中包含了 ColorRandom 和 Timer 两个组件,当前展示的组件会处在 activated 的状态,而其他被缓存的组件则处在 inactivated 的状态
如果我们注释了两个 keep-alive 会发现不管怎么切换组件,都只会重新渲染,并不会保留前次的状态

移除组件
移除流程如下:
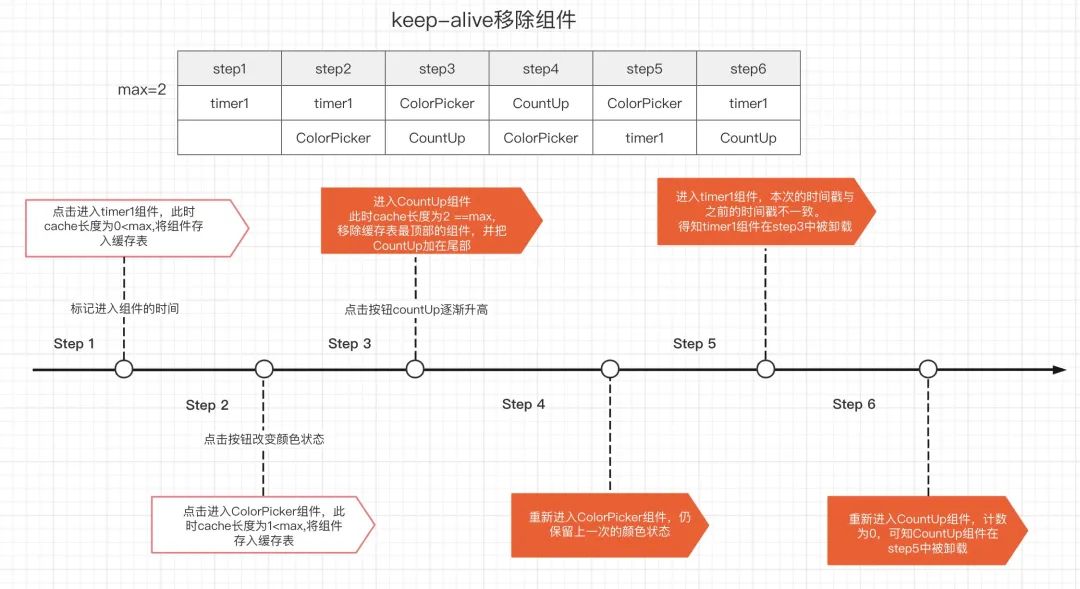
为了验证组件是否在切换tab时能被成功卸载,在每个组件的 onUnmounted 中加上了 log。
onUnmounted(()=>{
  console.log(`${props.name} 组件被卸载`)
})
当缓存数据长度小于等于 max ,切换组件并不会卸载其他组件,就像上面在 vue devtools 里展示的一样,只会触发组件的 activated和deactivated两个生命周期若此时缓存数据长度大于 max ,则会从缓存列表中删除优先级优先被淘汰的组件,对应的可以看到该组件 umounted生命周期触发。
性能优化
使用 KeepAlive 后,被 KeepAlive 包裹的组件在经过第一次渲染后,它的 vnode 以及 DOM 都会被缓存起来,然后再下一次再次渲染该组件的时候,直接从缓存中拿到对应的 vnode 和 DOM,然后渲染,并不需要再走一次组件初始化,render 和 patch 等一系列流程,减少了 script 的执行时间,性能更好。
总结
Vue 内部将 DOM 节点抽象成了一个个的 VNode 节点,keep-alive 组件的缓存也是基于 VNode 节点的而不是直接存储 DOM 结构。它将满足条件( include 与 exclude )的组件在 cache 对象中缓存起来,在需要重新渲染的时候再将 vnode 节点从 cache 对象中取出并渲染。
具体缓存过程如下:
声明有序集合 keys 作为缓存容器,存入组件的唯一 key 值
在缓存容器 keys 中,越靠前的 key 值意味着被访问的越少也越优先被淘汰
渲染函数执行时,若命中缓存时,则从 keys 中删除当前命中的 key,并往 keys 末尾追加 key 值,刷新该 key 的优先级
未命中缓存时,则 keys 追加缓存数据 key 值,若此时缓存数据长度大于 max 最大值,则删除最旧的数据
当触发 beforeMount/update 生命周期,缓存当前 activated 组件的子树的数据