 字节流动
字节流动


JNI 层操作 Bitmap 对象
Android中JNI层处理Bitmap通常有两种方法
获取到 Bitmap 中的byte数组并传入native方法,JNI层处理得到的byte数组后返回一个新的byte数组,Java层重建Bitmap对象。(不推荐)
Java层直接向JNI层传入Bitmap的引用,JNI层得到Bitmap对象的图像数据的地址,直接修改Bitmap的byte数组。
阅读了很多篇博客,很多开发者都会采用第一种方法,本人是极不推荐的。这种方法会在内存中重建一个byte数组,会造成内存的浪费,性能低下。
第二种方法是性能最优的,JNI层充分利用的C/C++指针的特性,直接获取到 Bitmap 中byte数组在内存中的地址,通过指针直接修改图像数据,所以用到了NDK中的android/bitmap.h。
android/bitmap.h
android/bitmap.h这个头文件用于在JNI层操作Bitmap对象的,其包含于 jnigraphics 库中,所以要在 CMakeLists.txt 中的 target_link_libraries 加入 -ljnigraphics,如下
target_link_libraries(native-lib -ljnigraphics ${log-lib})
三个常用函数
AndroidBitmap_getInfo() 从位图句柄获得信息(宽度、高度、像素格式)
AndroidBitmap_lockPixels() 对像素缓存上锁,即获得该缓存的指针。
AndroidBitmap_unlockPixels() 解锁
JNI接口函数
请看注释
JNIEXPORT void JNICALL
Java_com_glee_ndkroad1006_MainActivity_gaussBlur(JNIEnv *env, jobject /* this */, jobject bmp) {
    AndroidBitmapInfo info = {0};//初始化BitmapInfo结构体
    int *data=NULL;//初始化Bitmap图像数据指针
    AndroidBitmap_getInfo(env, bmp, &info);
    AndroidBitmap_lockPixels(env, bmp, (void **) &data);//锁定Bitmap,并且获得指针
    /**********高斯模糊算法作对int数组进行处理***********/
    //调用gaussBlur函数,把图像数据指针、图片长宽和模糊半径传入
    gaussBlur(data,info.width,info.height,80);
    /****************************************************/
    AndroidBitmap_unlockPixels(env,bmp);//解锁
}
Java层代码
public class MainActivity extends AppCompatActivity {
static {
//通过静态代码块加载so库
System.loadLibrary("native-lib");
}
@Override
protected void onCreate(Bundle savedInstanceState) {
super.onCreate(savedInstanceState);
setContentView(R.layout.activity_main);
//初始化两个ImageView
ImageView iv1 = (ImageView) findViewById(R.id.img1);
ImageView iv2 = (ImageView) findViewById(R.id.img2);
//iv1设置图片
iv1.setImageResource(R.drawable.test);
//生成bitmap对象
Bitmap bitmap = BitmapFactory.decodeResource(getResources(), R.drawable.test);
//调用native方法,传入Bitmap对象,对Bitmap进行高斯迷糊处理
gaussBlur(bitmap);
//把Bitmap对象设置给iv2
iv2.setImageBitmap(bitmap);
}
//native方法声明
public native void gaussBlur(Bitmap bitmap);
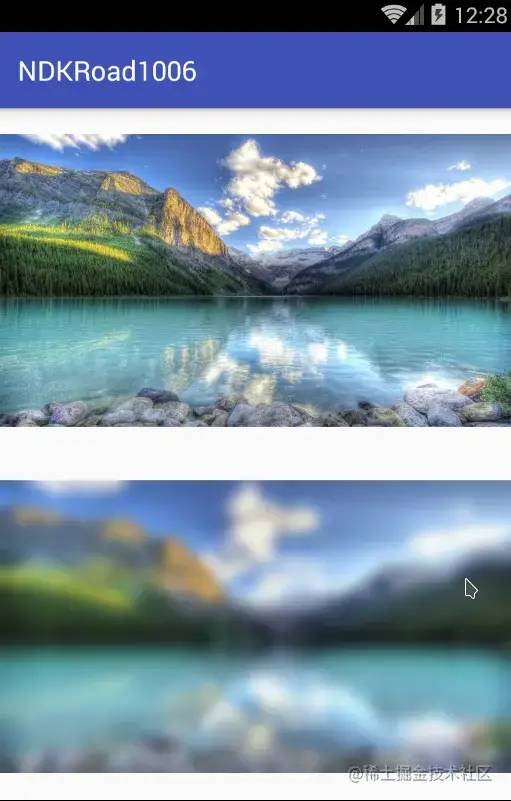
}上方的 ImageView 是没有进行高斯模糊处理的,下方的 ImageView 调用了JNI方法进行高斯模糊处理。
高斯模糊算法
void gaussBlur1(int* pix, int w, int h, int radius)
{
    float sigma = (float) (1.0 * radius / 2.57);
    float deno  = (float) (1.0 / (sigma * sqrt(2.0 * PI)));
    float nume  = (float) (-1.0 / (2.0 * sigma * sigma));
    float* gaussMatrix = (float*)malloc(sizeof(float)* (radius + radius + 1));
    float gaussSum = 0.0;
    for (int i = 0, x = -radius; x <= radius; ++x, ++i)
    {
        float g = (float) (deno * exp(1.0 * nume * x * x));
        gaussMatrix[i] = g;
        gaussSum += g;
    }
    int len = radius + radius + 1;
    for (int i = 0; i < len; ++i)
        gaussMatrix[i] /= gaussSum;
    int* rowData  = (int*)malloc(w * sizeof(int));
    int* listData = (int*)malloc(h * sizeof(int));
    for (int y = 0; y < h; ++y)
    {
        memcpy(rowData, pix + y * w, sizeof(int) * w);
        for (int x = 0; x < w; ++x)
        {
            float r = 0, g = 0, b = 0;
            gaussSum = 0;
            for (int i = -radius; i <= radius; ++i)
            {
                int k = x + i;
                if (0 <= k && k <= w)
                {
                    //得到像素点的rgb值
                    int color = rowData[k];
                    int cr = (color & 0x00ff0000) >> 16;
                    int cg = (color & 0x0000ff00) >> 8;
                    int cb = (color & 0x000000ff);
                    r += cr * gaussMatrix[i + radius];
                    g += cg * gaussMatrix[i + radius];
                    b += cb * gaussMatrix[i + radius];
                    gaussSum += gaussMatrix[i + radius];
                }
            }
            int cr = (int)(r / gaussSum);
            int cg = (int)(g / gaussSum);
            int cb = (int)(b / gaussSum);
            pix[y * w + x] = cr << 16 | cg << 8 | cb | 0xff000000;
        }
    }
    for (int x = 0; x < w; ++x)
    {
        for (int y = 0; y < h; ++y)
            listData[y] = pix[y * w + x];
        for (int y = 0; y < h; ++y)
        {
            float r = 0, g = 0, b = 0;
            gaussSum = 0;
            for (int j = -radius; j <= radius; ++j)
            {
                int k = y + j;
                if (0 <= k && k <= h)
                {
                    int color = listData[k];
                    int cr = (color & 0x00ff0000) >> 16;
                    int cg = (color & 0x0000ff00) >> 8;
                    int cb = (color & 0x000000ff);
                    r += cr * gaussMatrix[j + radius];
                    g += cg * gaussMatrix[j + radius];
                    b += cb * gaussMatrix[j + radius];
                    gaussSum += gaussMatrix[j + radius];
                }
            }
            int cr = (int)(r / gaussSum);
            int cg = (int)(g / gaussSum);
            int cb = (int)(b / gaussSum);
            pix[y * w + x] = cr << 16 | cg << 8 | cb | 0xff000000;
        }
    }
    free(gaussMatrix);
    free(rowData);
    free(listData);
}
作者:李季_
链接:https://juejin.cn/post/6844903502112784397
-- END --
进技术交流群,扫码添加我的微信:Byte-Flow

获取视频教程和源码
推荐:
Android NDK 开发:Java 与 Native 相互调用

