
【详细图解】再次理解im2col
共 5873字,需浏览 12分钟
· 2021-10-14
一句话:im2col是将一个[C,H,W]矩阵变成一个[H,W]矩阵的一个方法,其原理是利用了行列式进行等价转换。
为什么要做im2col? 减少调用gemm的次数。
重要:本次的代码只是为了方便理解im2col,不是用来做加速,所以代码写的很简单且没有做任何优化。
一、卷积的可视化
例子是一个[1, 6, 6]的输入,卷积核是[1, 3, 3],stride等于1,padding等于0。那么卷积的过程可视化如下图,一共需要做16次卷积计算,每次卷积计算有9次乘法和8次加法。
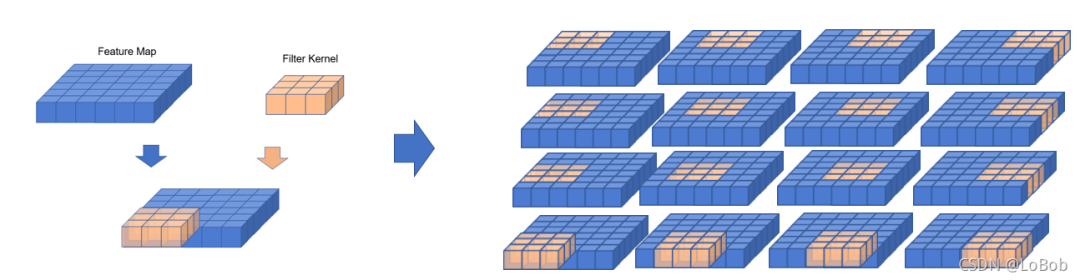
输出的公式如下,即Output_height = (6 - 3 + 2*0)/1 + 1 = 4 = Output_width

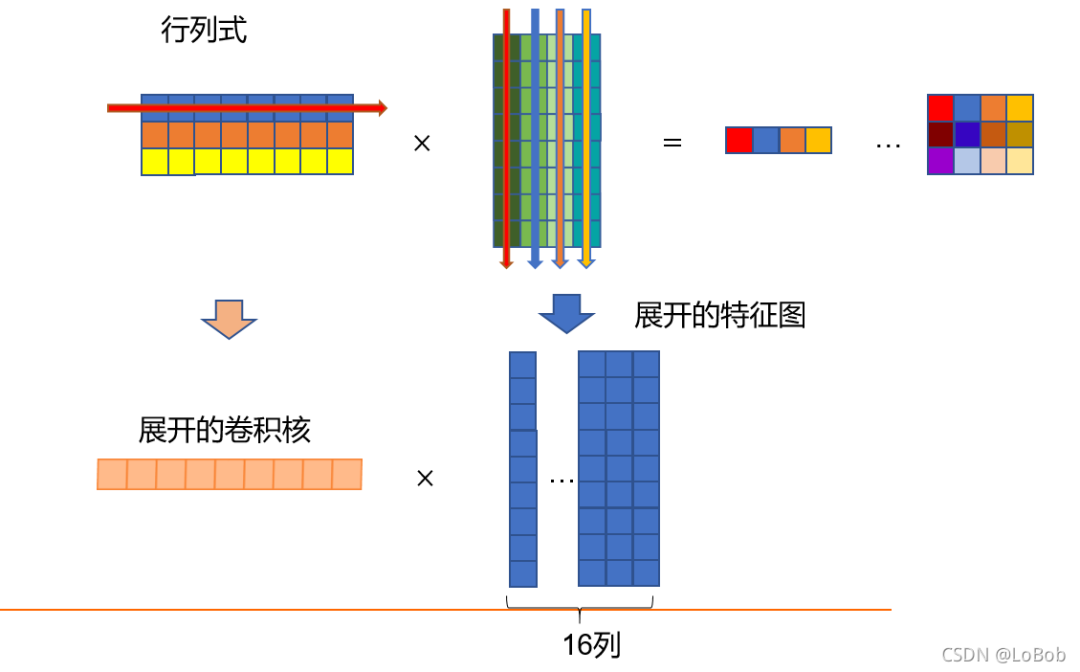
二、行列式
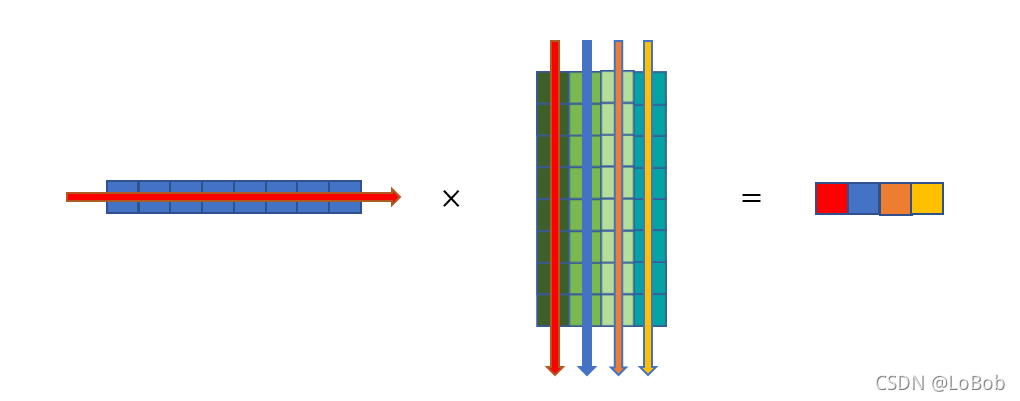
乘号左边的横条,跟乘号右边的竖条进行点乘(即每个元素对应相乘后再全部加起来)。
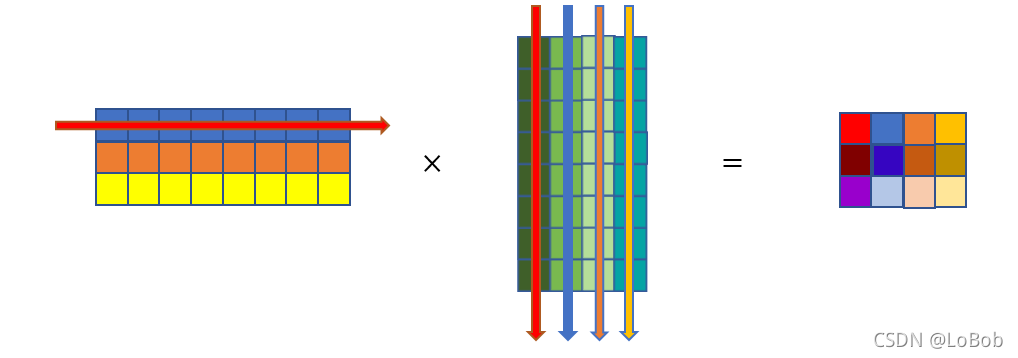
关于行列式,大家都清楚的一点,一根横条的元素个数要等于一根竖条的元素个数(这样才可以让做点乘的时候能一一对应起来,不会让小方块落单)。竖条有多少条,出来的结果就有多少个小方块(在横条的个数为1的情况下)。
出来的结果(等号的右边)的行数等于乘号左边的横条的行数,出来的结果(等号的右边)的列数等于乘号右边的横条的列数,公式表示就是[row, x] * [x, col] = [row, col]。举个例子[3, 8] * [8, 4] = [3, 4]
三、[1, H, W]的im2col

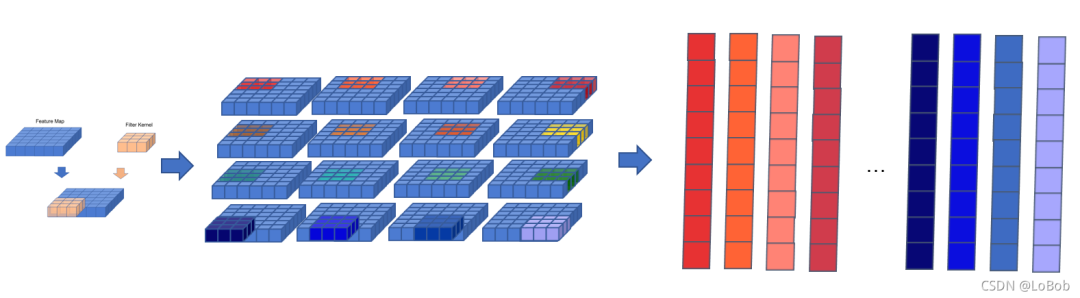
展开后,就可以直接做两个数组的矩阵乘积了
import  numpy as np

scr = np.array(np.arange(0,7**2).reshape(7, 7))
intH, intW= scr.shape

kernel = np.array([-0.2589,  0.2106, -0.1583, -0.0107,  0.1177,  0.1693, -0.1582, -0.3048, -0.1946]).reshape(3,3)
KHeight, KWeight = kernel.shape

row_num = intH - KHeight + 1
col_num = intW - KWeight + 1
OutScrIm2Col = np.zeros([row_num*col_num,KHeight*KWeight])

ii, jj = 0, 0
col_cnt, row_cnt = 0, 0
for i in range(0, row_num):
    for j in range(0, col_num): # 这俩个for是为了遍历列,即乘了多少次,这里完全可以merge成一个for循环,只需要提前计算好就行
        ii = i
        jj = j
        for iii in range(0, KHeight): # 这俩个for是为了取出一次 一横 * 一竖 的 行列式,这里完全可以mege成一个for循环,只需要提前计算好就行
            for jjj in range(0, KHeight):
                OutScrIm2Col[row_cnt][col_cnt] = scr[ii][jj]
                jj +=1
                col_cnt += 1
            ii += 1
            jj = j
        col_cnt = 0
        row_cnt += 1

im2col_kernel = im2col_kernel.reshape(-1,9)
OutScrIm2Col = OutScrIm2Col.T
out = np.matmul(im2col_kernel,OutScrIm2Col) # 这步就是做两个数组的矩阵乘积
中间俩个for循环是来填满展开的数组/矩阵的每一列,即卷积核对应的元素,其个数等于卷积核的元素个数,举个例子,[1, 3, 3]的卷积核,那么该卷积核的元素个数等于9;最外层的两个for循环是用来填满展开的数组/矩阵的每一行,即列数,也就是卷积核在输入滑动了多少次

pytorch来做验证
import torch
from torch import nn
import numpy as np
torch.manual_seed(100)

net = nn.Conv2d(1, 1, 3, padding=0, bias=False)

scr = np.array(np.arange(0, 7**2).reshape(1, 1, 7, 7)).astype(np.float32)
scr = torch.from_numpy(scr)

print(net.weight.data) # 把这里的weight的值复制到上面numpy的代码来做验证
print(net(scr))

# print的信息
tensor([[[[-0.2589,  0.2106, -0.1583],
          [-0.0107,  0.1177,  0.1693],
          [-0.1582, -0.3048, -0.1946]]]])
tensor([[[[ -7.6173,  -8.2053,  -8.7934,  -9.3815,  -9.9695],
          [-11.7337, -12.3217, -12.9098, -13.4978, -14.0859],
          [-15.8500, -16.4381, -17.0261, -17.6142, -18.2022],
          [-19.9664, -20.5545, -21.1425, -21.7306, -22.3186],
          [-24.0828, -24.6708, -25.2589, -25.8469, -26.4350]]]],
       grad_fn=)
四、[C, H, W]的im2col
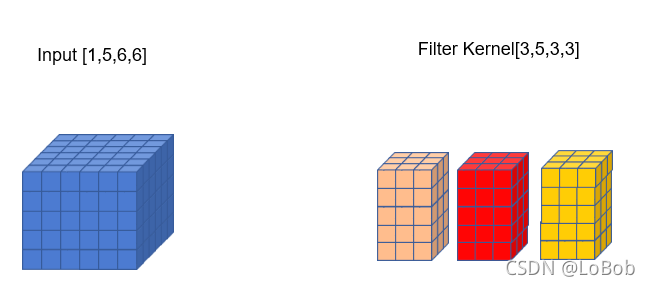

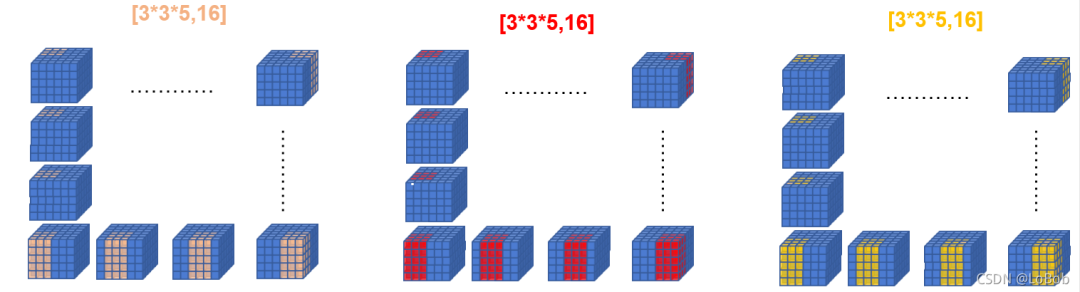
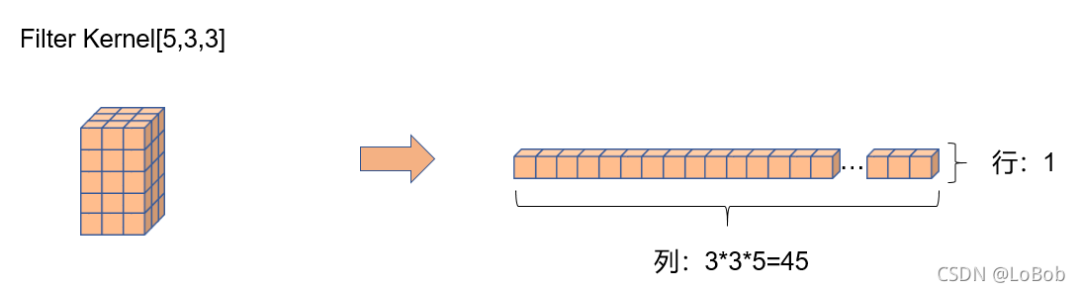
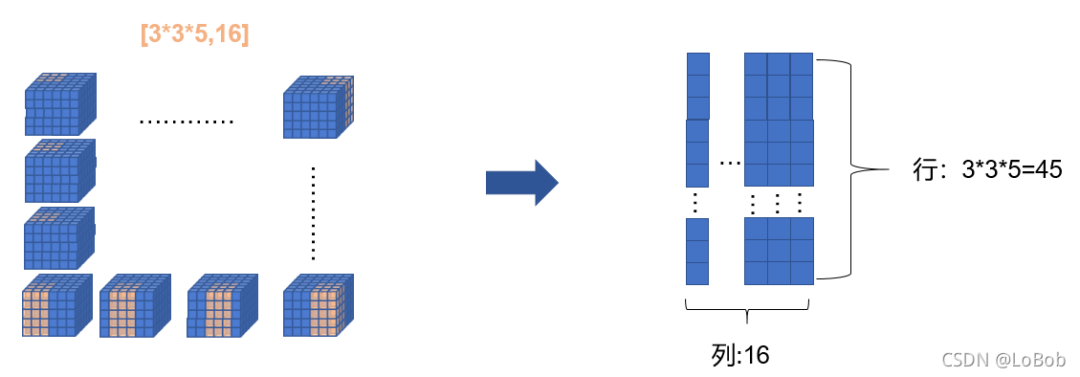
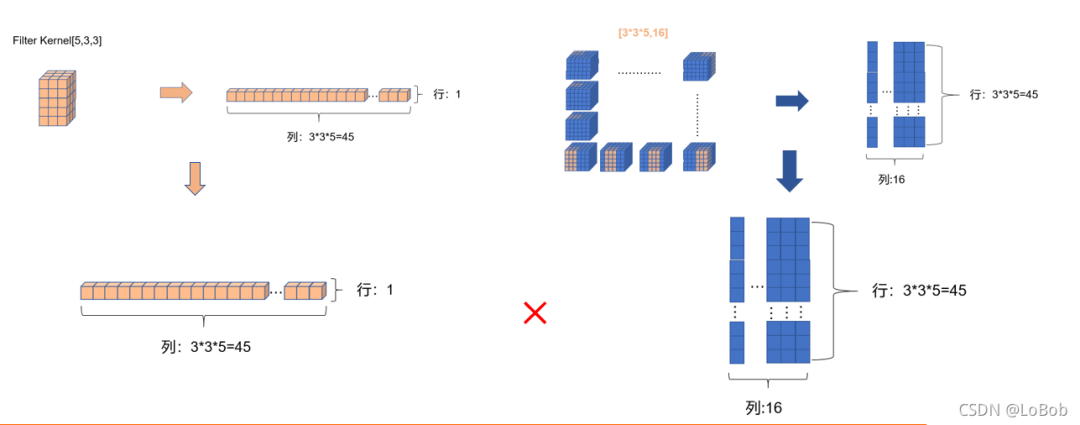
前面一堆图,是我故意不写文字,希望大家能够通过图能够看明白。前面卷积核只有一行的情况,跟[1, H, W]的情况基本一摸一样,只是这一行的元素个数等于卷积核的元素个数即可5x3x3=45,展开的特征图的每一个竖条也是45。
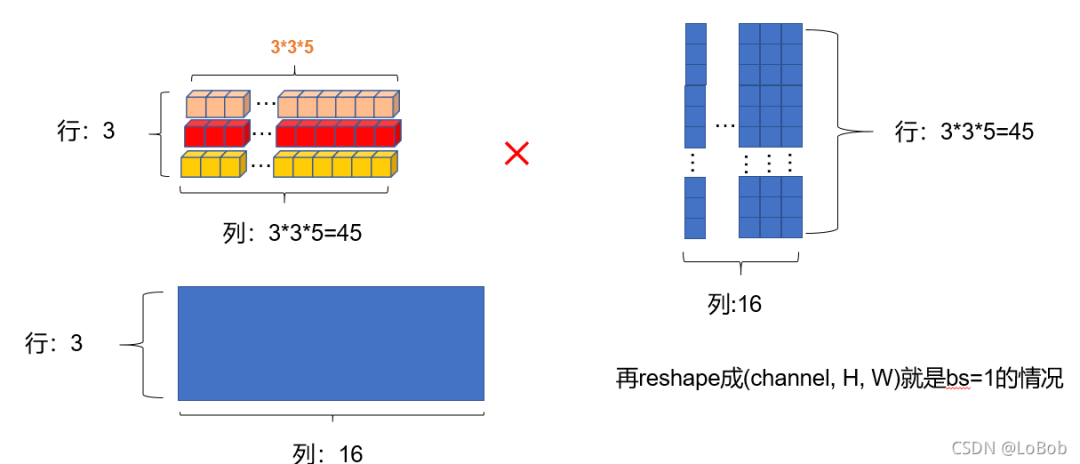
当卷积核函数等于3的时候,就是对应的只要增加卷积核的横条数即可,展开的特征图没有改变。这里希望大家用行列式的计算和普通卷积的过程联想起来,你会发现是一摸一样的计算过程。
代码其实跟[1,H, W]只有一初不同,就是从特征图里面取数据的时候多了个维度,需要取对应的通道。这里为什么要取对应的通道数呢?原因是行列式的计算中,横条和竖条是元素一一对应做乘法。
import  numpy as np
np.set_printoptions(threshold=np.inf)

src = np.array(np.arange(0, 9**3))[0:5*9*9]
src = np.tile(src, 5)
src = src.reshape(-1, 5, 9, 9)
kernel = np.array([[[[-0.1158,  0.0942, -0.0708],
          [-0.0048,  0.0526,  0.0757],
          [-0.0708, -0.1363, -0.0870]],

         [[-0.1139, -0.1128,  0.0702],
          [ 0.0631,  0.0857, -0.0244],
          [ 0.1197,  0.1481,  0.0765]],

         [[-0.0823, -0.0589, -0.0959],
          [ 0.0966,  0.0166,  0.1422],
          [-0.0167,  0.1335,  0.0729]],

         [[-0.0032, -0.0768,  0.0597],
          [ 0.0083, -0.0754,  0.0867],
          [-0.0228, -0.1440, -0.0832]],

         [[ 0.1352,  0.0615, -0.1005],
          [ 0.1163,  0.0049, -0.1384],
          [ 0.0440, -0.0468, -0.0542]]]])

scrN, srcChannel, intH, intW= src.shape
KoutChannel, KinChannel, kernel_H, kernel_W = kernel.shape
im2col_kernel = kernel.reshape(KoutChannel, -1)

outChannel, outH, outW =  KoutChannel, (intH - kernel_H + 1) , (intW - kernel_W + 1)
OutScrIm2Col = np.zeros( [ kernel_H*kernel_W*KinChannel, outH*outW ] )
row_num, col_num = OutScrIm2Col.shape

ii, jj, cnt_row, cnt_col = 0, 0, 0, 0

# 卷积核的reshape准备 :outchannel, k*k*inchannel
im2col_kernel = kernel.reshape(KoutChannel, -1)
# 输入的reshape准备 :outH = (intH - k + 2*pading)/stride + 1
outChannel, outH, outW =  KoutChannel, (intH - kernel_H + 1) , (intW - kernel_W + 1)

i_id = -1
cnt_col = -1
cnr = 0
for Outim2colCol_H in range(0, outH):
    i_id += 1
    j_id = -1
    cnt_row  = -1
    for Outim2colCol_W in range(0, outW):
        j_id, cnt_col += 1,  += 1
        cnt_row = 0
        for c in range(0, srcChannel): # 取一次卷积的数据,放到一列
            for iii in range(0, kernel_H):
                i_number = iii + i_id
                for jjj in range(0, kernel_W):
                    j_number = jjj + j_id
                    OutScrIm2Col[cnt_row][cnt_col] = src[bs][c][i_number][j_number]
                    cnr +=1
                    cnt_row += 1

Out =  np.matmul(im2col_kernel, OutScrIm2Col)
Out.reshape(outChannel, outH, outW)
print(Out.shape)
print(outChannel, outH, outW)
pytorch代码的验证
import torch
from torch import nn
import numpy as np
torch.manual_seed(100)

net = nn.Conv2d(in_channels=5, out_channels=1, kernel_size=3, padding=0, bias=False)
print(net.weight.data.shape)
print(net.weight.data)

scr = np.array(np.arange(0, 9**3))[:9*9*5].reshape(1, -1, 9, 9).astype(np.float32)

scr = torch.from_numpy(src)
print("data:", scr.shape)
scr = torch.from_numpy(scr)
print("data:", scr.shape)


Out = net(scr)
print("Our:", Out.shape)
print(Out)
五、[B, C, H, W]的im2col
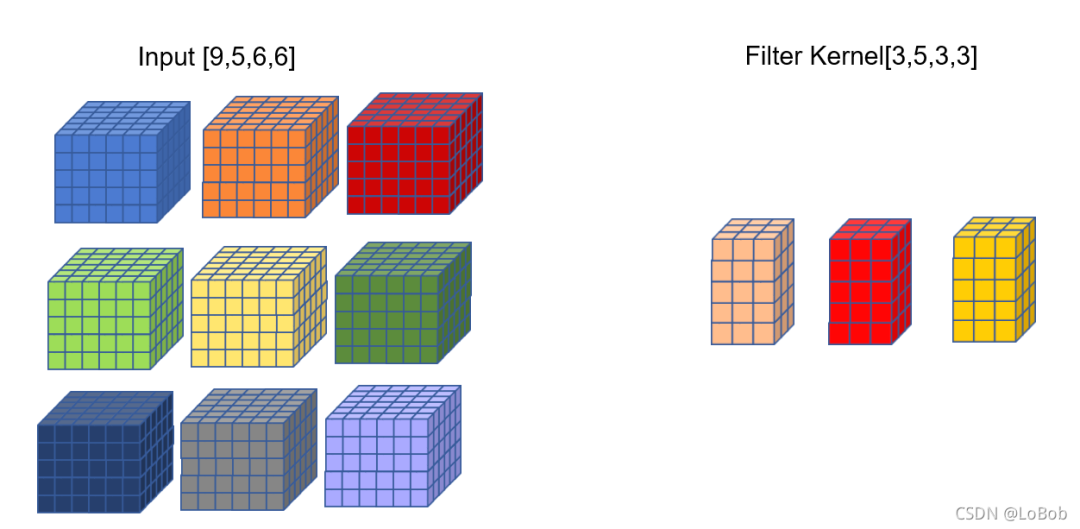
问题:如何bs=9的情况呢,要怎么做im2col+gemm呢?方法 1:把filter摊平的shape变成[3,5339],把input摊平的shape变成[5339,16]
– output的shape就为[3,16]了 - ❌
方法 2:把filter摊平的shape变成[39,533],把input摊平的shape变成[533,16],output的shape就为[39,16]了
– 隐患:如何filter数量是51233这种数量,那么非常占用显存/内存
方法 3:im2col+gemm外面加一层关于bs的for循环
– 隐患:加一层for循环嵌套非常耗时
经过简单分析,发现采取for循环的方式来进行im2col是相对合适的情况。我向msnh2012的作者穆士凝魂请教,得到的答案是,是用加一层for循环的方式居多,而且由于可以并发,多一层循环的开销比想象中小一些。如果是推理框架的话,有部分情况bs是等于1的,所以可以规避这个问题。
欢迎关注GiantPandaCV
欢迎联系&投稿