
Flutter 实现"剑气"加载
共 14628字,需浏览 30分钟
· 2021-10-02
前言:前几天在掘金上看到一篇文章,用html+css编写了一个剑气加载的动效。前端能做的东西,我Flutter大前端岂能罢休?于是小弟班门弄斧,用Flutter编写了这个剑气动效。相关掘金文章:juejin.cn/post/7001779766852321287
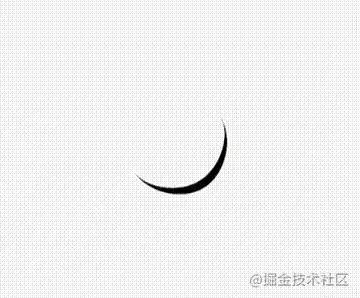
效果图
知识点
Animation【动效】 Clipper/Canvas【路径裁剪/画布】 Matrix4【矩阵转化】
剑气形状
我们仔细看一道剑气,它的形状是一轮非常细小的弯弯的月牙;在Flutter中,我们可以通过Clipper路径来裁剪出来,或者也可以通过canvas绘制出来。
先看canvas如何进行绘制的
class MyPainter extends CustomPainter {
  Color paintColor;

  MyPainter(this.paintColor);

  Paint _paint = Paint()
    ..strokeCap = StrokeCap.round
    ..isAntiAlias = true
    ..strokeJoin = StrokeJoin.bevel
    ..strokeWidth = 1.0;

  @override
  void paint(Canvas canvas, Size size) {
    _paint..color = this.paintColor;
    Path path = new Path();
    // 获取视图的大小
    double w = size.width;
    double h = size.height;
    // 月牙上边界的高度
    double topH = h * 0.92;
    // 以区域中点开始绘制
    path.moveTo(0, h / 2);
    // 贝塞尔曲线连接path
    path.cubicTo(0, topH * 3 / 4, w / 4, topH, w / 2, topH);
    path.cubicTo((3 * w) / 4, topH, w, topH * 3 / 4, w, h / 2);
    path.cubicTo(w, h * 3 / 4, 3 * w / 4, h, w / 2, h);
    path.cubicTo(w / 4, h, 0, h * 3 / 4, 0, h / 2);

    canvas.drawPath(path, _paint);
  }

  @override
  bool shouldRepaint(covariant CustomPainter oldDelegate) => false; // 一次性画好,不需要更新,返回false
}
Clipper也上代码,跟canvas两种选其一即可,我用的是canvas
class SwordPath extends CustomClipper<Path> {
  @override
  getClip(Size size) {
    print(size);
    // 获取视图的大小
    double w = size.width;
    double h = size.height;
    // 月牙上边界的高度
    double topH = h * 0.92;
    Path path = new Path();
    // 以区域中点开始绘制
    path.moveTo(0, h / 2);
    // 贝塞尔曲线连接path
    path.cubicTo(0, topH * 3 / 4, w / 4, topH, w / 2, topH);
    path.cubicTo((3 * w) / 4, topH, w, topH * 3 / 4, w, h / 2);
    path.cubicTo(w, h * 3 / 4, 3 * w / 4, h, w / 2, h);
    path.cubicTo(w / 4, h, 0, h * 3 / 4, 0, h / 2);
    return path;
  }

  @override
  bool shouldReclip(covariant CustomClipper oldClipper) => false;
}
生成月牙控件
CustomPaint(
    painter: MyPainter(widget.loadColor),
    size: Size(200, 200),
),
让剑气旋转起来
我们需要剑气一直不停的循环转动,所以需要用到动画,让剑气围绕中心的转动起来。注意这里只是单纯的平面旋转,也就是我们说的2D变换。这里我们用到的是Transform.rotate控件,通过animation.value传入旋转的角度,从而实现360度的旋转。
class _SwordLoadingState extends State<SwordLoading>
    with TickerProviderStateMixin {
  late AnimationController _controller;
  late Animation<double> _animation;
  double angle = 0;

  @override
  void initState() {
    _controller =
        AnimationController(vsync: this, duration: Duration(milliseconds: 800));
    // pi * 2:360°旋转
    _animation = Tween(begin: 0.0, end: pi * 2).animate(_controller);
    _controller.repeat(); // 循环播放动画
    super.initState();
  }

  @override
  Widget build(BuildContext context) {
    return Transform.rotate(
      alignment: Alignment.center,
      angle: _animation.value,
      child: CustomPaint(
        painter: MyPainter(widget.loadColor),
        size: Size(widget.size, widget.size),
      ),
    );
   }
}
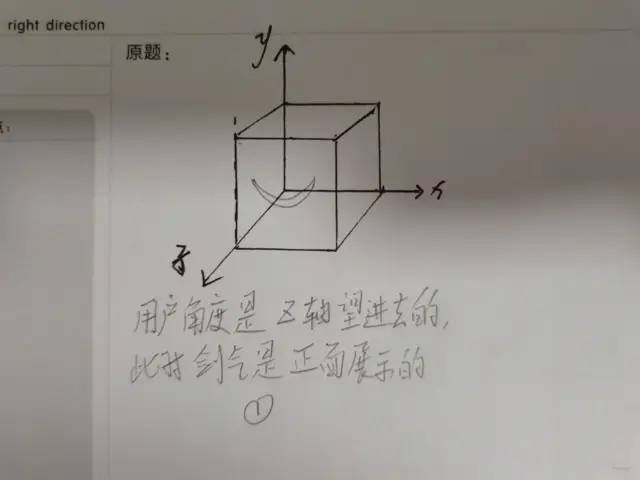
让剑气有角度的、更犀利的转动
我们仔细看单独一条剑气,其实是在一个三维的模型中,把与Z轴垂直的剑气 向Y轴、X轴进行了一定角度的偏移。 相当于在这个3D空间内,剑气不在某一个平面了,而是斜在这个空间内,然后 再绕着圆心去旋转。 而观者的视图,永远与Z轴垂直【或者说:X轴和Y轴共同组成的平面上】,所以就会产生剑气 从外到里进行旋转 的感觉。
下图纯手工绘制,不要笑我~~~
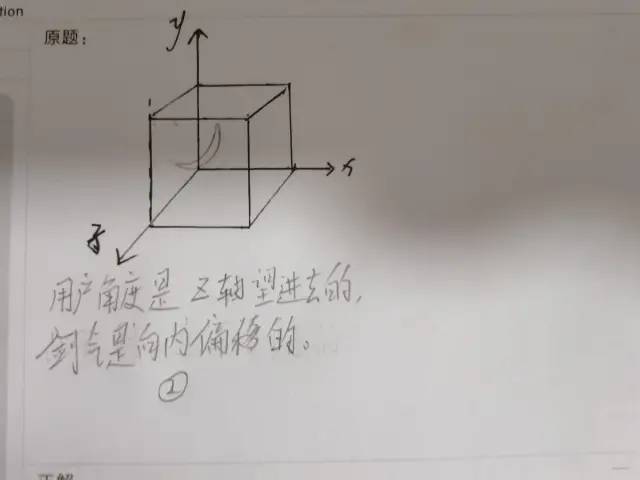
综上,可以确定这个过程是一个3D的变换,很明显我们Transform.rotate这种2D的widget已经不满足需求了,这个时候Matrix4大佬上场了,我们通过Matrix4.identity()..rotate的方法,传入我们的3D转化,在通过rotateZ进行旋转,简直完美。代码如下
 AnimatedBuilder(
    animation: _animation,
    builder: (context, _) => Transform(
      transform: Matrix4.identity()
              ..rotate(v.Vector3(0, -8, 12), pi)
              ..rotateZ(_animation.value),
      alignment: Alignment.center,
      child: CustomPaint(
              painter: MyPainter(widget.loadColor),
              size: Size(widget.size, widget.size),
      ),
   ),
),
这里多说一句,要完成矩阵变换,Matrix4必不可少,可以着重学习下。
让剑气一起动起来
完成一个剑气的旋转之后,我们回到预览效果,无非就是3个剑气堆叠在一起,通过偏移角度去区分。Flutter堆叠效果直接用Stack实现,完整代码如下:
import 'package:flutter/material.dart';
import 'dart:math';
import 'package:vector_math/vector_math_64.dart' as v;

class SwordLoading extends StatefulWidget {
  const SwordLoading({Key? key, this.loadColor = Colors.black, this.size = 88})
      : super(key: key);

  final Color loadColor;
  final double size;

  @override
  _SwordLoadingState createState() => _SwordLoadingState();
}

class _SwordLoadingState extends State<SwordLoading>
    with TickerProviderStateMixin {
  late AnimationController _controller;
  late Animation<double> _animation;
  double angle = 0;

  @override
  void initState() {
    _controller =
        AnimationController(vsync: this, duration: Duration(milliseconds: 800));
    _animation = Tween(begin: 0.0, end: pi * 2).animate(_controller);
    _controller.repeat();
    super.initState();
  }

  @override
  Widget build(BuildContext context) {
    return Stack(
      children: [
        AnimatedBuilder(
          animation: _animation,
          builder: (context, _) => Transform(
            transform: Matrix4.identity()
              ..rotate(v.Vector3(0, -8, 12), pi)
              ..rotateZ(_animation.value),
            alignment: Alignment.center,
            child: CustomPaint(
              painter: MyPainter(widget.loadColor),
              size: Size(widget.size, widget.size),
            ),
          ),
        ),
        AnimatedBuilder(
          animation: _animation,
          builder: (context, _) => Transform(
            transform: Matrix4.identity()
              ..rotate(v.Vector3(-12, 8, 8), pi)
              ..rotateZ(_animation.value),
            alignment: Alignment.center,
            child: CustomPaint(
              painter: MyPainter(widget.loadColor),
              size: Size(widget.size, widget.size),
            ),
          ),
        ),
        AnimatedBuilder(
          animation: _animation,
          builder: (context, _) => Transform(
            transform: Matrix4.identity()
              ..rotate(v.Vector3(-8, -8, 6), pi)
              ..rotateZ(_animation.value),
            alignment: Alignment.center,
            child: CustomPaint(
              painter: MyPainter(widget.loadColor),
              size: Size(widget.size, widget.size),
            ),
          ),
        ),
      ],
    );
  }
}

class MyPainter extends CustomPainter {
  Color paintColor;

  MyPainter(this.paintColor);

  Paint _paint = Paint()
    ..strokeCap = StrokeCap.round
    ..isAntiAlias = true
    ..strokeJoin = StrokeJoin.bevel
    ..strokeWidth = 1.0;

  @override
  void paint(Canvas canvas, Size size) {
    _paint..color = this.paintColor;
    Path path = new Path();
    // 获取视图的大小
    double w = size.width;
    double h = size.height;
    // 月牙上边界的高度
    double topH = h * 0.92;
    // 以区域中点开始绘制
    path.moveTo(0, h / 2);
    // 贝塞尔曲线连接path
    path.cubicTo(0, topH * 3 / 4, w / 4, topH, w / 2, topH);
    path.cubicTo((3 * w) / 4, topH, w, topH * 3 / 4, w, h / 2);
    path.cubicTo(w, h * 3 / 4, 3 * w / 4, h, w / 2, h);
    path.cubicTo(w / 4, h, 0, h * 3 / 4, 0, h / 2);

    canvas.drawPath(path, _paint);
  }

  @override
  bool shouldRepaint(covariant CustomPainter oldDelegate) =>
      false; // 一次性画好,不需要更新,返回false
}
业务端调用
SwordLoading(loadColor: Colors.black,size: 128),
写在最后
花了我整个周六下午的时间,很开心用Flutter实现了加载动画,说说感受吧。
在编写的过程中,对比html+css的方式,Flutter的实现难度其实更大,而且剑气必须使用canvas绘制出来。 如果你也懂前端,你可以深刻体会声明式和命令式UI在编写布局和动画所带来的强烈差异,从而加深Flutter万物皆对象的思想。*【因为万物皆对象,所以所有控件和动画,都是可以显示声明的对象,而不是像前端那样通过解析xml命令来显示】 2D/3D变换,我建议Flutter学者们,一定要深入学习,这种空间思维对我们实现特效是不可获取的能力。
转自:掘金 Karl_wei
https://juejin.cn/post/7002977635206692901
PS:如果觉得我的分享不错,欢迎大家随手点赞、转发、在看。
PS:如果觉得我的分享不错,欢迎大家随手点赞、转发、在看。