开源诊断利器Arthas ByteKit 深度解读(1):基本原理介绍
共 37647字,需浏览 76分钟
· 2021-09-17
点击上方“服务端思维”,选择“设为星标”
回复”669“获取独家整理的精选资料集
回复”加群“加入全国服务端高端社群「后端圈」

Arthas ByteKit 深度解读(1):基本原理介绍
前言
本文由整体到局部的思路展开分析Arthas ByteKit 字节码处理框架,结合类图和数据流图,介绍ByteKit字节码处理流程及核心对象。
简介
Arthas ByteKit 为新开发的字节码工具库,基于ASM提供更高层的字节码处理能力,面向诊断/APM领域,不是通用的字节码库。ByteKit期望能提供一套简洁的API,让开发人员可以比较轻松的完成字节码增强。
本文主要介绍以下几点:
ByteKit 基本用法 ByteKit 字节码处理流程 如何解析Interceptor Class ByteKit 字节码核心处理逻辑 LocationMatcher/Location的魔力 @Binding原理介绍
基本概念
首先介绍ByteKit的基本概念:
Target class : 拦截的目标类,本文中为Sample类; Interceptor class : 用户定义的拦截器类,定义了目标类的字节码增强逻辑,本文为SampleInterceptor; ExceptionSuppressHandler : 拦截器使用的异常处理器,用于捕获处理拦截方法意外抛出的异常; ClassNode/MethodNode : 通过Java asm 工具库将二进制的class字节码转换成的结构化对象;
基本用法
为了理解起来更加清晰,对com.example.ByteKitDemo进行简单修改,避免内部类造成的干扰,抽取几个独立类如下:
SampleDemo: 测试入口类 Sample: 要增强的目标类 SampleInterceptor: Sample类的拦截器 PrintExceptionSuppressHandler: 异常处理器 EnhanceUtil: ByteKit 处理逻辑封装
package com.example;

import com.alibaba.arthas.deps.org.objectweb.asm.tree.ClassNode;
import com.alibaba.arthas.deps.org.objectweb.asm.tree.MethodNode;
import com.taobao.arthas.bytekit.asm.MethodProcessor;
import com.taobao.arthas.bytekit.asm.binding.Binding;
import com.taobao.arthas.bytekit.asm.interceptor.InterceptorProcessor;
import com.taobao.arthas.bytekit.asm.interceptor.annotation.AtEnter;
import com.taobao.arthas.bytekit.asm.interceptor.annotation.AtExceptionExit;
import com.taobao.arthas.bytekit.asm.interceptor.annotation.AtExit;
import com.taobao.arthas.bytekit.asm.interceptor.annotation.ExceptionHandler;
import com.taobao.arthas.bytekit.asm.interceptor.parser.DefaultInterceptorClassParser;
import com.taobao.arthas.bytekit.utils.AgentUtils;
import com.taobao.arthas.bytekit.utils.AsmUtils;
import com.taobao.arthas.bytekit.utils.Decompiler;

import java.util.Arrays;
import java.util.List;


// 要拦截增强的目标类
class Sample {
    private int exceptionCount = 0;

    public String hello(String str, boolean exception) {
        if (exception) {
            exceptionCount++;
            throw new RuntimeException("test exception, str: " + str);
        }
        return "hello " + str;
    }
}

// Sample 类的拦截器
class SampleInterceptor {

    // 拦截方法Entry点进行处理
    @AtEnter(inline = false, suppress = RuntimeException.class, suppressHandler = PrintExceptionSuppressHandler.class)
    public static void atEnter(@Binding.This Object object,
                               @Binding.Class Object clazz,
                               @Binding.Args Object[] args,
                               @Binding.MethodName String methodName,
                               @Binding.MethodDesc String methodDesc) {
        System.out.println("atEnter, args[0]: " + args[0]);
    }

    // 拦截方法正常返回的语句,在返回前进行处理
    @AtExit(inline = true)
    public static void atExit(@Binding.Return Object returnObject) {
        System.out.println("atExit, returnObject: " + returnObject);
    }

    // 拦截方法内部抛出异常点
    @AtExceptionExit(inline = true, onException = RuntimeException.class)
    public static void atExceptionExit(@Binding.Throwable RuntimeException ex,
                                       @Binding.Field(name = "exceptionCount") int exceptionCount) {
        System.out.println("atExceptionExit, ex: " + ex.getMessage() + ", field exceptionCount: " + exceptionCount);
    }
}

// 异常处理器
class PrintExceptionSuppressHandler {

    @ExceptionHandler(inline = true)
    public static void onSuppress(@Binding.Throwable Throwable e, @Binding.Class Object clazz) {
        System.out.println("exception handler: " + clazz);
        e.printStackTrace();
    }
}

// ByteKit 处理逻辑封装
class EnhanceUtil {

    public static byte[] enhanceClass(Class targetClass, String[] targetMethodNames, Class interceptorClass) throws Exception {
        // 初始化Instrumentation
        AgentUtils.install();

        // 解析定义的 Interceptor类 和相关的注解
        DefaultInterceptorClassParser interceptorClassParser = new DefaultInterceptorClassParser();
        List<InterceptorProcessor> processors = interceptorClassParser.parse(interceptorClass);

        // 加载字节码
        ClassNode classNode = AsmUtils.loadClass(targetClass);

        List<String> methodNameList = Arrays.asList(targetMethodNames);

        // 对加载到的字节码做增强处理
        for (MethodNode methodNode : classNode.methods) {
            if (methodNameList.contains(methodNode.name)) {
                MethodProcessor methodProcessor = new MethodProcessor(classNode, methodNode);
                for (InterceptorProcessor interceptor : processors) {
                    interceptor.process(methodProcessor);
                }
            }
        }

        // 获取增强后的字节码
        return AsmUtils.toBytes(classNode);
    }

}

//测试入口类
class SampleDemo {

    public static void main(String[] args) throws Exception {

        // 启动Sample
        System.out.println("before retransform ...");
        try {
            Sample sample = new Sample();
            sample.hello("1", false);
            sample.hello("2", true);
        } catch (Exception e) {
            e.printStackTrace(System.out);
        }
        System.out.println();


        // 对Sample类的hello方法进行拦截处理,返回增强后的字节码
        byte[] bytes = EnhanceUtil.enhanceClass(Sample.class, new String[]{"hello"}, SampleInterceptor.class);

        // 查看反编译结果
        //System.out.println(Decompiler.decompile(bytes));

        // 通过 reTransform 增强类
        AgentUtils.reTransform(Sample.class, bytes);


        // 启动Sample
        System.out.println("after retransform ...");
        try {
            Sample sample = new Sample();
            sample.hello("3", false);
            sample.hello("4", true);
        } catch (Exception e) {
            e.printStackTrace(System.out);
        }
    }

}
SampleInterceptor 拦截器类解析
// Sample 类的拦截器
class SampleInterceptor {

    // 拦截方法Entry点进行处理
    @AtEnter(inline = false, suppress = RuntimeException.class, suppressHandler = PrintExceptionSuppressHandler.class)
    public static void atEnter(@Binding.This Object object,
                               @Binding.Class Object clazz,
                               @Binding.Args Object[] args,
                               @Binding.MethodName String methodName,
                               @Binding.MethodDesc String methodDesc) {
        System.out.println("atEnter, args[0]: " + args[0]);
    }

    // 拦截方法正常返回的语句,在返回前进行处理
    @AtExit(inline = true)
    public static void atExit(@Binding.Return Object returnObject) {
        System.out.println("atExit, returnObject: " + returnObject);
    }

    // 拦截方法内部抛出异常点
    @AtExceptionExit(inline = true, onException = RuntimeException.class)
    public static void atExceptionExit(@Binding.Throwable RuntimeException ex,
                                       @Binding.Field(name = "exceptionCount") int exceptionCount) {
        System.out.println("atExceptionExit, ex: " + ex.getMessage() + ", field exceptionCount: " + exceptionCount);
    }
}
在SampleInterceptor 中定义了3个拦截方法,分别标记拦截注解 @AtEnter/@AtExit/@AtExceptionExit;用 @Binding.Xxx注解绑定了不同的参数;在 @AtEnter里配置了inline = false,在拦截点调用静态拦截方法SampleInterceptor.atEnter();在 @AtExit里配置了inline = true,则表示将拦截方法SampleInterceptor.atExit()本身以inline方式展开到原方法中;@AtEnter配置了suppress = RuntimeException.class和suppressHandler = PrintExceptionSuppressHandler.class,说明插入的代码会被try/catch包围;@AtExceptionExit在原方法体范围try-catch 指定异常进行处理。
@ExceptionHandler 解析:
在上面的 @AtEnter配置里,生成的代码会被 try/catch 包围,那么具体的内容是在PrintExceptionSuppressHandler里。
将增强后的字节码反编译得到的代码如下,为方便理解加上注释:
   public String hello(String str, boolean exception) {

      // @AtEnter 原方法体之前插入拦截代码:inline=false 调用拦截方法SampleInterceptor.atEnter()
      try {
         SampleInterceptor.atEnter(this, Sample.class, new Object[]{str, new Boolean(exception)}, "hello", "(Ljava/lang/String;Z)Ljava/lang/String;");
      } catch (RuntimeException var11) { // suppress 在拦截方法后插入try-catch指定异常

         // inline 展开suppressHandler (PrintExceptionSuppressHandler.class)
         Class var6 = Sample.class;
         System.out.println("exception handler: " + var6);
         var11.printStackTrace();
      }

      try {
         // 原hello方法处理逻辑
         if (exception) {// 66
            ++this.exceptionCount;// 67
            throw new RuntimeException("test exception, str: " + str);// 68
         } else {
            String var3 = "hello " + str;// 70

            // @AtExit return语句前插入inline 展开SampleInterceptor.atExit()方法内容
            System.out.println("atExit, returnObject: " + var3);
            // 原hello方法的return语句
            return var3;
         }
      } catch (RuntimeException var10) { // @AtExceptionExit 在原方法体范围try-catch指定异常

         // inline 展开SampleInterceptor.atExceptionExit()方法内容
         int var9 = this.exceptionCount;
         System.out.println("atExceptionExit, ex: " + var10.getMessage() + ", field exceptionCount: " + var9);
         throw var10;
      }
   }
字节码处理流程
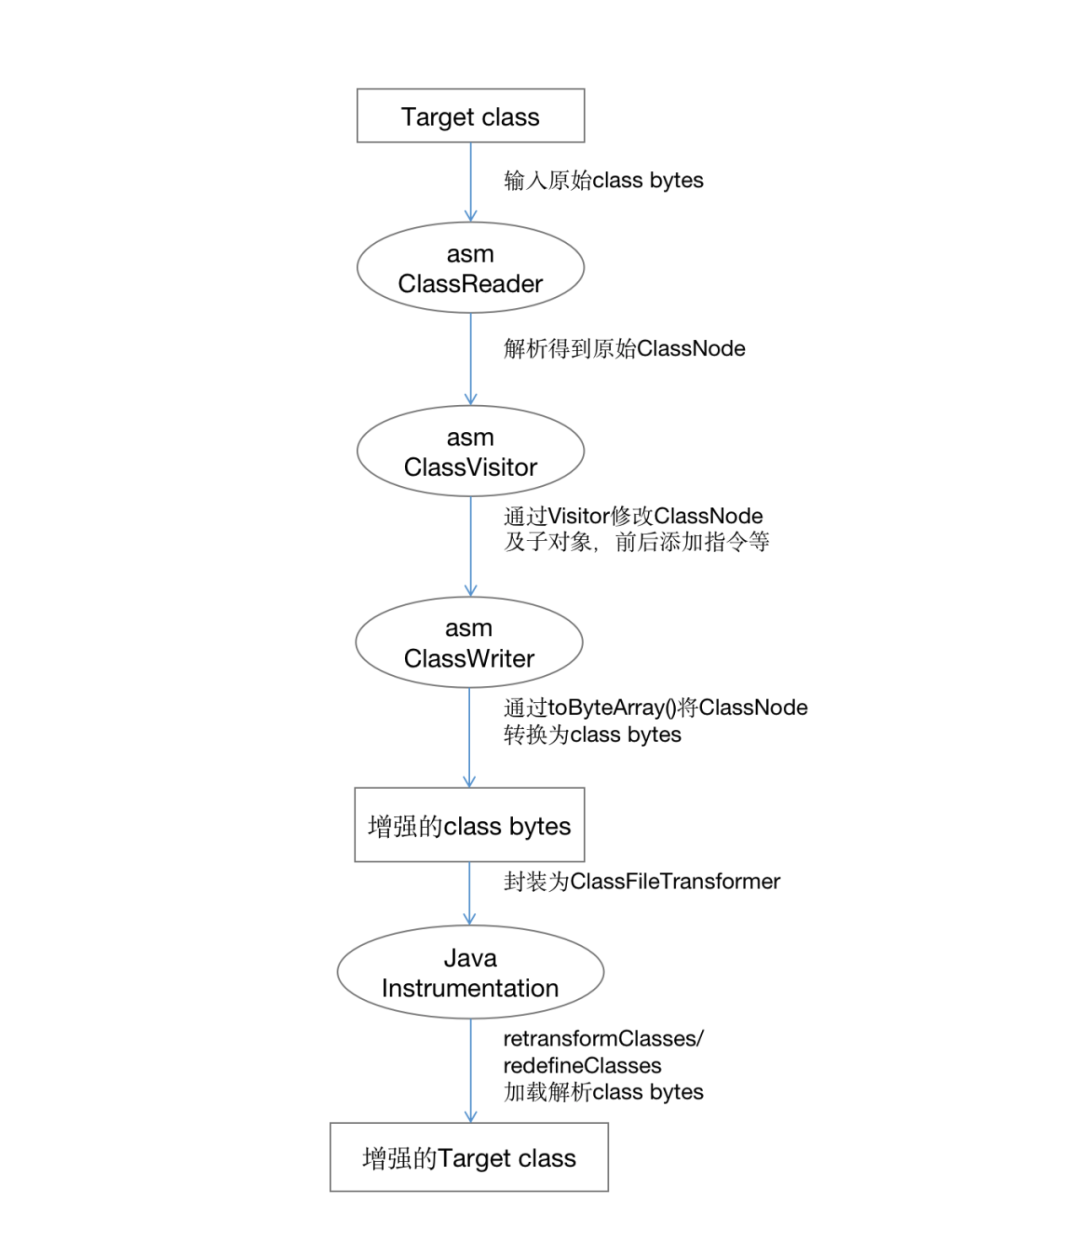
asm字节码处理流程:
目标类 class bytes -> ClassReader解析 -> ClassVisitor增强修改字节码 -> ClassWriter生成增强后的 class bytes -> 通过Instrumentation解析加载为新的Class.
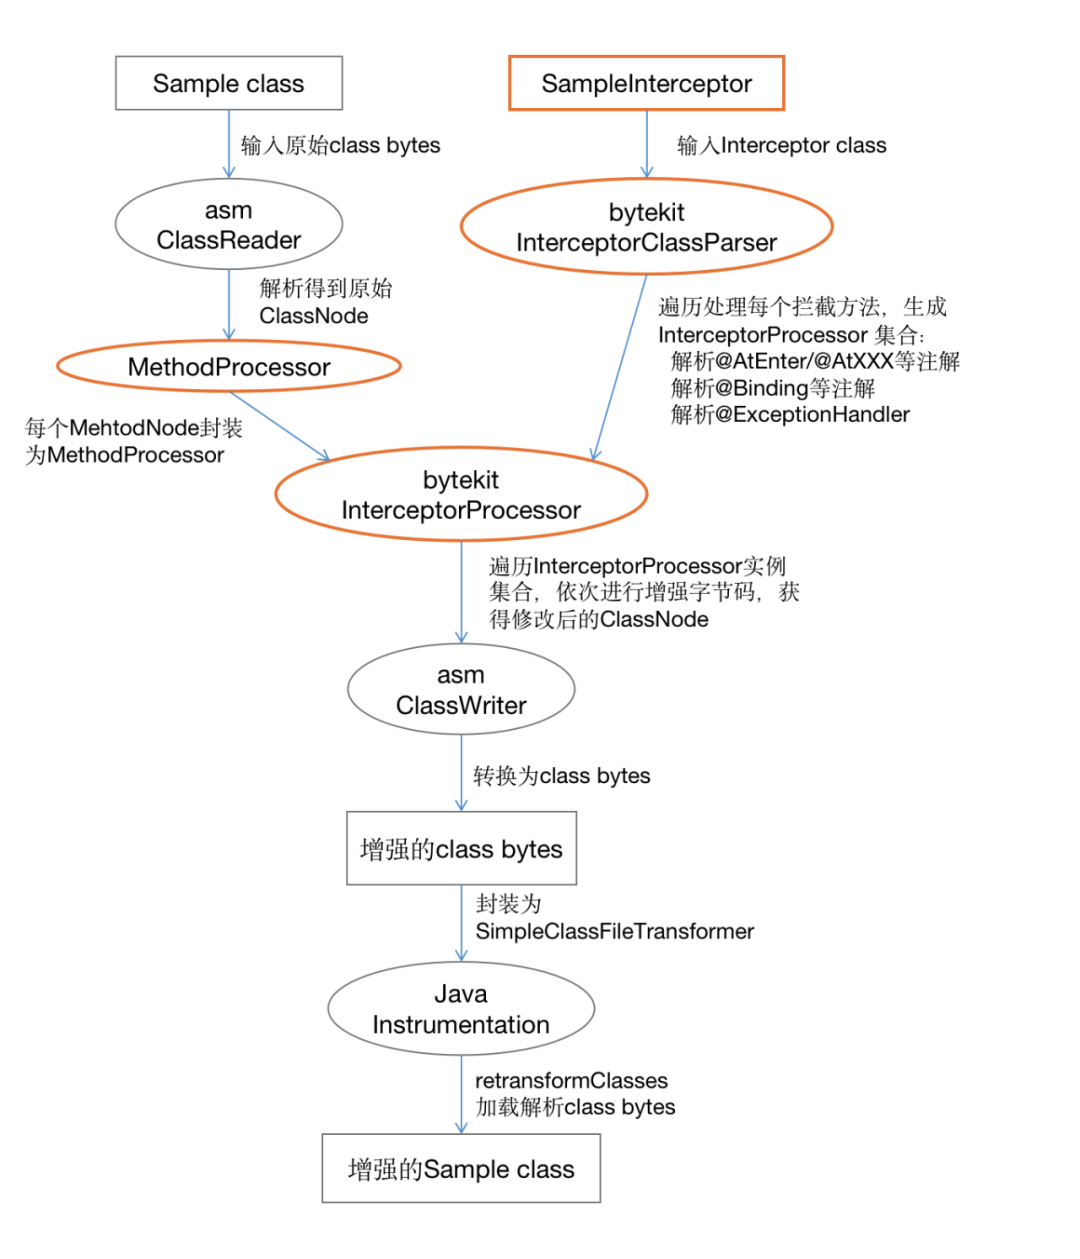
ByteKit 字节码处理流程:
ByteKit对比asm的改进:
用户只需要定义Interceptor class 及 Exception handler class,ByteKit自动将拦截方法的代码以字节码形式织入目标类,替代asm的ClassVisitor字节码指令相关处理; Interceptor class 及 Exception handler class 完全是Java语法,不需要编写任何Java 字节码指令代码,大幅降低使用门槛; Interceptor class 支持非常丰富的 @AtXxx代码拦截点,除了常见的方法进入/退出/异常拦截点外,还包括行号/调用方法/访问字段/同步块等支持丰富的 @Binding参数绑定,如this对象/Class/返回值/方法入参/局部变量/字段/调用方法的名称/调用方法的参数/行号等支持inline方式将拦截器的代码内联到目标方法中 invokeOrigin技术,在原方法前后插入代码,直接使用原方法的参数及局部变量!
其它特性,详细内容可以参考ByteKit文档。
从ByteKit的样例代码及上面的处理流程图,我们得知Interceptor class 是最为关键的信息,包含了用户定义的拦截处理逻辑。ByteKit 需要将Interceptor class 转换为程序可以使用的描述性数据结构,然后根据这些描述数据修改目标类的字节码。ByteKit的主要处理步骤:
解析Interceptor Class的 @AtXxx,@Binding等注解,生成InterceptorProcessor对象集合;遍历InterceptorProcessor集合,修改原方法的字节码;
ByteKit 核心类图
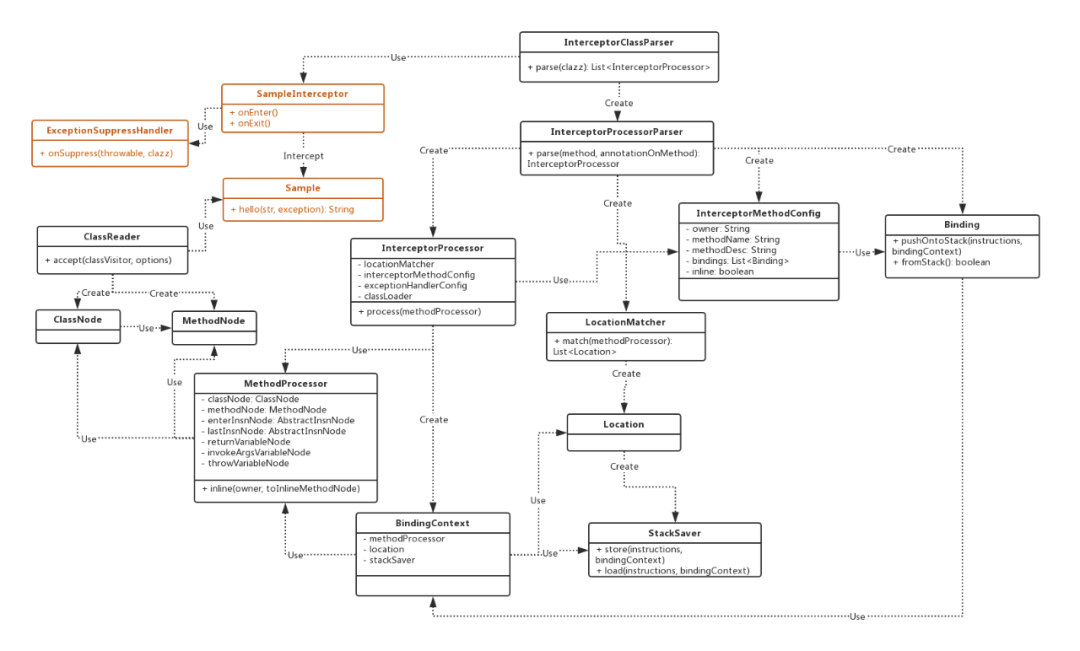
橙色的3个类是用户定义的Target类和拦截器,上面已经进行说明。这里列举一下ByteKit核心类及其作用:
InterceptorClassParser: 拦截器(Interceptor)解析器,默认实现类为DefaultInterceptorClassParser。此类为拦截器解析入口,第一步分析拦截器的所有静态方法,通过方法@AtXxx注解找到对应的InterceptorProcessorParser类进行下一步处理;InterceptorProcessorParser:@AtXxx注解的解析类,每个注解都有一个对应的Parser类。此类为拦截方法的核心解析类,生成InterceptorProcessor、LocationMatcher、InterceptorMethodConfig、Binding等对象;InterceptorProcessor: 拦截器字节码处理类,也是用户定义的拦截方法的解析结果,每一个拦截方法生成一个InterceptorProcessor实例;MethodProcessor: Target方法处理类,包含原始方法的ClassNode和MethodNode;InterceptorMethodConfig: 拦截方法的VO类,记录了方法签名及其Binding等信息;
@AtXxx: 拦截点注解,标记在拦截方法上;LocationMatcher: 这是一个比较特殊的类,通过这个类获得后面需要处理的指令的位置(Location),每个@AtXxx注解有一个对应的LocationMatcher子类;Location: 指令位置描述类,每个@AtXxx注解有对应的Location子类,描述对应的指令位置;StackSaver: 将栈数据保存到隐藏变量或者从隐藏局部变量加载到栈上。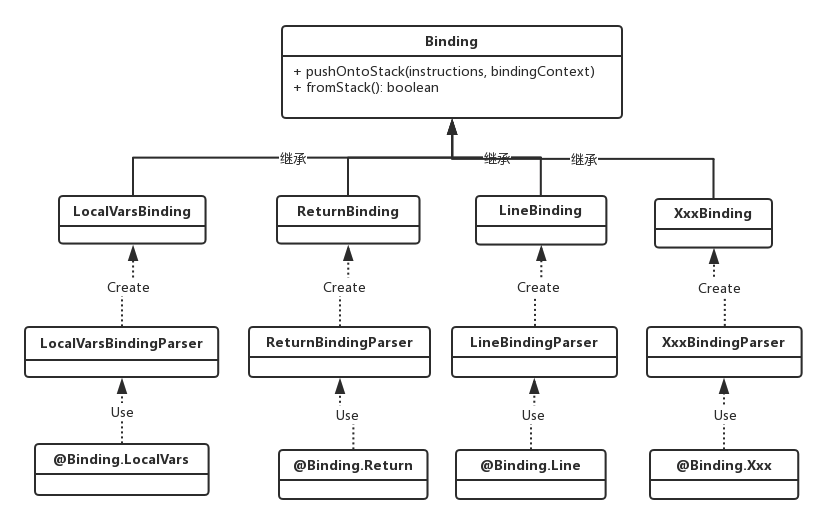
@Binding.Xxx: 拦截方法的参数绑定注解,按用户定义的参数顺序准备相应的数据到栈上;XxxBindingParser:@Binding.Xxx注解的解析类,生成对应的Binding子类;Binding: @Binding.Xxx 绑定注解的字节码处理类,每个@Binding.Xxx有一个对应的Binding子类,负责@Binding.Xxx 参数的栈数据处理逻辑;
解析Interceptor Class
遍历Interceptor 的静态方法,解析每个方法上的@AtXxx注解和@Binding.Xxx注解,生成InterceptorProcessor对象。
public class DefaultInterceptorClassParser implements InterceptorClassParser {

    public List<InterceptorProcessor> parse(Class<?> clazz) {
        final List<InterceptorProcessor> result = new ArrayList<InterceptorProcessor>();

   // 拦截方法回调处理函数
        MethodCallback methodCallback = new MethodCallback() {

            @Override
            public void doWith(Method method) throws IllegalArgumentException, IllegalAccessException {
           // 枚举拦截方法标记的所有Annatation注解
                for (Annotation onMethodAnnotation : method.getAnnotations()) {
                    for (Annotation onAnnotation : onMethodAnnotation.annotationType().getAnnotations()) {
                      // 找到InterceptorParserHander的子类,即@AtXxx注解
                        if (InterceptorParserHander.class.isAssignableFrom(onAnnotation.annotationType())) {
       // 判断是否为静态方法
                            if (!Modifier.isStatic(method.getModifiers())) {
                                throw new IllegalArgumentException("method must be static. method: " + method);
                            }

       // 找到@AtXxx注解指定的parserHander类并实例化
                            InterceptorParserHander handler = (InterceptorParserHander) onAnnotation;
                            InterceptorProcessorParser interceptorProcessorParser = InstanceUtils
                                    .newInstance(handler.parserHander());

                            // 调用InterceptorProcessorParser.parse()解析拦截方法生成InterceptorProcessor对象
                            InterceptorProcessor interceptorProcessor = interceptorProcessorParser.parse(method,
                                    onMethodAnnotation);
                            result.add(interceptorProcessor);
                        }
                    }
                }
            }

        };

        //枚举拦截器的所有方法
        ReflectionUtils.doWithMethods(clazz, methodCallback);

        return result;
    }
}
结合下面的@AtEnter注解进行理解:
@Documented
@Retention(RetentionPolicy.RUNTIME)
@java.lang.annotation.Target(ElementType.METHOD)
// parserHander属性指定本注解的Parser类为EnterInterceptorProcessorParser.class
@InterceptorParserHander(parserHander = EnterInterceptorProcessorParser.class)
public @interface AtEnter {
    boolean inline() default true;

    Class<? extends Throwable> suppress() default None.class;

    Class<?> suppressHandler() default Void.class;

    class EnterInterceptorProcessorParser implements InterceptorProcessorParser {

        @Override
        public InterceptorProcessor parse(Method method, Annotation annotationOnMethod) {

   // 创建本注解的LocationMatcher实例:EnterLocationMatcher
            LocationMatcher locationMatcher = new EnterLocationMatcher();

   // 创建 InterceptorProcessor
            AtEnter atEnter = (AtEnter) annotationOnMethod;

            return InterceptorParserUtils.createInterceptorProcessor(method,
                    locationMatcher,
                    atEnter.inline(),
                    atEnter.suppress(),
                    atEnter.suppressHandler());

        }

    }
}
@Binding.Xxx解析过程与@AtXxx注解类似,这里不再展开说明。
核心处理逻辑
上一小节主要讲解Interceptor class的解析过程,本小节主要是讲解ByteKit怎么实现字节码增强的核心逻辑。InterceptorProcessor.process() 的字节码处理核心逻辑如下:
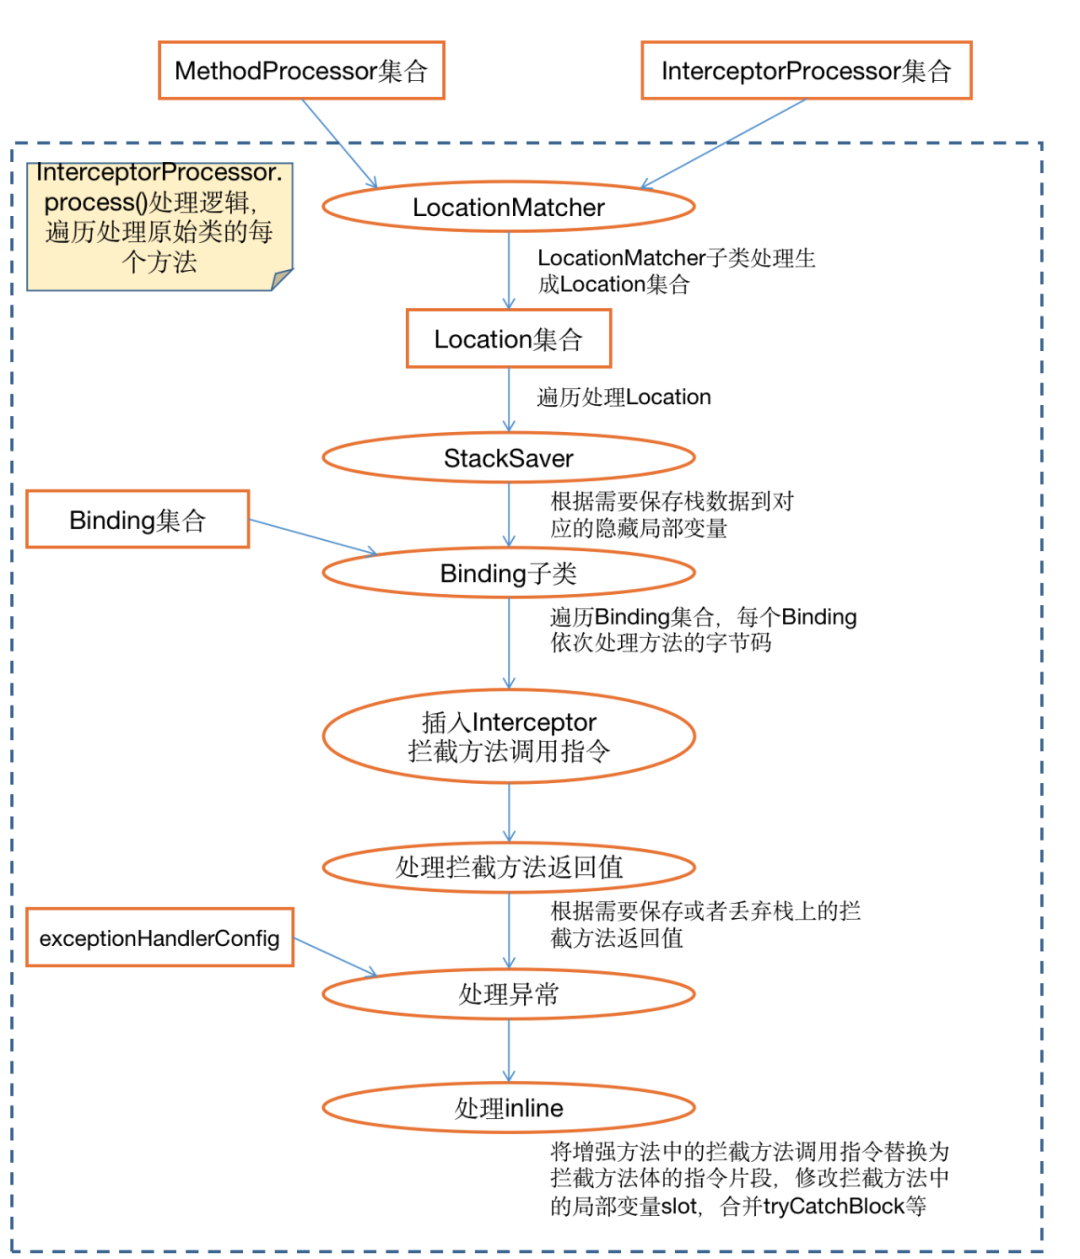
此方法为最主要的字节码处理逻辑,这里涉及到ByteKit核心的几个字节码处理类:
MethodProcessor 实例是原始方法封装对象,可以理解为原材料; 各种LocationMatcher、Binding子类可以理解为各种配件; InterceptorProcessor 实例可以理解为某个拦截方法的套件工具,对MethodProcessor进行处理后即完成了这个拦截方法的字节码增强;
每个InterceptorProcessor实例的处理过程:
通过LocationMatcher计算得到Location集合; 遍历Location集合进行处理; 根据需要使用StackSaver保存当前栈数据到隐藏变量,某些Binding会从隐藏变量加载数据; 遍历处理Binding集合,本拦截方法的每个@Binding.Xxx参数都需要依次处理; 插入拦截方法调用指令,如SampleInterceptor.atEnter(); 根据需要处理拦截方法的返回值,支持使用拦截方法返回值替换修改原方法return值或者丢弃多余的拦截方法返回值; 拦截方法的supress异常处理; 如果拦截方法注解配置 inline=true,则展开拦截方法的内容,替换掉前面(5)插入的拦截方法调用指令;处理下一个Location;
LocationMatcher/Location 的魔力
学习ByteKit框架时,一直有一个问题困扰着我:
LocationMatcher/Location 这个是什么?与@AtXxx注解有什么关系?
单从字面理解LocationMatcher/Location有困难,那么我们顺着ByteKit处理字节码的思路来推导一下。
ByteKit 处理流程与传统asm ClassVisitor不同:
ClassVisitor是在遍历原始方法指令时修改插入新增的指令; ByteKit是遍历Interceptor拦截方法,将每个拦截方法的增强逻辑应用于原始方法上;
两者指令定位的差异:
ClassVisitor在visitXxx方法中进行判断是否遇到期望的指令,如方法调用指令、return指令等; ByteKit也需要定位每个拦截方法的开始指令,这个就是通过LocationMatcher来实现;
ByteKit 指令定位过程
1.解析Interceptor class生成定位规则
预处理解析Interceptor class时,没有Target class的信息,不可能产生Target class相关的字节码数据,所以此时ByteKit 生成了LocationMatcher实例和Binding实例。Binding是参数绑定的规则,LocationMatcher则是指令定位规则。 不同的拦截注解 @AtXxx的定位规则不同,所以会有对应的LocationMatcher子类;
2.通过定位规则计算定位点
LocationMatcher 对MethodProcessor实例计算处理后,生成Location实例集合。Location 即指令定位点,记录了当前拦截方法指令处理的 开始指令。这里体现了asm指令列表InsnList的双向链表的妙处,通过某个指令可以很方便地前或者往后遍历或者插入新的指令,即使这个指令前后多次修改插入其它指令,仍然可以正确定位!
问题答案:LocationMatcher 为拦截方法@AtXxx注解的定位规则,Location 为具体的指令定位点。
LocationMatcher分析
1.EnterLocationMatcher 将原始方法体开始的第一条有效指令enterInsnNode封装为EnterLocation。
public class EnterLocationMatcher implements LocationMatcher {

    @Override
    public List<Location> match(MethodProcessor methodProcessor) {
        List<Location> locations = new ArrayList<Location>();
        AbstractInsnNode enterInsnNode = methodProcessor.getEnterInsnNode();

        LocationFilter locationFilter = methodProcessor.getLocationFilter();
        if (locationFilter.allow(enterInsnNode, LocationType.ENTER, true)) {
            EnterLocation enterLocation = new EnterLocation(enterInsnNode);
            locations.add(enterLocation);
        }
        return locations;
    }
}
2.ExitLocationMatcher
一个LocationMatcher可能计算产生多个Location实例,比如@AtExit的ExitLocationMatcher 会查找到原始方法中所有return指令,为每个return指令生成一个ExitLocation。
public class ExitLocationMatcher implements LocationMatcher {

    @Override
    public List<Location> match(MethodProcessor methodProcessor) {
        List<Location> locations = new ArrayList<Location>();
        AbstractInsnNode insnNode = methodProcessor.getEnterInsnNode();

        while (insnNode != null) {
            if (insnNode instanceof InsnNode) {
                InsnNode node = (InsnNode) insnNode;
                // 判断是否某种return指令
                if (matchExit(node)) {
                    LocationFilter locationFilter = methodProcessor.getLocationFilter();
                    // 检查是否为允许的Location,主要是防止重复增强字节码
                    if (locationFilter.allow(node, LocationType.EXIT, false)) {
                    // 创建Location
                        ExitLocation ExitLocation = new ExitLocation(node);
                        locations.add(ExitLocation);
                    }
                }
            }
            insnNode = insnNode.getNext();
        }

        return locations;
    }

    public boolean matchExit(InsnNode node) {
        switch (node.getOpcode()) {
        case Opcodes.RETURN: // empty stack
        case Opcodes.IRETURN: // 1 before n/a after
        case Opcodes.FRETURN: // 1 before n/a after
        case Opcodes.ARETURN: // 1 before n/a after
        case Opcodes.LRETURN: // 2 before n/a after
        case Opcodes.DRETURN: // 2 before n/a after
            return true;
        }
        return false;
    }
}
@Binding 原理介绍
SampleInterceptor中通过@Binding.MethodName String methodName 绑定了方法名参数,在运行时这个methodName参数就真的被填充了数据,我们来看一下到底是怎么实现这个呢?
public class MethodNameBinding extends Binding {

 @Override
 public void pushOntoStack(InsnList instructions, BindingContext bindingContext) {
  MethodProcessor methodProcessor = bindingContext.getMethodProcessor();
  AsmOpUtils.ldc(instructions, methodProcessor.getMethodNode().name);
 }

 @Override
 public Type getType(BindingContext bindingContext) {
  return Type.getType(String.class);
 }

}
这个MethodNameBinding实现逻辑挺简单的,插入一条ldc method_name 指令就搞定了。
反编译的代码,第4个参数"hello"即是方法名称:
SampleInterceptor.atEnter(this, Sample.class, new Object[]{str, new Boolean(exception)}, "hello", "(Ljava/lang/String;Z)Ljava/lang/String;");
javap -v 查看字节码:
23: ldc           #25                 // String hello
25: ldc           #26                 // String (Ljava/lang/String;Z)Ljava/lang/String;
27: invokestatic  #32                 // Method com/example/SampleInterceptor.atEnter:(Ljava/lang/Object;Ljava/lang/Object;[Ljava/lang/Object;Ljava/lang/String;Ljava/lang/String;)V
这里涉及到方法调用指令invokestatic的使用方法:
Description: calls a static method
”
n is the number of arguments to the method
the long method name is really a path name, the name of the class, the parenthesized argument list of the method called, and the return type.
Primitive types are represented by their capitalized first letter, ie I for an integer.
Constructors are path followed by()V
Stack
| Before | After |
|---|---|
| arg n | returned value |
| ... | |
| arg 1 |
invokestatic 用于调用静态方法,将方法的参数从左至右依次压入栈,调用静态方法时将全部参数弹出栈,然后将方法的返回值重新放入栈顶。
第23行 ldc #25 // String hello 的作用是加载常量表Constant pool中的#25常量压入栈,这个常量就是字符串"hello"。下面是常量表:
Constant pool:
  #1 = Utf8               com/example/Sample
  #2 = Class              #1             // com/example/Sample
  ...
  #16 = Utf8               hello
  #17 = Utf8               (Ljava/lang/String;Z)Ljava/lang/String;
  ...
  #25 = String             #16            // hello
  #26 = String             #17            // (Ljava/lang/String;Z)Ljava/lang/String;
简单来说,在调用SampleInterceptor.atEnter拦截方法前,需要将它的参数依次入栈,调用拦截方法前的参数准备工作由Binding类完成,即Binding的作用就是将绑定参数的值依序放入栈中。
下面介绍几种不同类型的参数绑定处理方式:
@Binding.MethodName String methodName这个绑定参数方法名为常量值,直接从常量表加载入栈即可。@Binding.Args Object[] args这个绑定参数为拦截的目标方法的调用参数,则需要从方法的局部变量表LocalVariableTable中加载,并构造一个Object[]数组对象入栈,具体实现逻辑请查看《Arthas ByteKit 深度解读(2):本地变量及参数绑定》。@Binding.InvokeArgs Object[] invokeArgs这个绑定参数为目标方法中调用其它方法的参数列表,绑定的处理更加复杂,需要创建StackSaver处理栈数据保存及恢复。大概的处理流程:在调用某个方法前将当前栈数据保存起来,然后调用拦截方法,拦截方法返回之后需要恢复栈数据,最后调用原来的方法。
总结
本文介绍了Arthas ByteKit字节码框架的基本原理,通过Interceptor class/@AtXxx注解/@Binding.Xxx注解等组件简化了Java class字节码增强的编码逻辑,不需要编写Java字节码级别的处理代码,大幅降低使用门槛。各种组件职责清晰,搭配使用灵活性高,可以满足类似APM/Spy诊断等场景下的应用需要。
— 本文结束 —

关注我,回复 「加群」 加入各种主题讨论群。
对「服务端思维」有期待,请在文末点个在看
喜欢这篇文章,欢迎转发、分享朋友圈