
源码分享《SpringBean生命周期》
共 14780字,需浏览 30分钟
· 2021-08-25
今日主题:Spring Bean的生命周期的分析和说明
使用场景:
1.项目启动做一些业务化的操作
2.项目停止的时候做一些业务化的操作
3.面试官会问你,SpringBena的生命周期了解吗
其实SpringBean的生命周期其实只有四个部分
Bean的实例化
Bean的初始化
Bean的使用
Bean的销毁
知识储备
接下来我们一起看几个Spring提供的接口(源码中的所有英文注释全部留着了,大家可以看看Spring自身对其的描述,不同人可能会有不同的想法吧)
1.BeanNameAware只有一个方法setBeanName,这个方法主要是让Bean自身知道定义的Bean的名称,有之前接触过使用XML配置spring bean的同学,就应该知道,这个就是bean的id属性;实现这个接口,我们的Bean就可以知道自身注册在容器中的名称
public interface BeanNameAware extends Aware {/*** Set the name of the bean in the bean factory that created this bean.* <p>Invoked after population of normal bean properties but before an* init callback such as {@link InitializingBean#afterPropertiesSet()}* or a custom init-method.* @param name the name of the bean in the factory.* Note that this name is the actual bean name used in the factory, which may* differ from the originally specified name: in particular for inner bean* names, the actual bean name might have been made unique through appending* "#..." suffixes. Use the {@link BeanFactoryUtils#originalBeanName(String)}* method to extract the original bean name (without suffix), if desired.*/void setBeanName(String name);}
2.BeanFactoryAware也是只有一个方法setBeanFactory,这个方法主要是让Bean获取到容器的内部信息,从而进行某些定制化的操作
public interface BeanFactoryAware extends Aware {/*** Callback that supplies the owning factory to a bean instance.* <p>Invoked after the population of normal bean properties* but before an initialization callback such as* {@link InitializingBean#afterPropertiesSet()} or a custom init-method.* @param beanFactory owning BeanFactory (never {@code null}).* The bean can immediately call methods on the factory.* @throws BeansException in case of initialization errors* @see BeanInitializationException*/void setBeanFactory(BeanFactory beanFactory) throws BeansException;}
3.ApplicationContextAware也是只有一个方法setApplicationContext,该方法可以将ApplicationContext设置到Bean中,可以由此获取其他的bean。比如我们开发的时候,并不是说在每一个地方都能将属性注入到我们想要的地方去的,比如在Utils使用到dao,我们就不能直接注入了,这个时候就是我们需要封装springContext的时候了,而ApplicationContextAware就起了关键性的作用
public interface ApplicationContextAware extends Aware {/*** Set the ApplicationContext that this object runs in.* Normally this call will be used to initialize the object.* <p>Invoked after population of normal bean properties but before an init callback such* as {@link org.springframework.beans.factory.InitializingBean#afterPropertiesSet()}* or a custom init-method. Invoked after {@link ResourceLoaderAware#setResourceLoader},* {@link ApplicationEventPublisherAware#setApplicationEventPublisher} and* {@link MessageSourceAware}, if applicable.* @param applicationContext the ApplicationContext object to be used by this object* @throws ApplicationContextException in case of context initialization errors* @throws BeansException if thrown by application context methods* @see org.springframework.beans.factory.BeanInitializationException*/void setApplicationContext(ApplicationContext applicationContext) throws BeansException;}
4.BeanPostProcessor从字面上来说,就是Bean的后置处理器,就是在bean的生命周期内,对Bean进行一系列的操作,简单来说就是初始化之前操作Bean,初始化后在对于Bean进行操作
public interface BeanPostProcessor {/*** Apply this BeanPostProcessor to the given new bean instance <i>before</i> any bean* initialization callbacks (like InitializingBean's {@code afterPropertiesSet}* or a custom init-method). The bean will already be populated with property values.* The returned bean instance may be a wrapper around the original.* <p>The default implementation returns the given {@code bean} as-is.* @param bean the new bean instance* @param beanName the name of the bean* @return the bean instance to use, either the original or a wrapped one;* if {@code null}, no subsequent BeanPostProcessors will be invoked* @throws org.springframework.beans.BeansException in case of errors* @see org.springframework.beans.factory.InitializingBean#afterPropertiesSet*/default Object postProcessBeforeInitialization(Object bean, String beanName) throws BeansException {return bean;}/*** Apply this BeanPostProcessor to the given new bean instance <i>after</i> any bean* initialization callbacks (like InitializingBean's {@code afterPropertiesSet}* or a custom init-method). The bean will already be populated with property values.* The returned bean instance may be a wrapper around the original.* <p>In case of a FactoryBean, this callback will be invoked for both the FactoryBean* instance and the objects created by the FactoryBean (as of Spring 2.0). The* post-processor can decide whether to apply to either the FactoryBean or created* objects or both through corresponding {@code bean instanceof FactoryBean} checks.* <p>This callback will also be invoked after a short-circuiting triggered by a* {@link InstantiationAwareBeanPostProcessor#postProcessBeforeInstantiation} method,* in contrast to all other BeanPostProcessor callbacks.* <p>The default implementation returns the given {@code bean} as-is.* @param bean the new bean instance* @param beanName the name of the bean* @return the bean instance to use, either the original or a wrapped one;* if {@code null}, no subsequent BeanPostProcessors will be invoked* @throws org.springframework.beans.BeansException in case of errors* @see org.springframework.beans.factory.InitializingBean#afterPropertiesSet* @see org.springframework.beans.factory.FactoryBean*/default Object postProcessAfterInitialization(Object bean, String beanName) throws BeansException {return bean;}}
5.InitializingBean在当你通过sring容器生产出实现了该接口的类的实例后,它就会调用afterPropertiesSet方法,通过这个方法,你可以检查你的bean是否正确地被初始化了
public interface InitializingBean {/*** Invoked by the containing {@code BeanFactory} after it has set all bean properties* and satisfied {@link BeanFactoryAware}, {@code ApplicationContextAware} etc.* <p>This method allows the bean instance to perform validation of its overall* configuration and final initialization when all bean properties have been set.* @throws Exception in the event of misconfiguration (such as failure to set an* essential property) or if initialization fails for any other reason*/void afterPropertiesSet() throws Exception;}
Spring Bean生命周期图示
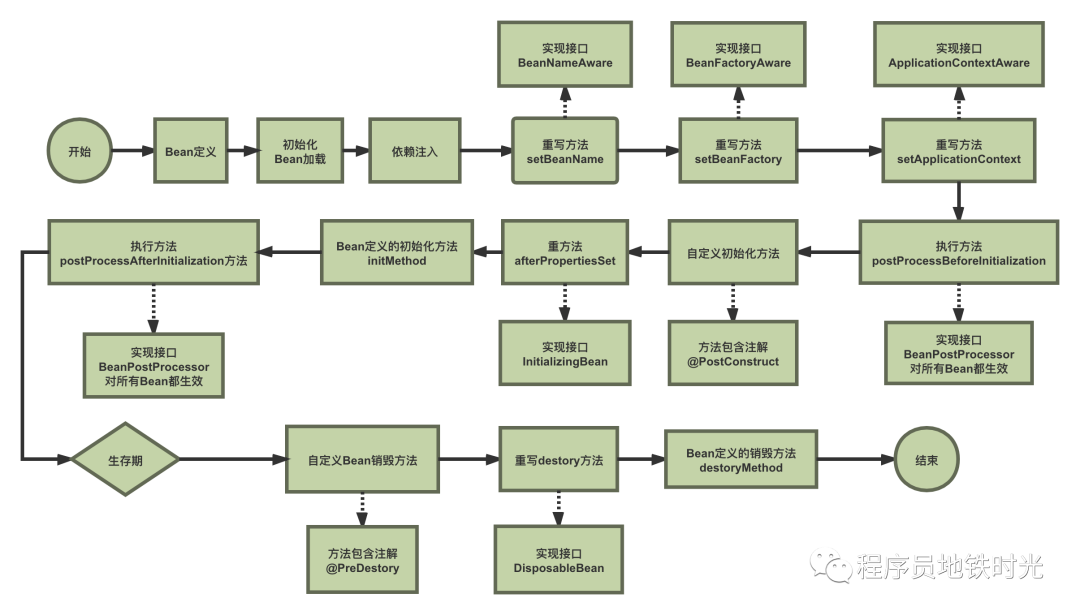 如图所示
如图所示
Bean初期涉及到Bean定义和初始化加载,初始化加载部分,可以查看另一篇文章
实现接口BeanNameAware,BeanFactoryAware,ApplicationContextAware来在Bean中使用Spring框架的一些对象属性。
实现接口BeanPostProcessor对于bean进行前置处理
调用bean的自定义方法(注解@PostConstruct方法)
实现InitializingBean方法
Bean定义的初始化方法init-method
实现接口BeanPostProcessor对于bean进行后置处理
生存期.....
调用bean的自定义方法(注解PreDestory方法)
实现接口DisposableBean重写destory方法
Bean定义的销毁方法destory-method
额外知识点
实现*Aware接口 在Bean中使用Spring框架的一些对象
有些时候我们需要在Bean的初始化中使用Spring框架自身的一些对象来执行一些操作,比如获取ServletContext的一些参数,获取ApplicaitionContext中的BeanDefinition的名字,获取Bean在容器中的名字等等。为了让Bean可以获取到框架自身的一些对象,Spring提供了一组名为*Aware的接口。
这些接口均继承于标记接口org.springframework.beans.factory.Aware,并提供一个将由Bean实现的set*方法,Spring通过基于setter的依赖注入方式使相应的对象可以被Bean使用
就此我们来说一下重要的Aware接口
ApplicationContextAware: 获得ApplicationContext对象,可以用来获取所有Bean definition的名字。
BeanFactoryAware:获得BeanFactory对象,可以用来检测Bean的作用域。
BeanNameAware:获得Bean在配置文件中定义的名字。
ResourceLoaderAware:获得ResourceLoader对象,可以获得classpath中某个文件。
ServletContextAware:在一个MVC应用中可以获取ServletContext对象,可以读取context中的参数。
ServletConfigAware在一个MVC应用中可以获取ServletConfig对象,可以读取config中的参数。
代码示例
1.新建一个SpringBoot项目

2示例代码如下:
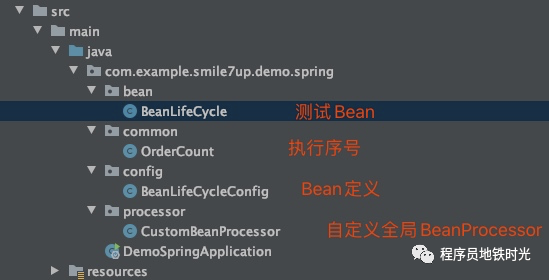
BeanLifeCycle.java
package com.example.smile7up.demo.spring.bean;import com.example.smile7up.demo.spring.common.OrderCount;import org.springframework.beans.BeansException;import org.springframework.beans.factory.*;import org.springframework.context.ApplicationContext;import org.springframework.context.ApplicationContextAware;import javax.annotation.PostConstruct;import javax.annotation.PreDestroy;/*** 2020/7/9** @author smile7up*/public class BeanLifeCycle implements InitializingBean, DisposableBean, BeanNameAware, BeanFactoryAware, ApplicationContextAware {public BeanLifeCycle() {int andIncrement = OrderCount.count.getAndIncrement();System.out.println(andIncrement+":调用Bean的构造器方法(constructor)");}public void setBeanName(String name) {int andIncrement = OrderCount.count.getAndIncrement();System.out.println(andIncrement+":获取定义的Bean的名称为:" + name);}public void setBeanFactory(BeanFactory beanFactory) throws BeansException {int andIncrement = OrderCount.count.getAndIncrement();System.out.println(andIncrement+":获取定义的Bean所在的BeanFactory" + beanFactory.getClass().getSimpleName());}public void setApplicationContext(ApplicationContext applicationContext) throws BeansException {int andIncrement = OrderCount.count.getAndIncrement();System.out.println(andIncrement+":获取定义的Bean所在的ApplicationContext,为" + applicationContext.getClass().getSimpleName());}public void postConstruct() {int andIncrement = OrderCount.count.getAndIncrement();System.out.println(andIncrement+":调用Bean的函数:方法包含注解@PostConstruct");}public void afterPropertiesSet() throws Exception {int andIncrement = OrderCount.count.getAndIncrement();System.out.println(andIncrement+":调用Bean的函数实现接口InitializingBean,重写方法afterPropertiesSet)");}public void initMethod() {int andIncrement = OrderCount.count.getAndIncrement();System.out.println(andIncrement+":调用Bean的定义的时候声明的initMethod");}public void preDestroy() {int andIncrement = OrderCount.count.getAndIncrement();System.out.println(andIncrement+":调用Bean的函数:方法包含注解@PreDestroy");}public void destroy() throws Exception {int andIncrement = OrderCount.count.getAndIncrement();System.out.println(andIncrement+":调用Bean的函数实现接口DisposableBean,重写方法destory");}public void destroyMethod() {int andIncrement = OrderCount.count.getAndIncrement();System.out.println(andIncrement+":调用Bean的定义的时候声明的destroyMethod)");}}
OrderCount.java
package com.example.smile7up.demo.spring.common;import lombok.Getter;import java.util.concurrent.atomic.AtomicInteger;/*** 2020/7/9** @author smile7up*/public class OrderCount {public static AtomicInteger count = new AtomicInteger(0);}
BeanLifeCycleConfig.java
package com.example.smile7up.demo.spring.config;import com.example.smile7up.demo.spring.bean.BeanLifeCycle;import org.springframework.context.annotation.Bean;import org.springframework.context.annotation.Configuration;/*** 2020/7/9** @author smile7up*/@Configurationpublic class BeanLifeCycleConfig {@Bean(name = "testBeanName",initMethod = "initMethod", destroyMethod = "destroyMethod")public BeanLifeCycle beanLifeCycle() {return new BeanLifeCycle();}}
CustomBeanProcessor.java
package com.example.smile7up.demo.spring.processor;import com.example.smile7up.demo.spring.bean.BeanLifeCycle;import com.example.smile7up.demo.spring.common.OrderCount;import org.springframework.beans.BeansException;import org.springframework.beans.factory.config.BeanPostProcessor;import org.springframework.stereotype.Component;/*** 2020/7/9** @author smile7up*/@Componentpublic class CustomBeanProcessor implements BeanPostProcessor {@Overridepublic Object postProcessBeforeInitialization(Object bean, String beanName) throws BeansException {if (bean.getClass() == BeanLifeCycle.class) {int andIncrement = OrderCount.count.getAndIncrement();System.out.println(andIncrement + ":调用方法postProcessBeforeInitialization...");}return bean;}@Overridepublic Object postProcessAfterInitialization(Object bean, String beanName) throws BeansException {if (bean.getClass() == BeanLifeCycle.class) {int andIncrement = OrderCount.count.getAndIncrement();System.out.println(andIncrement + ":调用方法postProcessAfterInitialization...");}return bean;}}
执行结果如下
2020-07-15 14:13:36.988 INFO 20923 --- [ main] c.e.s.demo.spring.DemoSpringApplication : Starting DemoSpringApplication on liuzuolongdeMacBook-Pro.local with PID 20923 (/Users/liuzuolong/project/smile_show_project/demo-spring/target/classes started by liuzuolong in /Users/liuzuolong/project/smile_show_project/demo-spring)2020-07-15 14:13:36.990 INFO 20923 --- [ main] c.e.s.demo.spring.DemoSpringApplication : No active profile set, falling back to default profiles: default2020-07-15 14:13:37.741 INFO 20923 --- [ main] o.s.b.w.embedded.tomcat.TomcatWebServer : Tomcat initialized with port(s): 8081 (http)2020-07-15 14:13:37.758 INFO 20923 --- [ main] o.apache.catalina.core.StandardService : Starting service [Tomcat]2020-07-15 14:13:37.758 INFO 20923 --- [ main] org.apache.catalina.core.StandardEngine : Starting Servlet engine: [Apache Tomcat/9.0.21]2020-07-15 14:13:37.821 INFO 20923 --- [ main] o.a.c.c.C.[Tomcat].[localhost].[/] : Initializing Spring embedded WebApplicationContext2020-07-15 14:13:37.822 INFO 20923 --- [ main] o.s.web.context.ContextLoader : Root WebApplicationContext: initialization completed in 790 ms0:调用Bean的构造器方法(constructor)1:获取定义的Bean的名称为:testBeanName2:获取定义的Bean所在的BeanFactoryDefaultListableBeanFactory3:获取定义的Bean所在的ApplicationContext,为AnnotationConfigServletWebServerApplicationContext4:调用方法postProcessBeforeInitialization...5:调用Bean的函数:方法包含注解6:调用Bean的函数实现接口InitializingBean,重写方法afterPropertiesSet)7:调用Bean的定义的时候声明的initMethod8:调用方法postProcessAfterInitialization...2020-07-15 14:13:37.965 INFO 20923 --- [ main] o.s.s.concurrent.ThreadPoolTaskExecutor : Initializing ExecutorService 'applicationTaskExecutor'2020-07-15 14:13:38.107 INFO 20923 --- [ main] o.s.b.w.embedded.tomcat.TomcatWebServer : Tomcat started on port(s): 8081 (http) with context path ''2020-07-15 14:13:38.110 INFO 20923 --- [ main] c.e.s.demo.spring.DemoSpringApplication : Started DemoSpringApplication in 1.42 seconds (JVM running for 2.479)Disconnected from the target VM, address: '127.0.0.1:64381', transport: 'socket'2020-07-15 14:13:42.260 INFO 20923 --- [ Thread-5] o.s.s.concurrent.ThreadPoolTaskExecutor : Shutting down ExecutorService 'applicationTaskExecutor'9:调用Bean的函数:方法包含注解10:调用Bean的函数实现接口DisposableBean,重写方法destory11:调用Bean的定义的时候声明的destroyMethod)
经过今天的学习,我们可以大致的了解了Spring Bean的生命周期,这样对以后我们在写技术代码的时候,可以知道什么时候,实现什么方法,同样也为我们后续的源码分析研究打下基础