
杂谈 : 聊一聊NIO
共 16808字,需浏览 34分钟
· 2021-07-31
一 . 前言
NIO 是老生常谈了 , 由于最近准备开 Netty 的新坑了 , 不再局限于使用 , 初期先把前置的知识点回顾一下
二 . NIO 的概念
2.1 NIO 是什么 ?
NIO 可以从2个维度说 ,它既可以是一种设计模型 ,也可以说是 Java 中的一个包 (NIO 包是在 java1.4中引入的).
IO 是计算机与其他部分之间的接口 , IO 可以分为多种 : BIO ,NIO , AIO
NIO 模型
2.2 NIO , AIO , BIO 的区别
BIO : 基于流( Stream ) 的阻塞 IO , 也是我们最常见的 IO
NIO : 通过 Selector 实现的基于缓冲区 (Buffer) 的非阻塞式 IO
AIO : 在 NIO 基础上引入了异步的概念
IO 流向和特点:
BIO : 基于 Stream , 单向流转
NIO : 基于 Channel , 双向流通

// PS : Stream 流的特点
- 每次处理一个字节的数据。输入流产生一个字节的数据,输出流消耗一个字节的数据
- 为流式数据创建过滤器非常容易 , 可以方便的创建过滤器链
- 流程更加简洁 , 容易处理复杂的逻辑 , 相对教慢

// PS : NIO的特点
- 事件驱动模型、单线程处理多任务、非阻塞 I/O 、IO 多路复用
- 每个操作在一个步骤中生成或消耗一个数据块
- 基于 block(Buffer) 的传输比基于流的传输更高效
- IO 函数 zero-copy
- 流程相对更复杂


复制代码
PS : 这里的单线程处理是指只会在一个线程里面通过 selector 来处理逻辑 , 然后由 select 指定具体的 Handler
线程的模式
BIO :一个连接一个线程,客户端的连接请求时服务器端就需要启动一个线程进行处理
NIO :一个请求一个线程,客户端的连接请求都会注册到多路复用器上 , 多路复用轮询到该请求时创建线程
AIO : 一个请求一个线程, 在创建线程时 , 会创建异步线程
复制代码
2.3 NIO 的组成部分
Channel s and Buffer s , 是 NIO 的中心对象,几乎用于每一个 I/O 操作 .
Channels : 频道
Channel 是一个对象,可以从中读取数据并向其写入数据
类似于 Stream , 去任何地方(或来自任何地方)的数据都必须通过 Channel 对象
数据可以从 channel 写入buffers ,也可以从 buffers 读取到 channels , channels 的 读写均为单向
通道中的数据总是要先读到一个Buffer,或者总是要从一个Buffer中写入
通道可以异步地读写
Buffers : 缓冲区
Buffer 是一个 Java 对象
缓冲区本质上是一个数组 , 通常是字节数组 , 也可以是其他数组
缓冲区提供对数据的结构化访问,并且跟踪系统的读/写进程。
发送到通道的所有数据必须首先放置在缓冲区中; 同样,从通道读取的任何数据都被读入缓冲区
Selectors :
Selector允许单线程处理多个 Channel , 当打开了多个连接(通道),但每个连接的流量都很低,使用Selector就会很方便 .
要使用Selector,得向Selector注册Channel,然后调用它的select()方法。
这个方法会一直阻塞到某个注册的通道有事件就绪。
一旦这个方法返回,线程就可以处理这些事件,事件的例子有如新连接进来,数据接收
2.4 Channel 的主要实现
Channel的类型 :
FileChannel --- 从文件中读写数据
DatagramChannel --- 能通过UDP读写网络中的数据
SocketChannel --- 能通过TCP读写网络中的数据
ServerSocketChannel --- 可以监听新进来的TCP连接,像Web服务器那样

2.5 Buffer 的主要实现
Buffer 的主要实现 : ByteBuffer / CharBuffer / DoubleBuffer / FloatBuffer / IntBuffer / LongBuffer / ShortBuffer
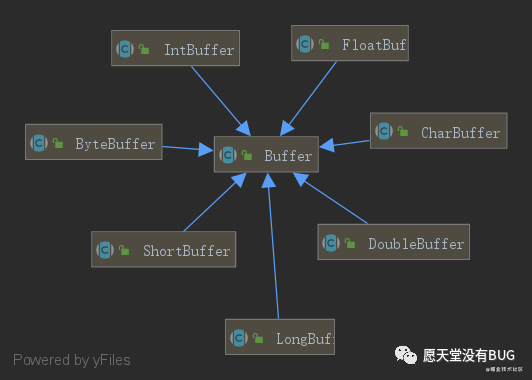
每个 Buffer 类都是 Buffer 接口的一个实例。除了 ByteBuffer 之外(基础对象),每一个都具有完全相同的操作,只是所处理的数据类型不同。
Buffer 方法简述
- array() : 返回返回该缓冲区的数组
- arrayOffset() : 返回该缓冲区第一个元素在该缓冲区的支持数组中的偏移量
- capacity() : 返回该缓冲区的容量

- clear() : 清除这个缓冲区
    - clear : position将被设回0,limit被设置成 capacity的值

- flip() : 翻转这个缓冲区
    - 将Buffer从写模式切换到读模式。调用flip()方法会将position设回0,并将limit设置成之前position的值

- hasArray() : 指示该缓冲区是否由可访问数组支持
- hasRemaining() : 告诉当前位置和极限之间是否有任何元素
- isReadOnly() : 只读
- limit() : 返回该缓冲区的限制
- limit(int newLimit)
- mark() : 将该缓冲区的标记设置在其位置 , 与 reset() 配合使用
- position() : 返回缓冲区的位置
- position(int newPosition)
- remaining() : 返回当前位置和限制之间的元素数
- reset() : 将该缓冲区的位置重置为先前标记的位置

- rewind() : 倒带这个缓冲区
    - Buffer.rewind()将position设回0,所以你可以重读Buffer中的所有数据。
    - limit保持不变,仍然表示能从Buffer中读取多少个元素


// 补充 : mark()与reset()方法
- 通过调用Buffer.mark()方法,可以标记Buffer中的一个特定position。
- 通过调用Buffer.reset()方法恢复到这个position

复制代码
要点 :
当向buffer写入数据时,buffer会记录下写了多少数据。
一旦要读取数据,需要通过flip()方法将Buffer从写模式切换到读模式。
在读模式下,可以读取之前写入到buffer的所有数据
读取完成后 需要清空缓存区 , 任何未读的数据都被移到缓冲区的起始处,新写入的数据将放到缓冲区未读数据的后面 , 此时可以使用如下方法
clear() : 清空整个缓存区
compact() : 清除已经读过的数据
capacity,position 和 limit 三属性
- capacity (总容量)
作为一个内存块,Buffer有一个固定的大小值,也叫“capacity”.你只能往里写capacity个byte、long,char等类型
- position(指针当前位置)
当你写数据到Buffer中时,position表示当前的位置。初始的position值为0
当将Buffer从写模式切换到读模式,position会被重置为0 当从Buffer的position处读取数据时,position向前移动到下一个可读的位置
- limit (读/写边界位置)
在写模式下,Buffer的limit表示你最多能往Buffer里写多少数据。写模式下,limit等于Buffer的capacity
当切换Buffer到读模式时, limit表示你最多能读到多少数据
- mark
用于记录当前 position 的前一个位置或者默认是 0在实际操作数据时它们有如下关系图
参考自 @ 一文让你彻底理解 Java NIO 核心组件 - SegmentFault 思否
在对Buffer进行读/写的过程中,position会往后移动,而 limit 就是 position 移动的边界。
在对Buffer进行写入操作时,limit应当设置为capacity的大小
对Buffer进行读取操作时,limit应当设置为数据的实际结束位置
2.6 Select 的主要实现
三 . Java NIO 使用
3.1 一个 NIO 的简单案例
File 读取
//**使用 buffer 步骤**
1. 写入数据到Buffer
2. 调用flip()方法
3. 从Buffer中读取数据
4. 调用clear()方法或者compact()方法


public void templateRead() throws Exception {

    logger.info("------> Step 1 : 开启基本案例 , 从 Stream 转换为  <-------");
    FileInputStream fin = new FileInputStream("src/main/resources/data/data.txt");
    FileChannel fc = fin.getChannel();


    logger.info("------> Step 2 : 构建一个缓冲区 <-------");
    ByteBuffer buffer = ByteBuffer.allocate(1024);

    logger.info("------> Step 3 : 从缓冲区读取数据 <-------");
    int bytesRead = fc.read(buffer);
    System.out.println("buffer = " + buffer);

    logger.info("------> Step 4: 单个字符读取 <-------");
    while (bytesRead != -1) {
        buffer.flip();  //缓冲区准备读取
        while (buffer.hasRemaining()) {
            System.out.print((char) buffer.get());// 每次读取一个字节
        }
        buffer.clear(); //准备缓冲区写入

        // 可以通过屏蔽该语句看效果
        bytesRead = fc.read(buffer);
    }

    fin.close();

}

复制代码
File 写入
 public void templateWrite() throws Exception {

    logger.info("------> Step 1 : 开启基本案例 , 从 Stream 转换为  <-------");
    RandomAccessFile randomAccessFile = new RandomAccessFile("src/main/resources/data/data2.txt", "rw");

    FileChannel fc = randomAccessFile.getChannel();


    logger.info("------> Step 2 : 构建一个缓冲区 <-------");
    ByteBuffer buffer = ByteBuffer.allocate(1024);
    byte[] message = new String("Hello World !").getBytes();
    for (int i = 0; i < message.length; ++i) {
        buffer.put(message[i]);
    }
    buffer.flip();

    logger.info("------> Step 3 : 往缓冲区写数据 <-------");
    fc.write(buffer);

}
复制代码
3.2 scatter/gather 概念
scatter/gather用于描述从Channel 中读取或者写入到Channel的操作
分散(scatter)从Channel中读取是指在读操作时将读取的数据写入多个buffer中
Channel将从Channel中读取的数据“分散(scatter)”到多个Buffer中
聚集(gather)写入Channel是指在写操作时将多个buffer的数据写入同一个Channelsc
Channel 将多个Buffer中的数据“聚集(gather)”后发送到Channel
// ------------------- Scattering Reads
ByteBuffer header = ByteBuffer.allocate(128);
ByteBuffer body   = ByteBuffer.allocate(1024);
ByteBuffer[] bufferArray = { header, body };
channel.read(bufferArray);

// Scattering Reads在移动下一个buffer前,必须填满当前的buffer
// 如果存在消息头和消息体,消息头必须完成填充

// ------------------- Scattering Reads
ByteBuffer header = ByteBuffer.allocate(128);
ByteBuffer body   = ByteBuffer.allocate(1024);
ByteBuffer[] bufferArray = { header, body };
channel.write(bufferArray);
复制代码
3.2 数据传输
在Java NIO中,如果两个通道中有一个是FileChannel,那你可以直接将数据从一个channel传输到另外一个channel
3.2.1 transferFrom 将数据从源通道传输到FileChannel中
RandomAccessFile fromFile = new RandomAccessFile("fromFile.txt", "rw");
FileChannel fromChannel = fromFile.getChannel();

toChannel.transferFrom(position, count, fromChannel);

// 输入参数position表示从position处开始向目标文件写入数据,count表示最多传输的字节
复制代码
3.2.2 transferTo() 将数据从FileChannel传输到其他的channel中
RandomAccessFile toFile = new RandomAccessFile("toFile.txt", "rw");
FileChannel toChannel = toFile.getChannel();

fromChannel.transferTo(position, count, toChannel);
复制代码
3.3 Selector
Selector(选择器) 是Java NIO中能够检测一到多个NIO通道,并能够知晓通道是否为诸如读写事件做好准备的组件。
这样,一个单独的线程可以管理多个channel,从而管理多个网络连接
仅用单个线程来处理多个Channels的好处是,只需要更少的线程来处理通道
3.3.1 Selector 的 创建
// 创建 selector
Selector selector = Selector.open();

// 向Selector注册通道
channel.configureBlocking(false);
SelectionKey key = channel.register(selector,Selectionkey.OP_READ);
// 此处是通过位运算达到配置类型的定义 ,在多线程中也能频繁看到
// -- Connect -- SelectionKey.OP_CONNECT --- 0100 -- 连接成功
// -- Accept -- SelectionKey.OP_ACCEPT --- 1000 -- 有可以接受的连接
// -- Read -- SelectionKey.OP_READ -- 0001 -- 有数据可读
// -- Write -- SelectionKey.OP_WRITE --- 0010 -- 可以写入数据了

// ---- SelectionKey 是 注册后返回的 key
// 其中包含属性 :interest集合 、ready集合、Channel、Selector、附加的对象(可选)
复制代码
3.3.2 ServerSocketChannel
/**
 * 构建一个简单的 SockChannel
 * @throws Exception
 */
private void createSocketServer() throws Exception {

    ServerSocketChannel serverSocketChannel = ServerSocketChannel.open();

    serverSocketChannel.socket().bind(new InetSocketAddress(9999));

    while (true) {
        SocketChannel socketChannel = serverSocketChannel.accept();
        //do something with socketChannel...
    }

}

/**
 * 常用方法
 * @throws Exception
 */
private void other() throws Exception {
    // --> 打开 ServerSocketChannel
    ServerSocketChannel serverSocketChannel = ServerSocketChannel.open();


    // --> 关闭 ServerSocketChannel
    serverSocketChannel.close();

    // --> 监听新进来的连接
    SocketChannel socketChannel = serverSocketChannel.accept();
}

/**
 * 非阻塞模式
 * @throws Exception
 */
private void async() throws Exception {
    // ServerSocketChannel可以
    ServerSocketChannel serverSocketChannel = ServerSocketChannel.open();
    serverSocketChannel.socket().bind(new InetSocketAddress(9999));
    // 设置成非阻塞模式
    serverSocketChannel.configureBlocking(false);
    while (true) {
        // 此时accept() 方法会立刻返回,如果还没有新进来的连接,返回的将是null
        SocketChannel socketChannel = serverSocketChannel.accept();
        if (socketChannel != null) {
            //do something with socketChannel...
        }
    }
}
复制代码
3.3.3 SocketChannel
Java NIO中的SocketChannel是一个连接到TCP网络套接字的通道
创建 SocketChannel 2 种方式 :
打开一个SocketChannel并连接到互联网上的某台服务器
一个新连接到达ServerSocketChannel时,会创建一个SocketChannel
// --> 打开 SocketChannel
SocketChannel socketChannel = SocketChannel.open();
socketChannel.connect(new InetSocketAddress("jenkov.com", 80));

// --> 关闭 SocketChannel
socketChannel.close();

// --> 从 SocketChannel 读取数据
ByteBuffer buf = ByteBuffer.allocate(48);
int bytesRead = socketChannel.read(buf);

// --> 写入 SocketChannel
String newData = "New String to write to file..." + System.currentTimeMillis();
ByteBuffer buf = ByteBuffer.allocate(48);
buf.clear();
buf.put(newData.getBytes());
buf.flip();
while(buf.hasRemaining()) {
    channel.write(buf);
}

// --> 非阻塞模式 , 非阻塞情况下 , write 会提前返回 ,需要循环调用
socketChannel.configureBlocking(false);

// --> write()
// --> read()
复制代码
3.3.4 FileChannel
通过使用一个InputStream、OutputStream或RandomAccessFile来获取一个FileChannel实例
从FileChannel读取数据 :
首先,准备一个Buffer
然后,调用FileChannel.read()方法 ,该方法将数据从FileChannel读取到Buffer中
RandomAccessFile aFile = new RandomAccessFile("data/local-data.txt", "rw");
FileChannel inChannel = aFile.getChannel();


// 返回-1,表示到了文件末尾
ByteBuffer buf = ByteBuffer.allocate(48);
int bytesRead = inChannel.read(buf);

// 向FileChannel写数据
String newData = "New String to write to file..." + System.currentTimeMillis();
ByteBuffer buf = ByteBuffer.allocate(48);
buf.clear();
buf.put(newData.getBytes());
buf.flip();
while(buf.hasRemaining()) {
    channel.write(buf);
}

// 关闭FileChannel
channel.close();

// position 获取filechannel 的当前位置 ,末尾为 -1
long pos = channel.position();
channel.position(pos +123);

// FileChannel的size方法 , 返回该实例所关联文件的大小
long fileSize = channel.size();

// 可以使用FileChannel.truncate()方法截取一个文件
channel.truncate(1024);

// FileChannel.force()方法将通道里尚未写入磁盘的数据强制写到磁盘上
// force()方法有一个boolean类型的参数,指明是否同时将文件元数据(权限信息等)写到磁盘上
channel.force(true);
复制代码
3.3.5 一个 Selector 的完整使用
该段代码参考至 Java NIO原理 图文分析及代码实现 , 写的很清楚 , 代码复制下来可以直接用 , 建议试试
public void startLogin() {

    logger.info("------> 进入服务端逻辑 <-------");

    try {
        initServer(8000);
        listen();
    } catch (Exception e) {
        logger.error("E----> error :{} -- content :{}", e.getClass(), e.getMessage());
    }

}


//通道管理器
private Selector selector;

/**
 * 获得一个ServerSocket通道,并对该通道做一些初始化的工作
 *
 * @param port 绑定的端口号
 * @throws IOException
 */
public void initServer(int port) throws IOException {

    // Step 1 : 获得一个ServerSocket通道
    ServerSocketChannel serverChannel = ServerSocketChannel.open();
    // 设置通道为非阻塞
    serverChannel.configureBlocking(false);

    // Step 2 : 为 ServerSocket 绑定 port端口
    serverChannel.socket().bind(new InetSocketAddress(port));

    // Step 3 : 此处开始使用 , 获得一个通道管理器
    this.selector = Selector.open();

    //将通道管理器和该通道绑定,并为该通道注册SelectionKey.OP_ACCEPT事件,注册该事件后,
    //当该事件到达时,selector.select()会返回,如果该事件没到达selector.select()会一直阻塞。
    serverChannel.register(selector, SelectionKey.OP_ACCEPT);
}

/**
 * 采用轮询的方式监听selector上是否有需要处理的事件,如果有,则进行处理
 *
 * @throws IOException
 */
@SuppressWarnings("unchecked")
public void listen() throws IOException {
    System.out.println("服务端启动成功!");
    // 轮询访问selector
    while (true) {
        //当注册的事件到达时,方法返回;否则,该方法会一直阻塞
        selector.select();
        // 获得selector中选中的项的迭代器,选中的项为注册的事件
        Iterator ite = this.selector.selectedKeys().iterator();
        while (ite.hasNext()) {
            SelectionKey key = (SelectionKey) ite.next();
            // 删除已选的key,以防重复处理
            ite.remove();
            // 客户端请求连接事件
            if (key.isAcceptable()) {
                ServerSocketChannel server = (ServerSocketChannel) key
                        .channel();
                // 获得和客户端连接的通道
                SocketChannel channel = server.accept();
                // 设置成非阻塞
                channel.configureBlocking(false);

                //在这里可以给客户端发送信息哦
                channel.write(ByteBuffer.wrap(new String("向客户端发送了一条信息").getBytes()));
                //在和客户端连接成功之后,为了可以接收到客户端的信息,需要给通道设置读的权限。
                channel.register(this.selector, SelectionKey.OP_READ);

                // 获得了可读的事件
            } else if (key.isReadable()) {
                read(key);
            }

        }

    }
}

/**
 * 处理读取客户端发来的信息 的事件
 *
 * @param key
 * @throws IOException
 */
public void read(SelectionKey key) throws IOException {
    // 服务器可读取消息:得到事件发生的Socket通道
    SocketChannel channel = (SocketChannel) key.channel();
    // 创建读取的缓冲区
    ByteBuffer buffer = ByteBuffer.allocate(10);
    channel.read(buffer);
    byte[] data = buffer.array();
    String msg = new String(data).trim();
    System.out.println("服务端收到信息:" + msg);
    ByteBuffer outBuffer = ByteBuffer.wrap(msg.getBytes());
    channel.write(outBuffer);// 将消息回送给客户端
}
复制代码
附上客户端逻辑
public void startLogin() {

    logger.info("------> 进入客户端逻辑 <-------");

    try {
        initClient("localhost", 8000);
        listen();
    } catch (Exception e) {
        logger.error("E----> error :{} -- content :{}", e.getClass(), e.getMessage());
    }

}

//通道管理器
private Selector selector;

/**
 * 获得一个Socket通道,并对该通道做一些初始化的工作
 *
 * @param ip   连接的服务器的ip
 * @param port 连接的服务器的端口号
 * @throws IOException
 */
public void initClient(String ip, int port) throws IOException {
    // 获得一个Socket通道
    SocketChannel channel = SocketChannel.open();
    // 设置通道为非阻塞
    channel.configureBlocking(false);
    // 获得一个通道管理器
    this.selector = Selector.open();

    // 客户端连接服务器,其实方法执行并没有实现连接,需要在listen()方法中调
    //用channel.finishConnect();才能完成连接
    channel.connect(new InetSocketAddress(ip, port));
    //将通道管理器和该通道绑定,并为该通道注册SelectionKey.OP_CONNECT事件。
    channel.register(selector, SelectionKey.OP_CONNECT);
}

/**
 * 采用轮询的方式监听selector上是否有需要处理的事件,如果有,则进行处理
 *
 * @throws IOException
 */
@SuppressWarnings("unchecked")
public void listen() throws IOException {
    // 轮询访问selector
    while (true) {
        selector.select();
        // 获得selector中选中的项的迭代器
        Iterator ite = this.selector.selectedKeys().iterator();
        while (ite.hasNext()) {
            SelectionKey key = (SelectionKey) ite.next();
            // 删除已选的key,以防重复处理
            ite.remove();
            // 连接事件发生
            if (key.isConnectable()) {
                SocketChannel channel = (SocketChannel) key
                        .channel();
                // 如果正在连接,则完成连接
                if (channel.isConnectionPending()) {
                    channel.finishConnect();

                }
                // 设置成非阻塞
                channel.configureBlocking(false);

                //在这里可以给服务端发送信息哦
                channel.write(ByteBuffer.wrap(new String("向服务端发送了一条信息").getBytes()));
                //在和服务端连接成功之后,为了可以接收到服务端的信息,需要给通道设置读的权限。
                channel.register(this.selector, SelectionKey.OP_READ);

                // 获得了可读的事件
            } else if (key.isReadable()) {
                read(key);
            }

        }

    }
}

/**
 * 处理读取服务端发来的信息 的事件
 *
 * @param key
 * @throws IOException
 */
public void read(SelectionKey key) throws IOException {
    //和服务端的read方法一样
}
复制代码
3.3.6 AIO Demo
参考 JAVA中BIO、NIO、AIO的分析理解-阿里云开发者社区 (aliyun.com) , 这个文档里面把三种类型都通过 Demo 的形式展现 , 非常清晰
截取几段 AIO 核心代码 :
public void init() {
    // 创建处理线程池
    group = AsynchronousChannelGroup.withCachedThreadPool(Executors.newCachedThreadPool(), 5);
    // 创建服务channel
    serverSocketChannel = AsynchronousServerSocketChannel.open(group);
    // 丙丁端口
    serverSocketChannel.bind(new InetSocketAddress(port));
}
复制代码
五 . NIO 性能分析
TODO : 性能分析当然是要做的 , 后续补上 , 见谅
六 . NIO 的其他用法
6.1 Java NIO Pipe 用法
Pipe有一个source通道和一个sink通道。数据会被写到sink通道,从source通道读取
// > 开启管道
Pipe pipe = Pipe.open();

// > 向管道写数据
Pipe.SinkChannel sinkChannel = pipe.sink();

// > 写入数据
String newData = "New String to write to file..." + System.currentTimeMillis();
ByteBuffer buf = ByteBuffer.allocate(48);
buf.clear();
buf.put(newData.getBytes());

buf.flip();

while(buf.hasRemaining()) {
    sinkChannel.write(buf);
}

// > 读取数据
// 1 访问 source通道
Pipe.SourceChannel sourceChannel = pipe.source();
// 2 调用source通道的read()方法
ByteBuffer buf = ByteBuffer.allocate(48);
int bytesRead = sourceChannel.read(buf);
复制代码
七 .深入学习
@ Getting started with new I/O (NIO) – IBM Developer
@ Java NIO - Quick Guide - Tutorialspoint
总结 :
之前一直对这些概念没有系统的了解 ,这里算是补上了
整个学习的过程中陆陆续续发现了很多优秀的博客 ,从中也学习到了很多东西 , 这里全部放在参考文档中了
另外 , 学习 Java NIO 只是为了了解概念 ,Netty 的 NIO 中大量代码是自己原生定制的 , 解决了很多原本Java NIO 的问题
参考文档 :
Getting started with new I/O (NIO) – IBM Developer
Java NIO 教程(七) FileChannel - 简书 (jianshu.com)
Java NIO原理 图文分析及代码实现 - 逸情公子 - ITeye博客
JAVA中BIO、NIO、AIO的分析理解-阿里云开发者社区 (aliyun.com)
作者:AntBlack
链接:https://juejin.cn/post/6988884927525683230
来源:掘金
著作权归作者所有。商业转载请联系作者获得授权,非商业转载请注明出处。