 前端劝退师
前端劝退师


写在开头
近期尤雨溪发布了5kb的petite-vue,好奇的我,clone了他的源码,给大家解析一波。 最近由于工作事情多,所以放缓了原创的脚步!大家谅解 想看我往期手写源码+各种源码解析的可以关注我公众号看我的 GitHub,基本上前端的框架源码都有解析过
正式开始
petite-vue是只有5kb的vue,我们先找到仓库,克隆下来
https://github.com/vuejs/petite-vue
克隆下来后发现,用的是vite + petite-vue + 多页面形式启动的
启动命令:
git clone https://github.com/vuejs/petite-vue
cd /petite-vue
npm i
npm run dev
然后打开 http://localhost:3000/即可看到页面:
保姆式教学
项目已经启动了,接下来我们先解析下项目入口,由于使用的构建工具是 vite,从根目录下的index.html人口找起:
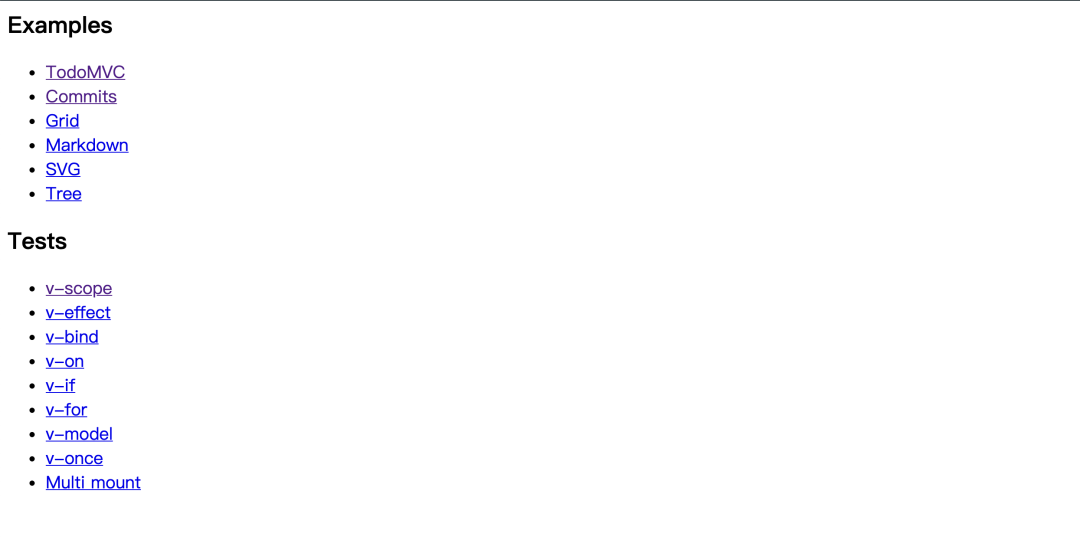
<h2>Examples</h2>
<ul>
  <li><a href="/examples/todomvc.html">TodoMVC</a></li>
  <li><a href="/examples/commits.html">Commits</a></li>
  <li><a href="/examples/grid.html">Grid</a></li>
  <li><a href="/examples/markdown.html">Markdown</a></li>
  <li><a href="/examples/svg.html">SVG</a></li>
  <li><a href="/examples/tree.html">Tree</a></li>
</ul>

<h2>Tests</h2>
<ul>
  <li><a href="/tests/scope.html">v-scope</a></li>
  <li><a href="/tests/effect.html">v-effect</a></li>
  <li><a href="/tests/bind.html">v-bind</a></li>
  <li><a href="/tests/on.html">v-on</a></li>
  <li><a href="/tests/if.html">v-if</a></li>
  <li><a href="/tests/for.html">v-for</a></li>
  <li><a href="/tests/model.html">v-model</a></li>
  <li><a href="/tests/once.html">v-once</a></li>
  <li><a href="/tests/multi-mount.html">Multi mount</a></li>
</ul>

<style>
  a {
    font-size: 18px;
  }
</style>
这就是多页面模式+vue+vite的一个演示项目,我们找到一个简单的演示页 commits:
<script type="module">
  import { createApp, reactive } from '../src'

  const API_URL = `https://api.github.com/repos/vuejs/vue-next/commits?per_page=3&sha=`

  createApp({
    branches: ['master', 'v2-compat'],
    currentBranch: 'master',
    commits: null,

    truncate(v) {
      const newline = v.indexOf('\n')
      return newline > 0 ? v.slice(0, newline) : v
    },

    formatDate(v) {
      return v.replace(/T|Z/g, ' ')
    },

    fetchData() {
      fetch(`${API_URL}${this.currentBranch}`)
        .then((res) => res.json())
        .then((data) => {
          this.commits = data
        })
    }
  }).mount()
</script>

<div v-scope v-effect="fetchData()">
  <h1>Latest Vue.js Commits</h1>
  <template v-for="branch in branches">
    <input
      type="radio"
      :id="branch"
      :value="branch"
      name="branch"
      v-model="currentBranch"
    />
    <label :for="branch">{{ branch }}</label>
  </template>
  <p>vuejs/vue@{{ currentBranch }}</p>
  <ul>
    <li v-for="{ html_url, sha, author, commit } in commits">
      <a :href="html_url" target="_blank" class="commit"
        >{{ sha.slice(0, 7) }}</a
      >
      - <span class="message">{{ truncate(commit.message) }}</span><br />
      by
      <span class="author"
        ><a :href="author.html_url" target="_blank"
          >{{ commit.author.name }}</a
        ></span
      >
      at <span class="date">{{ formatDate(commit.author.date) }}</span>
    </li>
  </ul>
</div>

<style>
  body {
    font-family: 'Helvetica', Arial, sans-serif;
  }
  a {
    text-decoration: none;
    color: #f66;
  }
  li {
    line-height: 1.5em;
    margin-bottom: 20px;
  }
  .author, .date {
    font-weight: bold;
  }
</style>
可以看到页面顶部引入了
import { createApp, reactive } from '../src'
开始从源码启动函数入手
启动函数为 createApp,找到源码:
//index.ts
export { createApp } from './app'
...
import { createApp } from './app'

let s
if ((s = document.currentScript) && s.hasAttribute('init')) {
  createApp().mount()
}
Document.currentScript 属性返回当前正在运行的脚本所属的
<script>元素。调用此属性的脚本不能是 JavaScript 模块,模块应当使用 import.meta 对象。
上面这段代码意思是,创建
s变量记录当前运行的脚本元素,如果存在制定属性init,那么就调用createApp和mount方法.但是这里项目里面是主动调用了暴露的
createApp方法,我们去看看createApp这个方法的源码,有大概80行代码
import { reactive } from '@vue/reactivity'
import { Block } from './block'
import { Directive } from './directives'
import { createContext } from './context'
import { toDisplayString } from './directives/text'
import { nextTick } from './scheduler'

export default function createApp(initialData?: any){
...
}
createApp方法接收一个初始数据,可以是任意类型,也可以不传。这个方法是入口函数,依赖的函数也比较多,我们要静下心来。这个函数进来就搞了一堆东西
createApp(initialData?: any){
   // root context
  const ctx = createContext()
  if (initialData) {
    ctx.scope = reactive(initialData)
  }

  // global internal helpers
  ctx.scope.$s = toDisplayString
  ctx.scope.$nextTick = nextTick
  ctx.scope.$refs = Object.create(null)

  let rootBlocks: Block[]

}
上面这段代码,是创建了一个ctx上下文对象,并且给它上面赋予了很多属性和方法。然后提供给createApp返回的对象使用 createContext创建上下文:
export const createContext = (parent?: Context): Context => {
  const ctx: Context = {
    ...parent,
    scope: parent ? parent.scope : reactive({}),
    dirs: parent ? parent.dirs : {},
    effects: [],
    blocks: [],
    cleanups: [],
    effect: (fn) => {
      if (inOnce) {
        queueJob(fn)
        return fn as any
      }
      const e: ReactiveEffect = rawEffect(fn, {
        scheduler: () => queueJob(e)
      })
      ctx.effects.push(e)
      return e
    }
  }
  return ctx
}
根据传入的父对象,做一个简单的继承,然后返回一个新的 ctx对象。
我一开始差点掉进误区,我写这篇文章,是想让大家明白简单的
vue原理,像上次我写的掘金编辑器源码解析,写得太细,太累了。这次简化下,让大家都能懂,上面这些东西不重要。这个createApp函数返回了一个对象:
return {
  directive(name: string, def?: Directive) {
      if (def) {
        ctx.dirs[name] = def
        return this
      } else {
        return ctx.dirs[name]
      }
    },
mount(el?: string | Element | null){}...,
unmount(){}...
}
对象上有三个方法,例如
directive指令就会用到ctx的属性和方法。所以上面一开始搞一大堆东西挂载到ctx上,是为了给下面的方法使用重点看
mount方法:
     mount(el?: string | Element | null) {
     if (typeof el === 'string') {
        el = document.querySelector(el)
        if (!el) {
          import.meta.env.DEV &&
            console.error(`selector ${el} has no matching element.`)
          return
        }
      }
     ...

     }
首先会判断如果传入的是string,那么就回去找这个节点,否则就会找 document
el = el || document.documentElement
定义 roots,一个节点数组
let roots: Element[]
     if (el.hasAttribute('v-scope')) {
       roots = [el]
     } else {
       roots = [...el.querySelectorAll(`[v-scope]`)].filter(
         (root) => !root.matches(`[v-scope] [v-scope]`)
       )
     }
     if (!roots.length) {
       roots = [el]
     }
如果有 v-scope这个属性,就把el存入数组中,赋值给roots,否则就要去这个el下面找到所以的带v-scope属性的节点,然后筛选出这些带v-scope属性下面的不带v-scope属性的节点,塞入roots数组
此时如果
roots还是为空,那么就把el放进去。这里在开发模式下有个警告:Mounting on documentElement - this is non-optimal as petite-vue,意思是用document不是最佳选择。
在把 roots处理完毕后,开始行动。
  rootBlocks = roots.map((el) => new Block(el, ctx, true))
      // remove all v-cloak after mount
      ;[el, ...el.querySelectorAll(`[v-cloak]`)].forEach((el) =>
        el.removeAttribute('v-cloak')
      )
这个 Block构造函数是重点,将节点和上下文传入以后,外面就只是去除掉'v-cloak'属性,这个mount函数就调用结束了,那么怎么原理就隐藏在Block里面。
这里带着一个问题,我们目前仅仅拿到了
el这个dom节点,但是vue里面都是模板语法,那些模板语法是怎么转化成真的dom呢?
Block原来不是一个函数,而是一个class.
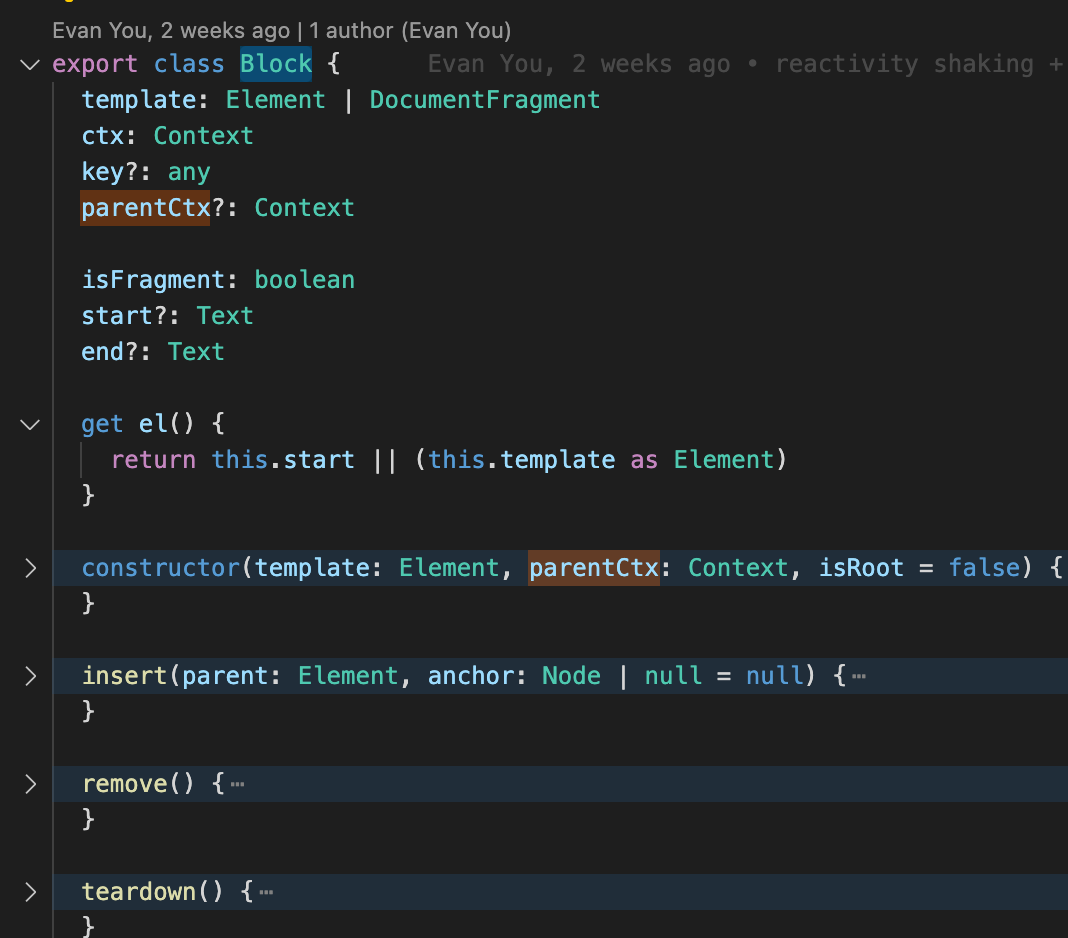
在constructor构造函数中可以看到
  constructor(template: Element, parentCtx: Context, isRoot = false) {
    this.isFragment = template instanceof HTMLTemplateElement

    if (isRoot) {
      this.template = template
    } else if (this.isFragment) {
      this.template = (template as HTMLTemplateElement).content.cloneNode(
        true
      ) as DocumentFragment
    } else {
      this.template = template.cloneNode(true) as Element
    }

    if (isRoot) {
      this.ctx = parentCtx
    } else {
      // create child context
      this.parentCtx = parentCtx
      parentCtx.blocks.push(this)
      this.ctx = createContext(parentCtx)
    }

    walk(this.template, this.ctx)
  }
以上代码可以分为三个逻辑 创建模板 template(使用clone节点的方式,由于dom节点获取到以后是一个对象,所以做了一层clone)如果不是根节点就递归式的继承 ctx上下文在处理完ctx和Template后,调用 walk函数walk函数解析:

会先根据nodetype进行判断,然后做不同的处理
如果是一个
element节点,就要处理不同的指令,例如v-if
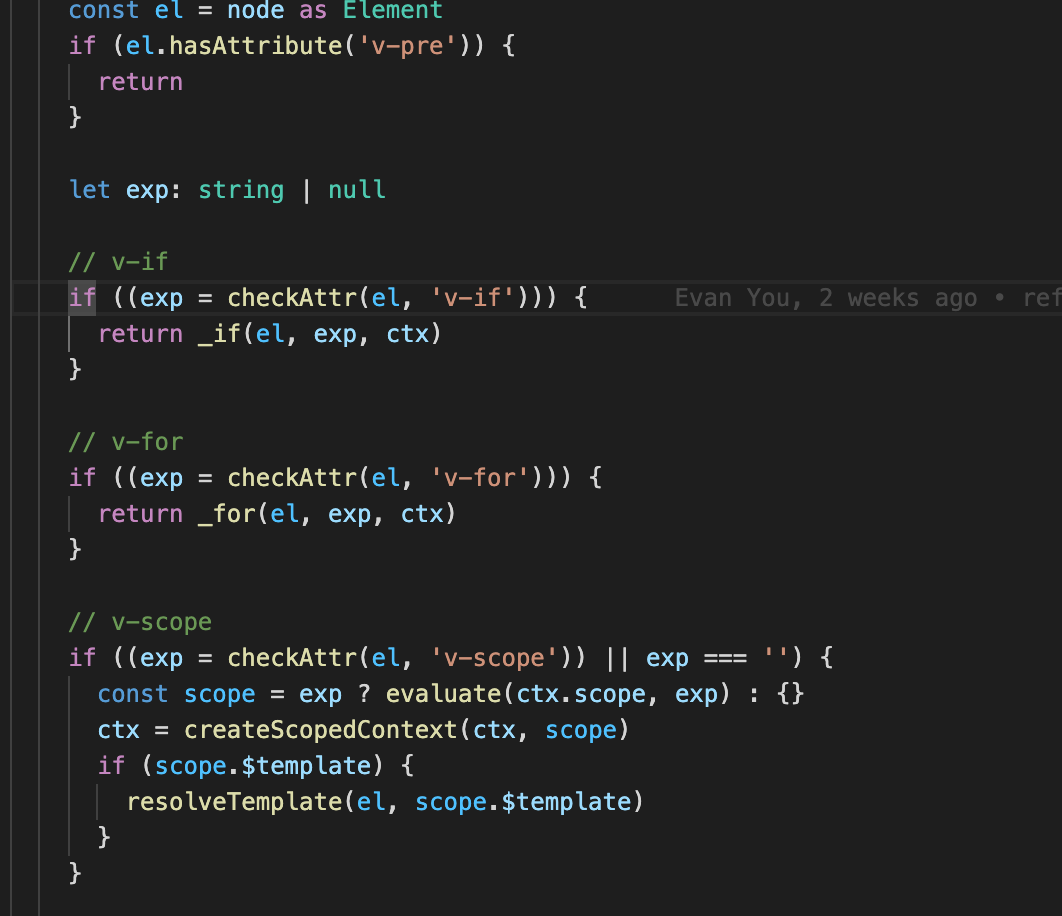
这里有一个工具函数要先看看
export const checkAttr = (el: Element, name: string): string | null => {
  const val = el.getAttribute(name)
  if (val != null) el.removeAttribute(name)
  return val
}
这个函数意思是检测下这个节点是否包含
v-xx的属性,然后返回这个结果并且删除这个属性拿
v-if举例,当判断这个节点有v-if属性后,那么就去调用方法处理它,并且删除掉这个属性(作为标识已经处理过了)
这里本了我想12点前睡觉的,别人告诉我只有5kb,我想着找个最简单的指令解析下,结果每个指令代码都有一百多行,今晚加班到九点多,刚把微前端改造的上了生产,还是想着坚持下给大家写完吧。现在已经凌晨了
v-if处理函数大概60行
export const _if = (el: Element, exp: string, ctx: Context) => {
...
}
首先_if函数先拿到el节点和exp这个v-if的值,以及ctx上下文对象
  if (import.meta.env.DEV && !exp.trim()) {
    console.warn(`v-if expression cannot be empty.`)
  }
如果为空的话报出警告 然后拿到el节点的父节点,并且根据这个exp的值创建一个comment注释节点(暂存)并且插入到el之前,同时创建一个branches数组,储存exp和el
 const parent = el.parentElement!
  const anchor = new Comment('v-if')
  parent.insertBefore(anchor, el)

  const branches: Branch[] = [
    {
      exp,
      el
    }
  ]

  // locate else branch
  let elseEl: Element | null
  let elseExp: string | null
Comment 接口代表标签(markup)之间的文本符号(textual notations)。尽管它通常不会显示出来,但是在查看源码时可以看到它们。在 HTML 和 XML 里,注释(Comments)为
'<!--' 和 '-->'之间的内容。在 XML 里,注释中不能出现字符序列 '--'。
接着创建 elseEl和elseExp的变量,并且循环遍历搜集了所有的else分支,并且存储在了branches里面
  while ((elseEl = el.nextElementSibling)) {
    elseExp = null
    if (
      checkAttr(elseEl, 'v-else') === '' ||
      (elseExp = checkAttr(elseEl, 'v-else-if'))
    ) {
      parent.removeChild(elseEl)
      branches.push({ exp: elseExp, el: elseEl })
    } else {
      break
    }
  }
这样Branches里面就有了v-if所有的分支啦,这里可以看成是一个树的遍历(广度优先搜索)
接下来根据副作用函数的触发,每次都去branches里面遍历寻找到需要激活的那个分支,将节点插入到parentNode中,并且返回nextNode即可实现 v-if的效果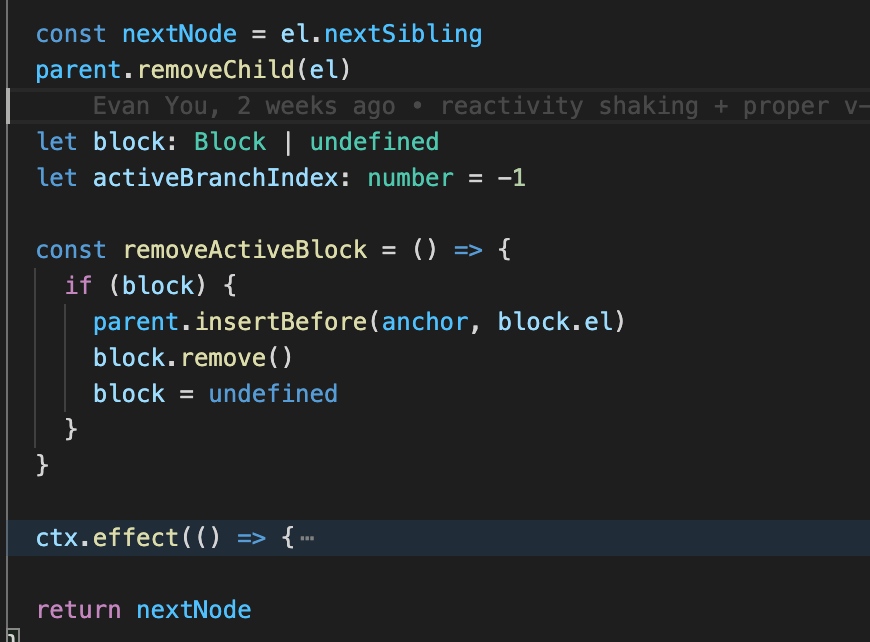
这里由于都是html,给我们省去了虚拟dom这些东西,可是上面仅仅是处理单个节点,如果是深层级的
dom节点,就要用到后面的深度优先搜索了
 // process children first before self attrs
    walkChildren(el, ctx)


const walkChildren = (node: Element | DocumentFragment, ctx: Context) => {
  let child = node.firstChild
  while (child) {
    child = walk(child, ctx) || child.nextSibling
  }
}
当节点上没有 v-if之类的属性时,这个时候就去取他们的第一个子节点去做上述的动作,匹配每个v-if v-for之类的指令
如果是文本节点
else if (type === 3) {
    // Text
    const data = (node as Text).data
    if (data.includes('{{')) {
      let segments: string[] = []
      let lastIndex = 0
      let match
      while ((match = interpolationRE.exec(data))) {
        const leading = data.slice(lastIndex, match.index)
        if (leading) segments.push(JSON.stringify(leading))
        segments.push(`$s(${match[1]})`)
        lastIndex = match.index + match[0].length
      }
      if (lastIndex < data.length) {
        segments.push(JSON.stringify(data.slice(lastIndex)))
      }
      applyDirective(node, text, segments.join('+'), ctx)
    }
这个地方很经典,是通过正则匹配,然后一系列操作匹配,最终返回了一个文本字符串。这个代码是挺精髓的,但是由于时间关系这里不细讲了
applyDirective函数
const applyDirective = (
  el: Node,
  dir: Directive<any>,
  exp: string,
  ctx: Context,
  arg?: string,
  modifiers?: Record<string, true>
) => {
  const get = (e = exp) => evaluate(ctx.scope, e, el)
  const cleanup = dir({
    el,
    get,
    effect: ctx.effect,
    ctx,
    exp,
    arg,
    modifiers
  })
  if (cleanup) {
    ctx.cleanups.push(cleanup)
  }
}
接下来 nodeType是11意味着是一个Fragment节点,那么直接从它的第一个子节点开始即可
} else if (type === 11) {
    walkChildren(node as DocumentFragment, ctx)
  }
nodeType 说 明
此属性只读且传回一个数值。
有效的数值符合以下的型别:
1-ELEMENT
2-ATTRIBUTE
3-TEXT
4-CDATA
5-ENTITY REFERENCE
6-ENTITY
7-PI (processing instruction)
8-COMMENT
9-DOCUMENT
10-DOCUMENT TYPE
11-DOCUMENT FRAGMENT
12-NOTATION
梳理总结
拉取代码 启动项目 找到入口createApp函数 定义ctx以及层层继承 发现block方法 根据节点是element还是text分开做处理 如果是text就去通过正则匹配,拿到数据返回字符串 如果是element就去做一个递归处理,解析所有的 v-if等模板语法,返回真实的节点
这里所有的dom节点改变,都是直接通过js操作dom
有趣的源码补充
这里的nextTick实现,是直接通过 promise.then
const p = Promise.resolve()

export const nextTick = (fn: () => void) => p.then(fn)
往期推荐

Vite 太快了,烦死了,是时候该小睡一会了。

如何实现比 setTimeout 快 80 倍的定时器?

万字长文!总结Vue 性能优化方式及原理

90 行代码的 webpack,你确定不学吗?
如果你觉得这篇内容对你挺有启发,我想邀请你帮我三个小忙:
点个「在看」,让更多的人也能看到这篇内容(喜欢不点在看,都是耍流氓 -_-)
欢迎加我微信「huab119」拉你进技术群,长期交流学习...
关注公众号「前端劝退师」,持续为你推送精选好文,也可以加我为好友,随时聊骚。


