 愿天堂没有BUG


一 .前言
上一篇聊过了 AOP 的初始化 , 了解了 AOP 是如何通过 PostProcess 完成 AOP 代理类的创建 ,
二 . AOP 创建起点
AOP 创建的
// 在 AbstractAutoProxyCreator # wrapIfNecessary 中 , 发起了 createProxy 流程用于创建代理类
 createProxy(bean.getClass(), beanName, specificInterceptors, new SingletonTargetSource(bean))

下面来看一下该逻辑中主要做了什么 :
复制代码
2.1 AbstractAutoProxyCreator 创建 Proxy 代理类
C- AbstractAutoProxyCreator
protected Object createProxy(Class<?> beanClass, @Nullable String beanName,
@Nullable Object[] specificInterceptors, TargetSource targetSource) {
if (this.beanFactory instanceof ConfigurableListableBeanFactory) {
AutoProxyUtils.exposeTargetClass((ConfigurableListableBeanFactory) this.beanFactory, beanName, beanClass);
}
// 构建一个 ProxyFactory
ProxyFactory proxyFactory = new ProxyFactory();
proxyFactory.copyFrom(this);
if (!proxyFactory.isProxyTargetClass()) {
if (shouldProxyTargetClass(beanClass, beanName)) {
proxyFactory.setProxyTargetClass(true);
} else {
evaluateProxyInterfaces(beanClass, proxyFactory);
}
}
// 构建通知者
Advisor[] advisors = buildAdvisors(beanName, specificInterceptors);
proxyFactory.addAdvisors(advisors);
proxyFactory.setTargetSource(targetSource);
customizeProxyFactory(proxyFactory);
proxyFactory.setFrozen(this.freezeProxy);
if (advisorsPreFiltered()) {
proxyFactory.setPreFiltered(true);
}
// 获取代理对象 -> 2.3 Aop 对象创建详情
// org.springframework.aop.framework.ProxyFactory
return proxyFactory.getProxy(getProxyClassLoader());
}
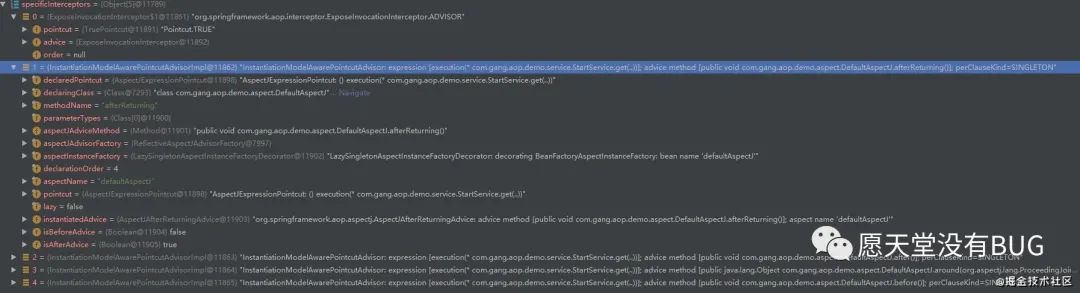
复制代码[PIC] : specificInterceptors 对象内容
[Pro] AutoProxyUtils 的作用
C- AutoProxyUtils : 自动代理的工具类
    M- shouldProxyTargetClass : 确定是否应该用目标类而不是接口代理给定bean
    M- determineTargetClass : 确定指定bean的原始目标类,否则返回到常规的getType查找
    M- exposeTargetClass : 公开指定bean的给定目标类
    M- isOriginalInstance : 根据 ORIGINAL_INSTANCE_SUFFIX 确定给定bean名是否指示“原始实例”

static void exposeTargetClass(
    ConfigurableListableBeanFactory beanFactory, @Nullable String beanName, Class<?> targetClass) {

    if (beanName != null && beanFactory.containsBeanDefinition(beanName)) {
        // ORIGINAL_TARGET_CLASS_ATTRIBUTE => org.springframework.aop.framework.autoproxy.AutoProxyUtils.originalTargetClass
        beanFactory.getMergedBeanDefinition(beanName).setAttribute(ORIGINAL_TARGET_CLASS_ATTRIBUTE, targetClass);
    }
}

// PS : 这里设置了 Attribute 属性 , 后面专门看一下该属性会在什么情况下使用 >>>


复制代码
[Pro] ProxyFactory 的作用
用于编程使用的AOP代理的工厂 , 该类提供了在定制用户代码中获取和配置AOP代理实例的简单方法
C- ProxyFactory
    MC- ProxyFactory() : 创建一个 ProxyFactory
    MC- ProxyFactory(Object target) : 创建时通过 target 设置 Target 和 Interfaces 属性
    MC- ProxyFactory(Class<?>... proxyInterfaces) : 没有目标,只有接口且必须添加拦截器
    MC- ProxyFactory(Class<?> proxyInterface, Interceptor interceptor) : 用于为单个拦截器创建代理的便利方法
    MC- ProxyFactory(Class<?> proxyInterface, TargetSource targetSource) :为指定的TargetSource创建一个ProxyFactory,使代理实现指定的接口
    M- getProxy() : 根据这个工厂的设置创建一个新的代理 , 可反复调用
    M- getProxy(@Nullable ClassLoader classLoader) :
    M- getProxy(Class<T> proxyInterface, Interceptor interceptor)
    M- getProxy(Class<T> proxyInterface, TargetSource targetSource)
    M- getProxy(TargetSource targetSource)

P- proxyInterface :
P- Interceptor :
P- TargetSource :

复制代码
[Pro] Advisor 作用
保存AOP通知(在连接点上要采取的动作)的基本接口和决定通知(如切入点)适用性的过滤器 , Advisor接口允许支持不同类型的通知,比如 Before Advice 和 After Advice

C- Advisor : 通知器
    M- getAdvice()
    M- isPerInstance()

// 这里说一说 Advisor 是什么时候调用的 >>>
复制代码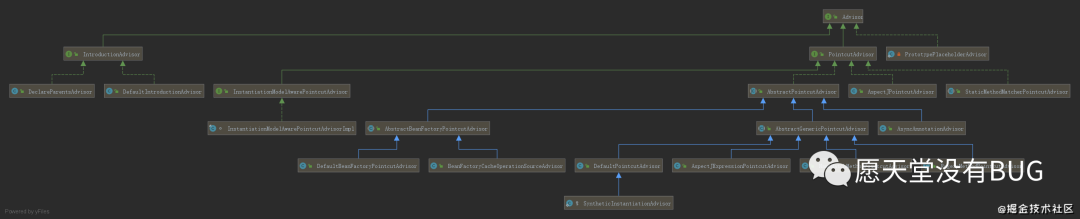
2.2 buildAdvisors 创建通知对象
C- AbstractAutoProxyCreator
protected Advisor[] buildAdvisors(@Nullable String beanName, @Nullable Object[] specificInterceptors) {
    // 2-2-1 : 将指定的拦截器名称解析为Advisor对象
    Advisor[] commonInterceptors = resolveInterceptorNames();

    List<Object> allInterceptors = new ArrayList<>();
    if (specificInterceptors != null) {
        allInterceptors.addAll(Arrays.asList(specificInterceptors));
        if (commonInterceptors.length > 0) {
            if (this.applyCommonInterceptorsFirst) {
                allInterceptors.addAll(0, Arrays.asList(commonInterceptors));
            } else {
                allInterceptors.addAll(Arrays.asList(commonInterceptors));
            }
        }
    }

    Advisor[] advisors = new Advisor[allInterceptors.size()];
    for (int i = 0; i < allInterceptors.size(); i++) {
            // 2-2-2 : 将指定的拦截器名称解析为Advisor对象
        advisors[i] = this.advisorAdapterRegistry.wrap(allInterceptors.get(i));
    }
    return advisors;
}


// 2-2-1 : 将指定的拦截器名称解析为Advisor对象
    private Advisor[] resolveInterceptorNames() {
        BeanFactory bf = this.beanFactory;
        ConfigurableBeanFactory cbf = (bf instanceof ConfigurableBeanFactory ? (ConfigurableBeanFactory) bf : null);
        List<Advisor> advisors = new ArrayList<>();
         // 获取通用 interceptor 对象 , 该对象可以 setInterceptorNames 设置
        for (String beanName : this.interceptorNames) {
            if (cbf == null || !cbf.isCurrentlyInCreation(beanName)) {
                Object next = bf.getBean(beanName);
                advisors.add(this.advisorAdapterRegistry.wrap(next));
            }
        }
        return advisors.toArray(new Advisor[0]);
    }


 // 2-2-2 : 将指定的拦截器名称解析为Advisor对象
C- DefaultAdvisorAdapterRegistry
public Advisor wrap(Object adviceObject) throws UnknownAdviceTypeException {
    if (adviceObject instanceof Advisor) {
        return (Advisor) adviceObject;
    }
    if (!(adviceObject instanceof Advice)) {
        throw new UnknownAdviceTypeException(adviceObject);
    }
    Advice advice = (Advice) adviceObject;
    if (advice instanceof MethodInterceptor) {
        // So well-known it doesn't even need an adapter.
        return new DefaultPointcutAdvisor(advice);
    }
    for (AdvisorAdapter adapter : this.adapters) {
        // Check that it is supported.
        if (adapter.supportsAdvice(advice)) {
            return new DefaultPointcutAdvisor(advice);
        }
    }
    throw new UnknownAdviceTypeException(advice);
}


复制代码
三 . Aop 代理类的创建流程
上一节通过 CreateProxy 发起了代理的创建 , 此节来说一下 ProxyFactory 的创建流程
Step 1 : 获取代理类主流程 => ProxyFactory
// 类结构 ===================
C- ProxyFactory
    E- ProxyCreatorSupport

public Object getProxy(@Nullable ClassLoader classLoader) {
    // createAopProxy() => org.springframework.aop.framework.ObjenesisCglibAopProxy
    return createAopProxy().getProxy(classLoader);
}

// ProxyCreatorSupport 是 ProxyFactory 的父类 , createAopProxy 会调用该类方法
protected final synchronized AopProxy createAopProxy() {
    if (!this.active) {
        // 激活代理配置
        activate();
    }
    // getAopProxyFactory() => org.springframework.aop.framework.DefaultAopProxyFactory
    return getAopProxyFactory().createAopProxy(this);
}


复制代码
Step 2 : AOP 代理工厂的选择
// Aop 基于 Proxy 代理 , 主要接口为 AopProxy , 而 AopProxy 的创建接口类为 AopProxyFactory ,
public interface AopProxyFactory {

    /**
     * 为给定的AOP配置创建一个AopProxy
     */
    AopProxy createAopProxy(AdvisedSupport config) throws AopConfigException;

}

// Aop 代理工厂默认为 DefaultAopProxyFactory
public AopProxy createAopProxy(AdvisedSupport config) throws AopConfigException {
    // config.isOptimize() : 返回代理是否应该执行主动优化
    // config.isProxyTargetClass() : 返回是否直接代理目标类以及任何接口
    // hasNoUserSuppliedProxyInterfaces(config) : 确定所提供的AdvisedSupport是否只指定了SpringProxy接口(或者根本没有指定代理接口)
    if (config.isOptimize() || config.isProxyTargetClass() || hasNoUserSuppliedProxyInterfaces(config)) {
        Class<?> targetClass = config.getTargetClass();
        if (targetClass == null) {
            throw new AopConfigException("TargetSource cannot determine target class: " +
                        "Either an interface or a target is required for proxy creation.");
        }
        if (targetClass.isInterface() || Proxy.isProxyClass(targetClass)) {
            return new JdkDynamicAopProxy(config);
        }
        return new ObjenesisCglibAopProxy(config);
    } else {
        return new JdkDynamicAopProxy(config);
    }
}


// PS : Spring 类默认会使用 JdkDynamicAopProxy , 自行定制的 AOP 类通常使用 CglibAopProxy

可以通过以下几种方式配置 :


// 方式一 : 构建 Bean 时可以通过配置切换 , 例如 :
@Configuration(proxyBeanMethods = false)
@ConditionalOnClass(ExecutableValidator.class)
@ConditionalOnResource(resources = "classpath:META-INF/services/javax.validation.spi.ValidationProvider")
@Import(PrimaryDefaultValidatorPostProcessor.class)
public class ValidationAutoConfiguration {

    @Bean
    @ConditionalOnMissingBean
    public static MethodValidationPostProcessor methodValidationPostProcessor(Environment environment,
            @Lazy Validator validator) {
        MethodValidationPostProcessor processor = new MethodValidationPostProcessor();
         // 设置代理目标对象
        boolean proxyTargetClass = environment.getProperty("spring.aop.proxy-target-class", Boolean.class, true);
        processor.setProxyTargetClass(proxyTargetClass);
        processor.setValidator(validator);
        return processor;
    }
}

// 方式二 : 配置 AOP 代理方式
1. 通过 EnableAspectJAutoProxy 配置
2. 通过属性 spring.aop.proxy-target-class 进行配置


复制代码
Step 3-1 : CglibAopProxy 创建代理类
C- CglibAopProxy
public Object getProxy(@Nullable ClassLoader classLoader) {

        try {
            Class<?> rootClass = this.advised.getTargetClass();

            Class<?> proxySuperClass = rootClass;
             // String CGLIB_CLASS_SEPARATOR = "$$";
             // 包含 $$
            if (rootClass.getName().contains(ClassUtils.CGLIB_CLASS_SEPARATOR)) {
                proxySuperClass = rootClass.getSuperclass();
                Class<?>[] additionalInterfaces = rootClass.getInterfaces();
                for (Class<?> additionalInterface : additionalInterfaces) {
                    this.advised.addInterface(additionalInterface);
                }
            }

            // 检查是否已经验证了所提供的Class,如果没有,则验证它
            validateClassIfNecessary(proxySuperClass, classLoader);

            // 配置 CGLIB 增强 -> RPO31001
            Enhancer enhancer = createEnhancer();
            if (classLoader != null) {
                enhancer.setClassLoader(classLoader);
                if (classLoader instanceof SmartClassLoader &&
                        ((SmartClassLoader) classLoader).isClassReloadable(proxySuperClass)) {
                    enhancer.setUseCache(false);
                }
            }
            enhancer.setSuperclass(proxySuperClass);
            enhancer.setInterfaces(AopProxyUtils.completeProxiedInterfaces(this.advised));
            enhancer.setNamingPolicy(SpringNamingPolicy.INSTANCE);
            enhancer.setStrategy(new ClassLoaderAwareGeneratorStrategy(classLoader));

            Callback[] callbacks = getCallbacks(rootClass);
            Class<?>[] types = new Class<?>[callbacks.length];
            for (int x = 0; x < types.length; x++) {
                types[x] = callbacks[x].getClass();
            }
            // fixedInterceptorMap only populated at this point, after getCallbacks call above
            enhancer.setCallbackFilter(new ProxyCallbackFilter(
                    this.advised.getConfigurationOnlyCopy(), this.fixedInterceptorMap, this.fixedInterceptorOffset));
            enhancer.setCallbackTypes(types);

            // 生成代理类并创建代理实例
            return createProxyClassAndInstance(enhancer, callbacks);
        }
        catch (CodeGenerationException | IllegalArgumentException ex) {
            throw new AopConfigException("Could not generate CGLIB subclass of " + this.advised.getTargetClass() +
                    ": Common causes of this problem include using a final class or a non-visible class",
                    ex);
        }
        catch (Throwable ex) {
            // TargetSource.getTarget() failed
            throw new AopConfigException("Unexpected AOP exception", ex);
        }
}


protected Object createProxyClassAndInstance(Enhancer enhancer, Callback[] callbacks) {
    enhancer.setInterceptDuringConstruction(false);
    enhancer.setCallbacks(callbacks);
    // 通过是否存在构造参数分别创建
    return (this.constructorArgs != null && this.constructorArgTypes != null ?
        enhancer.create(this.constructorArgTypes, this.constructorArgs) :
        enhancer.create());
}

// RPO31001 补充 : Enhancer 的作用

通常我们常见的代理方式是通过 Proxy 类 , 而 Enhancer 也是一个方法代理类 , Proxy是基于接口的方式进行代理,Enhancer是基于继承的方式代理


复制代码
Step 3-2 : JdkDynamicAopProxy
// JdkDynamicAopProxy 构建代理类
public Object getProxy(@Nullable ClassLoader classLoader) {
    Class<?>[] proxiedInterfaces = AopProxyUtils.completeProxiedInterfaces(this.advised, true);
    findDefinedEqualsAndHashCodeMethods(proxiedInterfaces);
    // 创建代理类
    return Proxy.newProxyInstance(classLoader, proxiedInterfaces, this);
}
复制代码
AopProxy 代理体系
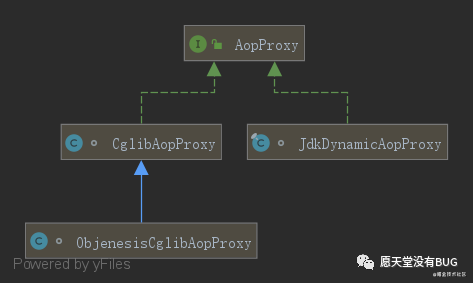
Spring 中的代理类通常有 2个类 : CglibAopProxy / JdkDynamicAopProxy

// [Pro] : 如何切换 AopProxy 代理类型

复制代码
四 . 要点深入
4.1 ORIGINAL_TARGET_CLASS_ATTRIBUTE 属性的使用
// Step 1 : AbstractApplicationContext # refresh
public void refresh() throws BeansException, IllegalStateException {
    synchronized (this.startupShutdownMonitor) {
        try {
            //.................

            // 实例化所有剩余的(非lazy-init)单例
            finishBeanFactoryInitialization(beanFactory);

            // Last step: publish corresponding event.
            finishRefresh();
        }
        //........
    }
}

// PS : 可以看到 , 在主流程倒数第二步中 ,

// EventListenerMethodProcessor :  对标注了 @EventListener 的方法进行解析, 然后转换为一个 ApplicationListener
// Step 2: C- EventListenerMethodProcessor # afterSingletonsInstantiated
public void afterSingletonsInstantiated() {
        ConfigurableListableBeanFactory beanFactory = this.beanFactory;
        String[] beanNames = beanFactory.getBeanNamesForType(Object.class);
        for (String beanName : beanNames) {
            if (!ScopedProxyUtils.isScopedTarget(beanName)) {
                Class<?> type = null;
                try {
                      // 确定指定bean的原始目标类
                      // Step 2-1 : 获取 originalTargetClass
                      // beanName -> org.springframework.context.annotation.internalConfigurationAnnotationProcessor
                      // type -> org.springframework.context.annotation.ConfigurationClassPostProcessor
                    type = AutoProxyUtils.determineTargetClass(beanFactory, beanName);
                }
                catch (Throwable ex) {
                    //...............
                }
                if (type != null) {
                    if (ScopedObject.class.isAssignableFrom(type)) {
                        try {

                            Class<?> targetClass = AutoProxyUtils.determineTargetClass(
                                    beanFactory, ScopedProxyUtils.getTargetBeanName(beanName));
                            if (targetClass != null) {
                                type = targetClass;
                            }
                        }
                        catch (Throwable ex) {
                            //...............
                        }
                    }
                    try {
                          // Step 2-3 : 获取 originalTargetClass
                        processBean(beanName, type);
                    }
                    catch (Throwable ex) {
                        //...............
                    }
                }
            }
        }
}

// Step 2-1 : 从 BeanDefinition 中获取属性 originalTargetClass
String ORIGINAL_TARGET_CLASS_ATTRIBUTE = Conventions.getQualifiedAttributeName(AutoProxyUtils.class, "originalTargetClass");
BeanDefinition bd = beanFactory.getMergedBeanDefinition(beanName);
Class<?> targetClass = (Class<?>) bd.getAttribute(ORIGINAL_TARGET_CLASS_ATTRIBUTE);

// Step 2-2 : 查找原始目标类 , 可以看到 , 通常查询的类都是 internalXXX 开头的类 , 该类为 beanDefinitionNames 中创建
public static Class<?> determineTargetClass(
            ConfigurableListableBeanFactory beanFactory, @Nullable String beanName) {

        if (beanName == null) {
            return null;
        }
        if (beanFactory.containsBeanDefinition(beanName)) {
            BeanDefinition bd = beanFactory.getMergedBeanDefinition(beanName);
            Class<?> targetClass = (Class<?>) bd.getAttribute(ORIGINAL_TARGET_CLASS_ATTRIBUTE);
            if (targetClass != null) {
                return targetClass;
            }
        }
        return beanFactory.getType(beanName);
}


// Step 2-3 : 该方法省略 , 主要是 EventListener 注解的处理 , 和主流程无关
private void processBean(final String beanName, final Class<?> targetType)


复制代码
4.2 AOP Cglib 配置流程
通常基础的AOP 代理是通过
org.springframework.boot.autoconfigure.aop.AopAutoConfiguration$AspectJAutoProxyingConfiguration$CglibAutoProxyConfiguration

public void registerBeanDefinitions(
            AnnotationMetadata importingClassMetadata, BeanDefinitionRegistry registry) {

    AopConfigUtils.registerAspectJAnnotationAutoProxyCreatorIfNecessary(registry);

    // h
    AnnotationAttributes enableAspectJAutoProxy =
                AnnotationConfigUtils.attributesFor(importingClassMetadata, EnableAspectJAutoProxy.class);
    //
    if (enableAspectJAutoProxy != null) {
        if (enableAspectJAutoProxy.getBoolean("proxyTargetClass")) {
            AopConfigUtils.forceAutoProxyCreatorToUseClassProxying(registry);
        }
        if (enableAspectJAutoProxy.getBoolean("exposeProxy")) {
            AopConfigUtils.forceAutoProxyCreatorToExposeProxy(registry);
        }
    }
}


public static void forceAutoProxyCreatorToUseClassProxying(BeanDefinitionRegistry registry) {
    // AUTO_PROXY_CREATOR_BEAN_NAME => org.springframework.aop.config.internalAutoProxyCreator
    if (registry.containsBeanDefinition(AUTO_PROXY_CREATOR_BEAN_NAME)) {
        BeanDefinition definition = registry.getBeanDefinition(AUTO_PROXY_CREATOR_BEAN_NAME);
        definition.getPropertyValues().add("proxyTargetClass", Boolean.TRUE);
    }
}


复制代码
补充一 : EnableAspectJAutoProxy
public @interface EnableAspectJAutoProxy {

    /**
     * Indicate whether subclass-based (CGLIB) proxies are to be created as opposed
     * to standard Java interface-based proxies. The default is {@code false}.
     */
    boolean proxyTargetClass() default false;

    /**
     * Indicate that the proxy should be exposed by the AOP framework as a {@code ThreadLocal}
     * for retrieval via the {@link org.springframework.aop.framework.AopContext} class.
     * Off by default, i.e. no guarantees that {@code AopContext} access will work.
     * @since 4.3.1
     */
    boolean exposeProxy() default false;

}
复制代码
补充二 : AopAutoConfiguration 自动配置类
@Configuration(proxyBeanMethods = false)
@ConditionalOnProperty(prefix = "spring.aop", name = "auto", havingValue = "true", matchIfMissing = true)
public class AopAutoConfiguration {

    @Configuration(proxyBeanMethods = false)
    @ConditionalOnClass(Advice.class)
    static class AspectJAutoProxyingConfiguration {

        @Configuration(proxyBeanMethods = false)
        @EnableAspectJAutoProxy(proxyTargetClass = false)
        @ConditionalOnProperty(prefix = "spring.aop", name = "proxy-target-class", havingValue = "false",
                matchIfMissing = false)
        static class JdkDynamicAutoProxyConfiguration {

        }

        @Configuration(proxyBeanMethods = false)
        @EnableAspectJAutoProxy(proxyTargetClass = true)
        @ConditionalOnProperty(prefix = "spring.aop", name = "proxy-target-class", havingValue = "true",
                matchIfMissing = true)
        static class CglibAutoProxyConfiguration {

        }

    }

    @Configuration(proxyBeanMethods = false)
    @ConditionalOnMissingClass("org.aspectj.weaver.Advice")
    @ConditionalOnProperty(prefix = "spring.aop", name = "proxy-target-class", havingValue = "true",
            matchIfMissing = true)
    static class ClassProxyingConfiguration {

        ClassProxyingConfiguration(BeanFactory beanFactory) {
            if (beanFactory instanceof BeanDefinitionRegistry) {
                BeanDefinitionRegistry registry = (BeanDefinitionRegistry) beanFactory;
                AopConfigUtils.registerAutoProxyCreatorIfNecessary(registry);
                AopConfigUtils.forceAutoProxyCreatorToUseClassProxying(registry);
            }
        }

    }

}
复制代码
补充三 : org.springframework.aop.config.internalAutoProxyCreator 的作用
C- AopConfigUtils # String AUTO_PROXY_CREATOR_BEAN_NAME = "org.springframework.aop.config.internalAutoProxyCreator"
    ?- 内部管理的自动代理创建器的bean名

复制代码
总结
讲道理 , 这篇文章其实没写好 , 很多地方现在都没弄清楚 , 精力有限无法在细致深入 , 总得来说算是一个半成品吧 , 后面时间充裕了 , 再来深入看一下
核心概念 :
AbstractAutoProxyCreator # createProxy 发起代理类的创建
AutoProxyUtils 为工具类 , 用于原类和代理的一些常见操作处理
通过 AopProxyFactory 创建代理类 , 有2种 : ObjenesisCglibAopProxy / JdkDynamicAopProxy
作者:AntBlack
链接:https://juejin.cn/post/6980187257856589855
来源:掘金
著作权归作者所有。商业转载请联系作者获得授权,非商业转载请注明出处。

