 美男子玩编程


1
通知
HarmonyOS提供了应用的通知功能,即在应用外层通过使用应用图标进行一些事件的通知。常见的使用场景:
显示接收到短消息、即时消息等。 显示应用的推送消息,如广告、版本更新等。 显示当前正在进行的事件,如播放音乐、导航、下载等。
2
接口说明
通知相关基础类包含NotificationSlot、NotificationRequest和NotificationHelper。基础类之间的关系如下所示:
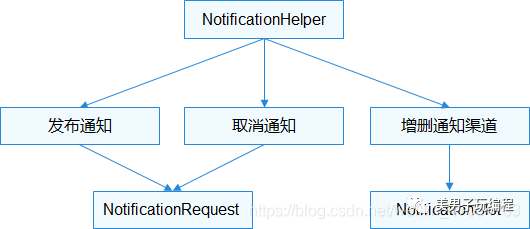
图1 通知基础类关系图
NotificationSlot NotificationSlot可以对提示音、振动、锁屏显示和重要级别等进行设置。一个应用可以创建一个或多个NotificationSlot,在发布通知时,通过绑定不同的NotificationSlot,实现不同用途。
NotificationSlot的级别目前支持如下几种, 由低到高:
LEVEL_NONE:表示通知不发布。 LEVEL_MIN:表示通知可以发布,但是不显示在通知栏,不自动弹出,无提示音;该级别不适用于前台服务的场景。 LEVEL_LOW:表示通知可以发布且显示在通知栏,不自动弹出,无提示音。 LEVEL_DEFAULT:表示通知发布后可在通知栏显示,不自动弹出,触发提示音。 LEVEL_HIGH:表示通知发布后可在通知栏显示,自动弹出,触发提示音。
NotificationRequest NotificationRequest用于设置具体的通知对象,包括设置通知的属性,如:通知的分发时间、小图标、大图标、自动删除等参数,以及设置具体的通知类型,如普通文本、长文本等。
具体的通知类型:目前支持六种类型,包括普通文本NotificationNormalContent、长文本NotificationLongTextContent、图片NotificationPictureContent、多行NotificationMultiLineContent、社交NotificationConversationalContent、媒体NotificationMediaContent。
NotificationHelper NotificationHelper封装了发布、更新、删除通知等静态方法。
3
效果演示
1
开发步骤
通知的开发指导分为创建NotificationSlot、发布通知和取消通知等开发场景。
第一步、初始化NotificationSlot
    public static final String SLOT_ID = "high";
    public static final String SLOT_NAME = "Order notification";
//--------------------
 ....
 @Override
public void onStart(Intent intent) {
        super.onStart(intent);
        super.setUIContent(ResourceTable.Layout_main_ability_slice);
        ...
        defineNotificationSlot(Const.SLOT_ID, Const.SLOT_NAME, NotificationSlot.LEVEL_HIGH);
  ...
    }
//---------------------
private void defineNotificationSlot(String id, String name, int importance) {
        // 创建notificationSlot对象
        NotificationSlot notificationSlot = new NotificationSlot(id, name, importance);
        // 设置振动提醒
        notificationSlot.setEnableVibration(true);
        // 设置锁屏模式
        notificationSlot.setLockscreenVisibleness(NotificationRequest.VISIBLENESS_TYPE_PUBLIC);
        Uri uri = Uri.parse(Const.SOUND_URI);
        notificationSlot.setSound(uri);
        try {
            NotificationHelper.addNotificationSlot(notificationSlot);
        } catch (RemoteException ex) {
            HiLog.error(LABEL_LOG, "%{public}s", "defineNotificationSlot remoteException.");
        }
    }
第二步、发布通知
private void publishNotification(String title, String text) {
       //构建NotificationRequest对象,应用发布通知前,通过NotificationRequest的setSlotId()方法与NotificationSlot绑定,使该通知在发布后都具备该对象的特征
        notificationId = 0x1000001;
        NotificationRequest request = new NotificationRequest(notificationId).setSlotId(Const.SLOT_ID)
            .setTapDismissed(true);
        //调用setContent()设置通知的内容
        request.setContent(createNotificationContent(title, text));
        IntentAgent intentAgent = createIntentAgent(MainAbility.class.getName(),
            IntentAgentConstant.OperationType.START_ABILITY);
        request.setIntentAgent(intentAgent);
        //调用publishNotification()发布通知
        try {
            NotificationHelper.publishNotification(request);
        } catch (RemoteException ex) {
            HiLog.error(LABEL_LOG, "%{public}s", "publishNotification remoteException.");
        }
    }
第三步、取消通知
取消通知分为取消指定单条通知和取消所有通知,应用只能取消自己发布的通知。
调用cancelNotification()取消指定的单条通知。
private void cancel() {
        try {
            NotificationHelper.cancelNotification(notificationId);
        } catch (RemoteException ex) {
            HiLog.error(LABEL_LOG, "%{public}s", "cancel remoteException.");
        }
    }
调用cancelAllNotifications()取消所有通知
private void cancelAll() {
        try {
            NotificationHelper.cancelAllNotifications();
        } catch (RemoteException ex) {
            HiLog.error(LABEL_LOG, "%{public}s", "cancelAll remoteException.");
        }
    }
 往期推荐
往期推荐