 龙旋
龙旋


效果图:
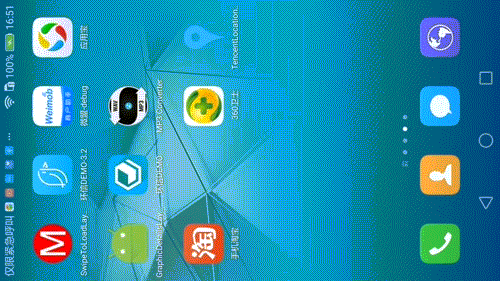
最近要在公司的项目中实现这种效果,就自己动手实现了一下。
使用
GraphicDetailsLayout gdLayout = (GraphicDetailsLayout) findViewById(R.id.gdlayout);gdLayout.addFragment(new Fragment[] {new SpFragment(), new DeFragment()}, getSupportFragmentManager());
还是很简单的,把上下两个fragment添加到GraphicDetailsLayout 中就可以了
思路
从效果中可以看到上下两个控件都是可以滚动的,初始化状态下,下面的控件是隐藏在屏幕下面的;那我们设计最外面的布局是LinearLayout,然后LinearLayout里面放两个ScrollView,ScrollView滚动到顶部或顶部的时候,告诉LinearLayout拦截事件,来实现两个ScrollView的上下拖动效果。
实现
首先自定义一个ScrollView
public class GDScrollView extends ScrollView {private LinearLayout mLl;private int mLlHeight;public static final String TAG_ONE = "up";public static final String TAG_TWO = "down";public static final int ID_ONE = 11111;public static final int ID_TWO = 22222;private GraphicDetailsLayout.ScrollListener mScrollListener;public GDScrollView(Context context) {super(context); }public GDScrollView(Context context, AttributeSet attrs) {super(context, attrs);}public GDScrollView(Context context, AttributeSet attrs, int defStyleAttr) {super(context, attrs, defStyleAttr);}(Build.VERSION_CODES.LOLLIPOP)public GDScrollView(Context context, AttributeSet attrs, int defStyleAttr,int defStyleRes) {super(context, attrs, defStyleAttr, defStyleRes);}public void setScrollListener(GraphicDetailsLayout.ScrollListener scrollListener) {mScrollListener = scrollListener;}public void addFragment(Fragment fragment, FragmentManager fragmentManager) {FragmentTransaction fragmentTransaction = fragmentManager.beginTransaction();if(mLl == null) mLl = (LinearLayout) getChildAt(0);fragmentTransaction.replace(mLl.getId(), fragment);fragmentTransaction.commit(); }protected void onMeasure(int widthMeasureSpec, int heightMeasureSpec) {super.onMeasure(widthMeasureSpec, heightMeasureSpec);mLlHeight = mLl.getMeasuredHeight();}protected void onFinishInflate() {super.onFinishInflate();mLl = (LinearLayout) getChildAt(0);}protected void onOverScrolled(int scrollX, int scrollY, boolean clampedX, boolean clampedY) {super.onOverScrolled(scrollX, scrollY, clampedX, clampedY);if(getTag().equals(TAG_ONE)) {//上面的界面滚动到底部的时候if(isScrollBottom()) {criticalPointOperation(false, true, TAG_ONE);}}if(getTag().equals(TAG_TWO)) {//下面的界面滚动到顶部的时候if(getScrollY() <= 0) {criticalPointOperation(false, true, TAG_TWO);}}}private void criticalPointOperation(boolean allow, boolean intercept, String tag) {getParent().requestDisallowInterceptTouchEvent(allow);if(mScrollListener != null) mScrollListener.scrollBottom(intercept, tag); }public boolean isScrollBottom() {return getScrollY() >= (mLlHeight - getMeasuredHeight());}}
重写onOverScrolled方法监控滚动的状态,判断不同的ScrollView滚动到顶部或者顶部触发回调事件,把触摸事件交给上层LinarLayout控件,来看看LinearLayout的onTouchEvent方法
@Overridepublic boolean onTouchEvent(MotionEvent event) {switch (event.getAction()) {case MotionEvent.ACTION_MOVE:if(mInitY == 0) {mInitY = event.getY();} else {int offset = (int) Math.abs(event.getY() - mInitY);if(offset > mTouchSlop) {int delayOffset = offset * 7 / 10;if(mCurrentTag.equals(GDScrollView.TAG_ONE)) {mUpSVMarginTop = mInitMarginTop - delayOffset;} else {mUpSVMarginTop = - halfHeight + delayOffset;}if(mUpSVMarginTop > 0) mUpSVMarginTop = 0;requestLayout();}}break;case MotionEvent.ACTION_UP:mIntercept = false;mInitY = 0;if(mCurrentTag.equals(GDScrollView.TAG_ONE)) {if(Math.abs(mUpSVMarginTop) > halfHeight / 3) {startAnimation(mUpSVMarginTop, halfHeight - Math.abs(mUpSVMarginTop), false);} else {startAnimation(mUpSVMarginTop, Math.abs(mUpSVMarginTop), true);}} else {if(Math.abs(mUpSVMarginTop) < halfHeight * 2 / 3) {startAnimation(mUpSVMarginTop, Math.abs(mUpSVMarginTop), true);} else {startAnimation(mUpSVMarginTop, halfHeight - Math.abs(mUpSVMarginTop), false);}}requestLayout();break;}return true;}
LinearLayout拦截到事件以后重写onTouchEvent方法,通过手势拖动来不断的计算ScrooView距离顶部的高度mUpSVMarginTop,调用requestLayout方法发起重新布局,重写onLayout方法
protected void onLayout(boolean changed, int l, int t, int r, int b) {super.onLayout(changed, l, t, r, b);halfHeight = getMeasuredHeight() / 2;mUpScrollView.layout(0, mUpSVMarginTop, getMeasuredWidth(), mUpSVMarginTop + halfHeight);mBottomScrollView.layout(0, mUpSVMarginTop + halfHeight , getMeasuredWidth(), mUpSVMarginTop + getMeasuredHeight());}
大致的思路和实现已经讲解完成了,想看具体实现代码
源码地址:
https://github.com/chenpengfei88/GraphicDetailsLayout
到这里接结束啦。

