给 Java gradle 工程添加 git hooks
共 5277字,需浏览 11分钟
· 2021-06-12
接《后端工程圣殿形象的崩塌以及重建》,今天记录一下使用土办法给 Java gradle 工程添加 git hooks 的步骤,并且创建了一个样例项目和提交记录放在了 GitHub:https://github.com/Jeff-Tian/securing-web-with-wechat-mp/commit/2a844e890cb0d91eaf5b5684f9d750cf586613a2。欢迎👏 围观和批评,毕竟这是一个很土的办法。
背景简介
Git 钩子可以在某些事件发生时,执行指定的任务。比如我希望在自己的工程里,当进行 git commit 和 push 前,跑一边测试,确保新的代码改动没有带来问题,那么就可以分别添加 pre-commit 和 pre-push 两个钩子事件任务。
默认的 Git 钩子目录是 .git/hooks。这个目录就是 Git 会在项目的事件发生时去检查可能需要执行的脚本的地方。
思路
还是因为对 Java 的世界不熟悉,因此走了土办法途径。很容易想到,直接写两个脚本,分别对应 pre-commit 和 pre-push,放在 .git/hooks 目录下。但这样做的缺点是,当你换一台机器时,这个信息就丢失了,因为这个改动没有纳入到源代码管理中。
所以想到的改进方案时将脚本写在源代码里,然后向 build.gradle 文件中添加一个安装钩子的任务,这样一来,所有拉去改项目的机器,都可以一键安装钩子。
实现
创建脚本
针对背景简介里的需求,一共需要创建两种钩子,分别是 pre-commit 和 pre-push。为了支持 macOS 和 windows 开发机,对每种钩子分别创建两个文件。以 pre-push 为例,分别创建 pre-push-macos 和 pre-push-windows 两个文件,如下:
pre-push-macos:
#!/bin/bash
echo "运行测试..."
./gradlew test --info
status=$?
# 如果测试失败会返回码置为 1
[ $status -ne 0 ] && exit 1
exit 0
pre-push-windows:
#!C:/Program\ Files/Git/usr/bin/sh.exe
echo "运行测试..."
./gradlew test --info
status=$?
# 如果测试失败会返回码置为 1
[ $status -ne 0 ] && exit 1
exit 0
两个文件几乎一致,只是第一行 She bang line 有区别,因为这两种系统对应的可以执行的 sh 文件所在目录有区别。
向 build.gradle 文件添加安装钩子的任务
import org.apache.tools.ant.taskdefs.condition.Os
task installGitHooks(type: Copy) {
def suffix = "macos"
if (Os.isFamily(Os.FAMILY_WINDOWS)) {
suffix = "windows"
}
from new File(rootProject.rootDir, "scripts/pre-commit-$suffix")
into { new File(rootProject.rootDir, '.git/hooks') }
rename("pre-commit-$suffix", 'pre-commit')
from new File(rootProject.rootDir, "scripts/pre-push-$suffix")
into { new File(rootProject.rootDir, '.git/hooks') }
rename("pre-push-$suffix", 'pre-push')
fileMode 0775
}
tasks.getByPath(':build').dependsOn installGitHooks
这个任务会判断系统的类型,并拷贝相应的脚本文件到 .git/hooks 目录下。这样当执行
./gradlew installGitHooks
命令时就会安装 Git 钩子。注意这里还指定 build 任务依赖 installGitHooks 任务,于是即使执行 ./gradlew build 也会触发自动安装 Git 钩子。
CI/CD
当然,在提交前运行 Git 钩子确保测试通过是很好的实践,但是不排除仍然可以绕过,以至于没有测试就推送了代码到仓库。为了避免将不工作的代码部署到线上(这里开发环境也属于线上,线上不单指生产环境),那么有必要在 CI/CD 环节也加上运行测试步骤。如果使用 GitHub Actions,你可以写一个如下的 .github/workflows/gradle.yml 文件,注意,下面的示例还在 Github Action 里集成了 Sonar 扫描步骤:
name: Java CI with Gradle
on:
push:
branches: [ master ]
pull_request:
branches: [ master ]
jobs:
sonar-build:
name: Build
runs-on: ubuntu-latest
steps:
- uses: actions/checkout@v2
with:
fetch-depth: 0 # Shallow clones should be disabled for a better relevancy of analysis
- name: Set up JDK 11
uses: actions/setup-java@v1
with:
java-version: 11
- name: Cache SonarCloud packages
uses: actions/cache@v1
with:
path: ~/.sonar/cache
key: ${{ runner.os }}-sonar
restore-keys: ${{ runner.os }}-sonar
- name: Cache Gradle packages
uses: actions/cache@v1
with:
path: ~/.gradle/caches
key: ${{ runner.os }}-gradle-${{ hashFiles('**/*.gradle') }}
restore-keys: ${{ runner.os }}-gradle
- name: Build and analyze
env:
GITHUB_TOKEN: ${{ secrets.GITHUB_TOKEN }} # Needed to get PR information, if any
SONAR_TOKEN: ${{ secrets.SONAR_TOKEN }}
run: ./gradlew build sonarqube --info
build:
runs-on: ubuntu-latest
steps:
- uses: actions/checkout@v2
- name: Set up JDK 11
uses: actions/setup-java@v2
with:
java-version: '11'
distribution: 'adopt'
- name: Grant execute permission for gradlew
run: chmod +x gradlew
- name: Build with Gradle
run: ./gradlew build
- name: Test with Gradle
run: ./gradlew test
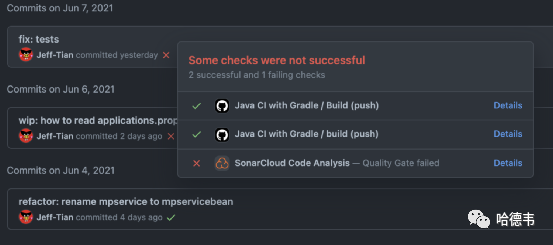
这样你就可以在提交历史里查看每次提交的测试结果和代码扫描结果了: