
你了解图片加载的过程吗?
Carson带你学习Android
共 20184字,需浏览 41分钟
· 2021-05-12
前言
本文将从源码深入剖析 「图片加载」 的过程。
❝为方便读者理解,源码已作简化处理。
❞
图片资源加载过程
首先我们看下加载图片资源的入口方法:BitmapFactory.decodeResource()
// BitmapFactory.decodeResource()

public static Bitmap decodeResource(Resources res, int id) {
    return decodeResource(res, id, null);
}

public static Bitmap decodeResource(Resources res, int id, Options opts) {
    // 步骤1:匹配资源 id,打开InputStream
    final TypedValue value = new TypedValue();
    InputStream is = res.openRawResource(id, value);

    // 步骤2:解码资源,返回 Bitmap
    return decodeResourceStream(res, value, is, null, opts);
}
所以,图片资源加载主要分为两步,具体如下图:
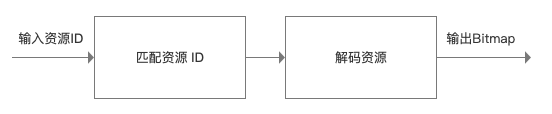
步骤1:匹配资源 ID
作用
从资源 id(一个 int 值)定位到具体某一个文件夹下的资源,即「获得 InputStream和TypedValue(即带有文件夹对应的 densityDpi)」。
源码解析
// 步骤说明
public static Bitmap decodeResource(Resources res, int id, Options opts) {
// 步骤1:匹配资源 id,打开InputStream -> 关注1
final TypedValue value = new TypedValue();
InputStream is = res.openRawResource(id, value);
// 步骤2:解码资源,返回 Bitmap
return decodeResourceStream(res, value, is, null, opts);
}
/**
* 关注1:ResourcesImpl.openRawResource()
*/
InputStream openRawResource(@RawRes int id, TypedValue value) {
// 匹配资源 -> 关注2
getValue(id, value, true);
// 打开输入流
return mAssets.openNonAsset(value.assetCookie, value.string.toString(),
AssetManager.ACCESS_STREAMING);
}
/**
* 关注2:getValue()
*/
void getValue(@AnyRes int id, TypedValue outValue, boolean resolveRefs) {
// 查找资源Id & 相关信息存储在 outValue -> 关注3
boolean found = mAssets.getResourceValue(id, 0, outValue, resolveRefs);
...
}
/**
* 关注3:AssetManager.getResourceValue()
*/
boolean getResourceValue(@AnyRes int resId, int densityDpi, TypedValue outValue, boolean resolveRefs) {
// 从Native文件中查找 -> 关注4
final int cookie = nativeGetResourceValue(mObject, resId, (short) densityDpi, outValue, resolveRefs);
if (cookie <= 0) {
return false;
}
return true;
}
/**
* 关注4:AssetManager.NativeGetResourceValue()
*/
static jint NativeGetResourceValue(JNIEnv* env, jclass /*clazz*/, jlong ptr, jint resid,
jshort density, jobject typed_value,
jboolean resolve_references) {
// ->关注5
return CopyValue(env, cookie, value, ref, flags, &selected_config, typed_value);
}
/**
* 关注5:AssetManager.CopyValue()
*/
static jint CopyValue(JNIEnv* env, ...jobject out_typed_value) {
...
if (config != nullptr) {
// 将文件夹对应的 density 保存在 TypeValue 中
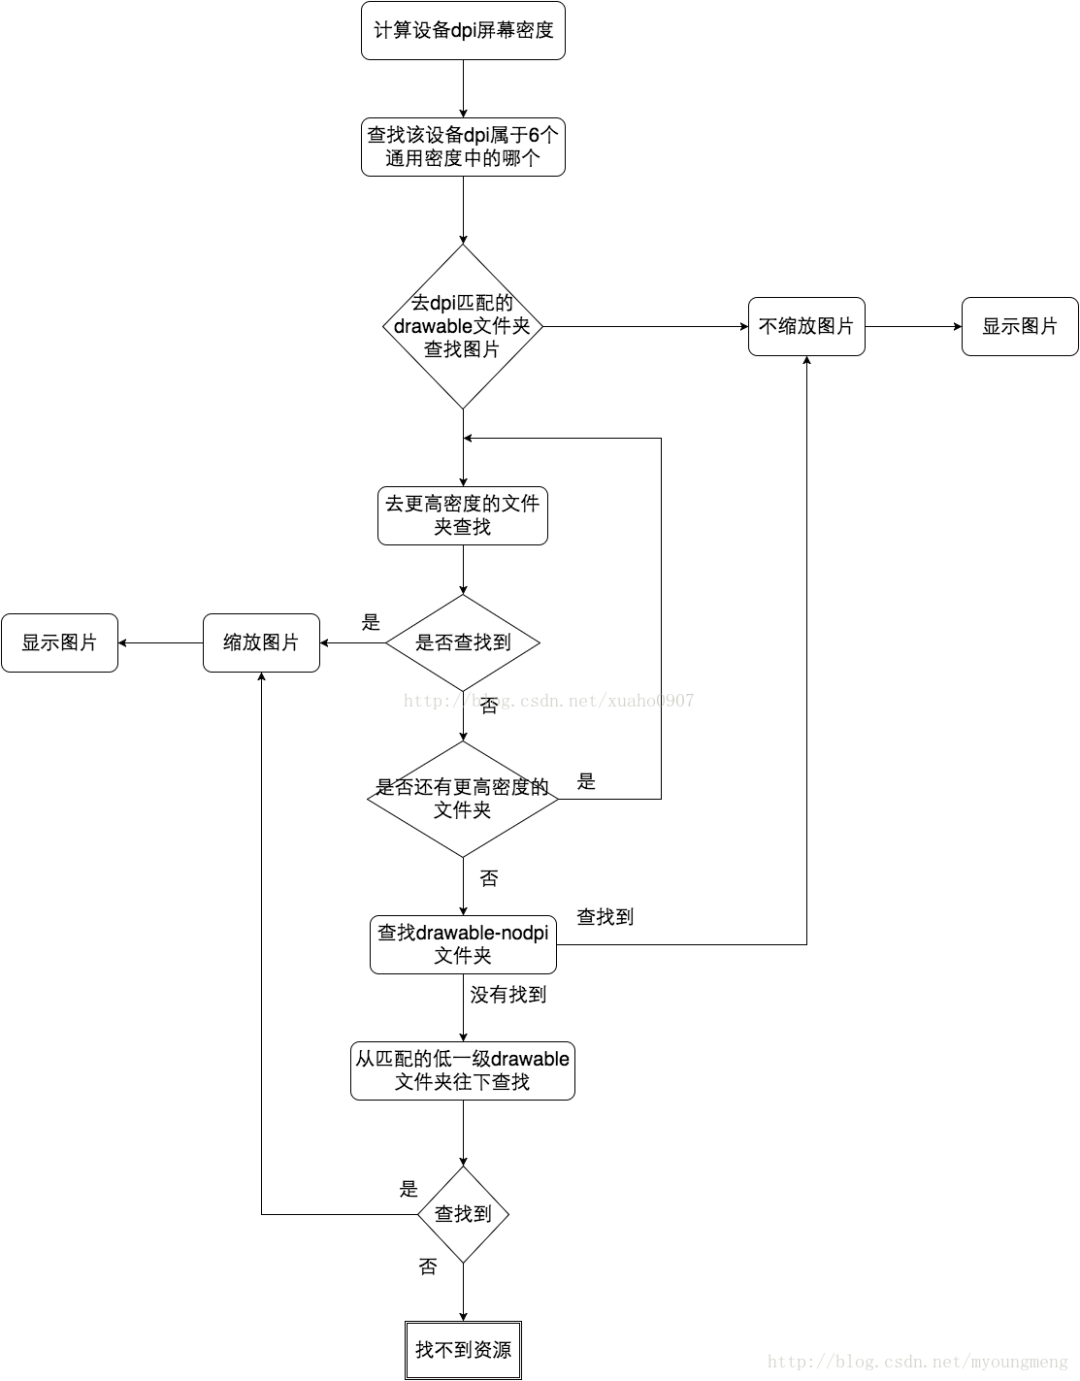
// 具体资源匹配如下流程图表示
env->SetIntField(out_typed_value, gTypedValueOffsets.mDensity, config->density);
}
return static_cast<jint>(ApkAssetsCookieToJavaCookie(cookie));
}
具体资源匹配如下流程图表示。
步骤2:解码资源
作用
对图片资源进行解码,并获得图片资源Bitmap。
源码解析
/**
  * 步骤说明
  */
 public static Bitmap decodeResource(Resources res, int id, Options opts) {
     // 步骤1:匹配资源 id,打开InputStream
     final TypedValue value = new TypedValue();
     InputStream is = res.openRawResource(id, value);

     // 步骤2:解码资源,返回 Bitmap -> 关注2
     return decodeResourceStream(res, value, is, null, opts);
 }

/**
  * 关注1:BitmapFactory.decodeResourceStream()
  */
 public static Bitmap decodeResourceStream(Resources res, TypedValue value, InputStream is, Rect pad, Options opts) {

     if (opts == null) {
         opts = new Options();
     }

     // 若未设置 inDensity,则设置为文件夹对应的 densityDpi
     if (opts.inDensity == 0 && value != null) {
         final int density = value.density;
         if (density == TypedValue.DENSITY_DEFAULT) {
             opts.inDensity = DisplayMetrics.DENSITY_DEFAULT;
         } else if (density != TypedValue.DENSITY_NONE) {
             opts.inDensity = density;
         }
     }

     // 若未设置inTargetDensity,则设置为设备的 densityDpi
     if (opts.inTargetDensity == 0 && res != null) {
         opts.inTargetDensity = res.getDisplayMetrics().densityDpi;
     }

     // 执行解码 -> 关注2
     return decodeStream(is, pad, opts);
 }

/**
  * 关注2:BitmapFactory.decodeStream()
  */
 public static Bitmap decodeStream(InputStream is, Rect outPadding, Options opts) {

     // 对于AssetManager输入流(如:/asset、/raw、/drawable)
     if (is instanceof AssetManager.AssetInputStream) {
         final long asset = ((AssetManager.AssetInputStream) is).getNativeAsset();
         // 核心解码方法
         return nativeDecodeAsset(asset, outPadding, opts, Options.nativeInBitmap(opts), Options.nativeColorSpace(opts));
     } else {
         // 对于其他输入流(如 FileInputStream)-> 关注3
         return decodeStreamInternal(is, outPadding, opts);
     }
 }

/**
  * 关注3:BitmapFactory.decodeStreamInternal()
  */
 private static Bitmap decodeStreamInternal(InputStream is, Rect outPadding, Options opts) {

     byte [] tempStorage = null; // 创建一块可复用的中间内存
     if (opts != null) tempStorage = opts.inTempStorage;

     if (tempStorage == null) tempStorage = new byte[DECODE_BUFFER_SIZE];

     // 核心解码方法
     return nativeDecodeStream(is, tempStorage, outPadding, opts,Options.nativeInBitmap(opts), Options.nativeColorSpace(opts));
}
从上面可以看出,对于不同输入流采用的解码资源方式会不一样(调用不同的native方法):
对于AssetManager 输入流(如:/asset、/raw、/drawable):调用nativeDecodeAsset() 对于其他输入流(如 FileInputStream):调用nativeDecodeStream()
/**
  * 对于AssetManager 输入流
  * 此处采用的解码方式是:BitmapFactory.nativeDecodeAsset()
  */
 static jobject nativeDecodeAsset(JNIEnv* env, jobject clazz, jlong native_asset,
         jobject padding, jobject options) {

     Asset* asset = reinterpret_cast<Asset*>(native_asset);
     // 最终执行解码
     return doDecode(env, skstd::make_unique<AssetStreamAdaptor>(asset), padding, options);
 }

/**
  * 对于其他输入流
  * 此处采用的解码方式是:BitmapFactory.nativeDecodeStream()
  */
 static jobject nativeDecodeStream(JNIEnv* env, jobject clazz, jobject is, jbyteArray storage, jobject padding, jobject options) {

     jobject bitmap = NULL;
     std::unique_ptr<SkStream> stream(CreateJavaInputStreamAdaptor(env, is, storage));

     if (stream.get()) {
         std::unique_ptr<SkStreamRewindable> bufferedStream(
                 SkFrontBufferedStream::Make(std::move(stream), SkCodec::MinBufferedBytesNeeded()));
         // 最终执行解码
         bitmap = doDecode(env, std::move(bufferedStream), padding, options);
     }
     return bitmap;
 }
从上面可以看出,无论是哪种资源输入流,最终调用的解码方法都是:BitmapFactory.doDecode()
static jobject doDecode(JNIEnv* env, std::unique_ptr<SkStreamRewindable> stream, jobject padding, jobject options) {

    // 步骤1.获取 java 层 Options 对象 In 字段值
    int sampleSize;      对应于 Options#inSampleSize(默认 1)
    if (sampleSize <= 0) {
        sampleSize = 1;
    }

    bool onlyDecodeSize; // 对应于 Options#inJustDecodeBounds(默认 false)
    bool isHardware;     // 对应于 Options#inPreferredConfig(默认 ARGB_8888)
    bool isMutable;      // 对应于 Options#inMutable(默认 false)
    jobject javaBitmap;  // 对应于 Options#inBitmap(默认 null)
    boolean inScale;     // 对应于 Options#inScaled(默认 true)
    int density;         // 对应于 Options#inDensity
    int targetDensity;   // 对应于 Options#inTargetDensity

    // 步骤2. 设置 java 层 Options 对象 out 字段初始值
    Options#outWidth = -1
    Options#outHeight = -1
    Options#outMimeType = 0
    Options#outConfig = 0
    Options#outColorSpace = 0

    // 步骤3. 获得 inDensity / inTargetDensity
    float scale = 1.0f;
    if (density != 0 && targetDensity != 0 && density != screenDensity) {
        scale = (float) targetDensity / density;
    }

    mutable 和 hardware 是冲突的
    if (isMutable && isHardware) {
        doThrowIAE(env, "Bitmaps with Config.HARWARE are always immutable");
        return nullObjectReturn("Cannot create mutable hardware bitmap");
    }

    // 步骤4:根据 sampleSize 确定采样后的尺寸(size)
    SkISize size = codec->getSampledDimensions(sampleSize);
    int scaledWidth = size.width();
    int scaledHeight = size.height();

    // 步骤5:确定 java 层 Options 对象 out 字段最终值
    Options#outWidth = scaledWidth
    Options#outHeight = scaledHeight
    Options#outMimeType = (例如 "image/png")
    Options#outConfig = (例如 ARGB_8888)
    Options#outColorSpace =(例如 RGB)

    // 若inJustDecodeBounds = true,只获取采样后的尺寸(无缩放)
    // 则直接返回
    if (onlyDecodeSize) {
        return nullptr;
    }

    // 步骤6:确定最终缩放到的目标尺寸(先采样,再缩放)
    bool willScale = false;
    if (scale != 1.0f) {
        willScale = true;
        scaledWidth = static_cast<int>(scaledWidth * scale + 0.5f);
        scaledHeight = static_cast<int>(scaledHeight * scale + 0.5f);
    }

    // 步骤7:存在 java 层的 Options#inBitmap,做一些准备工作
    android::Bitmap* reuseBitmap = nullptr;
    if (javaBitmap != NULL) {
        reuseBitmap = &bitmap::toBitmap(env, javaBitmap);
    }
    RecyclingPixelAllocator recyclingAllocator(reuseBitmap, existingBufferSize);

    // 步骤8:采样解码得到 SkBitmap(注意:只使用了采用后尺寸)
    const SkImageInfo decodeInfo = SkImageInfo::Make(size.width(), size.height(), decodeColorType, alphaType, decodeColorSpace);
    SkBitmap decodingBitmap;
    decodingBitmap.setInfo(bitmapInfo);
    decodingBitmap.tryAllocPixels(decodeAllocator)

    // 步骤9:执行缩放
    SkBitmap outputBitmap;
    if (willScale) {

        // 1. 根据是否有可回收的 inBitmap,确定不同的分配器
        SkBitmap::Allocator* outputAllocator;
        if (javaBitmap != nullptr) {
            outputAllocator = &recyclingAllocator;
        } else {
            outputAllocator = &defaultAllocator;
        }

        // 2. 复制(注意:使用了缩放后尺寸)
        SkColorType scaledColorType = decodingBitmap.colorType();
        outputBitmap.setInfo(bitmapInfo.makeWH(scaledWidth, scaledHeight).makeColorType(scaledColorType));
        outputBitmap.tryAllocPixels(outputAllocator)

        // 3. 利用 Canvas 进行缩放
        const float scaleX = scaledWidth / float(decodingBitmap.width());
        const float scaleY = scaledHeight / float(decodingBitmap.height());

        SkCanvas canvas(outputBitmap, SkCanvas::ColorBehavior::kLegacy);
        canvas.scale(scaleX, scaleY);
        canvas.drawBitmap(decodingBitmap, 0.0f, 0.0f, &paint);
    } else {
        outputBitmap.swap(decodingBitmap);
    }

    // 返回点1:java 层的 Options#inBitmap
    if (javaBitmap != nullptr) {
        return javaBitmap
    }

    // 返回点2:硬件位图(from Android 8)
    if (isHardware) {
        sk_sp<Bitmap> hardwareBitmap = Bitmap::allocateHardwareBitmap(outputBitmap);
        return bitmap::createBitmap(env, hardwareBitmap.release(), bitmapCreateFlags,
                ninePatchChunk, ninePatchInsets, -1);
    }

    // 返回3:普通情况下一般会走这个返回逻辑
    return bitmap::createBitmap(env, defaultAllocator.getStorageObjAndReset(),
            bitmapCreateFlags, ninePatchChunk, ninePatchInsets, -1);
}
「Carson每天带你学习一个Android知识点」,长按扫描关注公众号。同时,期待您精彩文章的投稿:真诚邀请您来分享
最后福利:学习资料赠送
福利:由本人亲自撰写 & 整理的「Android学习方法资料」 数量:10名 参与方式:「点击文章右下角”在看“ -> 回复截图到公众号 即可,我将从中随机抽取」 
点击“在看”就能升职 & 加薪水哦! 
评论