
如何利用图像预处理提高OCR的准确性?
点击上方“小白学视觉”,选择加"星标"或“置顶”
重磅干货,第一时间送达

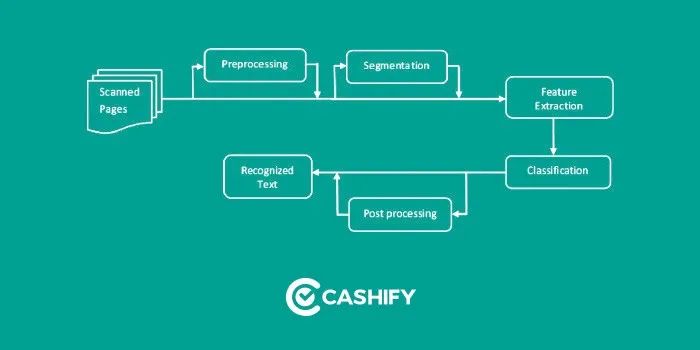
OCR代表光学字符识别,将文档照片或场景照片转换为机器编码的文本。有很多工具可以在你们的系统中实现OCR,例如Tesseract OCR和Cloud Vision。他们使用AI和机器学习以及经过训练的自定义模型。文本识别取决于多种因素,以产生高质量的输出。OCR输出在很大程度上取决于输入图像的质量,这就是每个OCR引擎都提供有关输入图像质量及其大小的准则的原因,这些准则可帮助OCR引擎产生准确的结果。
图像预处理功能可以提高输入图像的质量,以便OCR引擎为我们提供准确的输出,使用以下图像处理操作可以改善输入图像的质量。
图像缩放比例对于图像分析很重要。通常,OCR引擎会准确输出300 DPI的图像。DPI描述了图像的分辨率,换句话说,它表示每英寸的打印点数。
def set_image_dpi(file_path):im = Image.open(file_path)width_y = im.sizefactor = min(1, float(1024.0 / length_x))size = int(factor * length_x), int(factor * width_y)im_resized = im.resize(size, Image.ANTIALIAS)temp_file = tempfile.NamedTemporaryFile(delete=False, suffix='.png')temp_filename = temp_file.namedpi=(300, 300))return temp_filenam

歪斜图像定义为不直的文档图像。歪斜的图像会直接影响OCR引擎的行分割,从而降低其准确性。我们需要执行以下步骤来更正文本倾斜。
1.检测图像中歪斜的文本块
gray = cv2.cvtColor(image, cv2.COLOR_BGR2GRAY)gray = cv2.GaussianBlur(gray, (5, 5), 0)edged = cv2.Canny(gray, 10, 50)cnts = cv2.findContours(edged.copy(), cv2.RETR_LIST, cv2.CHAIN_APPROX_SIMPLE)cnts = cnts[0] if imutils.is_cv2() else cnts[1]cnts = sorted(cnts, key=cv2.contourArea, reverse=True)[:5]screenCnt = Nonefor c in cnts:peri = cv2.arcLength(c, True)approx = cv2.approxPolyDP(c, 0.02 * peri, True)if len(approx) == 4:screenCnt = approxbreakcv2.drawContours(image, [screenCnt], -1, (0, 255, 0), 2)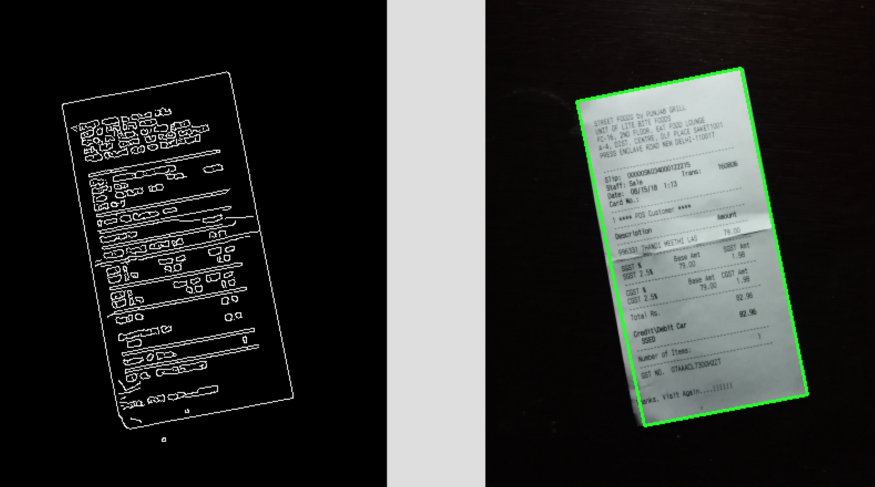
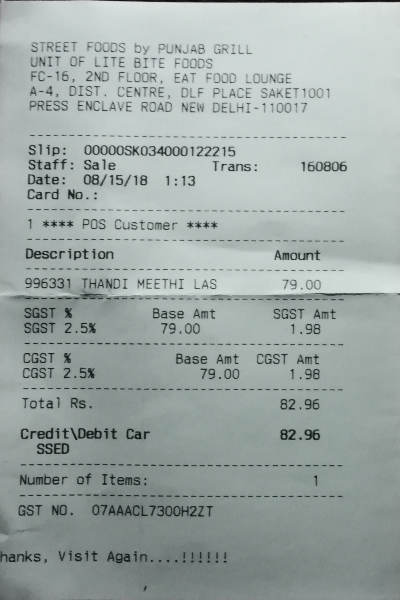
2.计算旋转角度
3.旋转图像以校正歪斜
pts = np.array(screenCnt.reshape(4, 2) * ratio)warped = four_point_transform(orig, pts)def order_points(pts):# initialzie a list of coordinates that will be ordered# such that the first entry in the list is the top-left,# the second entry is the top-right, the third is the# bottom-right, and the fourth is the bottom-leftrect = np.zeros((4, 2), dtype="float32")# the top-left point will have the smallest sum, whereas# the bottom-right point will have the largest sums = pts.sum(axis=1)= pts[np.argmin(s)]= pts[np.argmax(s)]# now, compute the difference between the points, the# top-right point will have the smallest difference,# whereas the bottom-left will have the largest differencediff = np.diff(pts, axis=1)= pts[np.argmin(diff)]= pts[np.argmax(diff)]# return the ordered coordinatesreturn rectdef four_point_transform(image, pts):# obtain a consistent order of the points and unpack them# individuallyrect = order_points(pts)tr, br, bl) = rect# compute the width of the new image, which will be the# maximum distance between bottom-right and bottom-left# x-coordiates or the top-right and top-left x-coordinateswidthA = np.sqrt(((br[0] - bl[0]) ** 2) + ((br[1] - bl[1]) ** 2))widthB = np.sqrt(((tr[0] - tl[0]) ** 2) + ((tr[1] - tl[1]) ** 2))maxWidth = max(int(widthA), int(widthB))# compute the height of the new image, which will be the# maximum distance between the top-right and bottom-right# y-coordinates or the top-left and bottom-left y-coordinatesheightA = np.sqrt(((tr[0] - br[0]) ** 2) + ((tr[1] - br[1]) ** 2))heightB = np.sqrt(((tl[0] - bl[0]) ** 2) + ((tl[1] - bl[1]) ** 2))maxHeight = max(int(heightA), int(heightB))# now that we have the dimensions of the new image, construct# the set of destination points to obtain a "birds eye view",# (i.e. top-down view) of the image, again specifying points# in the top-left, top-right, bottom-right, and bottom-left# orderdst = np.array([0],- 1, 0],- 1, maxHeight - 1],maxHeight - 1]], dtype="float32")# compute the perspective transform matrix and then apply itM = cv2.getPerspectiveTransform(rect, dst)warped = cv2.warpPerspective(image, M, (maxWidth, maxHeight))return warped
通常,OCR引擎会在内部进行二值化处理,因为它们可以处理黑白图像。最简单的方法是计算阈值,然后将所有像素转换为白色,且其值高于阈值,其余像素转换为黑色。
噪点是图像像素之间颜色或亮度的随机变化。噪声会降低图像中文本的可读性。噪声有两种主要类型:盐椒噪声和高斯噪声。
def remove_noise_and_smooth(file_name):img = cv2.imread(file_name, 0)filtered = cv2.adaptiveThreshold(img.astype(np.uint8), 255, cv2.ADAPTIVE_THRESH_MEAN_C, cv2.THRESH_BINARY, 9, 41)kernel = np.ones((1, 1), np.uint8)opening = cv2.morphologyEx(filtered, cv2.MORPH_OPEN, kernel)closing = cv2.morphologyEx(opening, cv2.MORPH_CLOSE, kernel)img = image_smoothening(img)or_image = cv2.bitwise_or(img, closing)return or_image
交流群
欢迎加入公众号读者群一起和同行交流,目前有SLAM、三维视觉、传感器、自动驾驶、计算摄影、检测、分割、识别、医学影像、GAN、算法竞赛等微信群(以后会逐渐细分),请扫描下面微信号加群,备注:”昵称+学校/公司+研究方向“,例如:”张三 + 上海交大 + 视觉SLAM“。请按照格式备注,否则不予通过。添加成功后会根据研究方向邀请进入相关微信群。请勿在群内发送广告,否则会请出群,谢谢理解~