
【Vue.js】875- Vue 3.0 进阶之自定义事件探秘
共 11836字,需浏览 24分钟
· 2021-02-21
这是 Vue 3.0 进阶系列 的第二篇文章,该系列的第一篇文章是 Vue 3.0 进阶之指令探秘。本文阿宝哥将以一个简单的示例为切入点,带大家一起一步步揭开自定义事件背后的秘密。
<div id="app">div>
<script>
const app = Vue.createApp({
template: '' ,
methods: {
sayHi() {
console.log('你好,我是阿宝哥!');
}
}
})
app.component('welcome-button', {
emits: ['welcome'],
template: `
欢迎
`
})
app.mount("#app")
script>
在以上示例中,我们先通过 Vue.createApp 方法创建 app 对象,之后利用该对象上的 component 方法注册全局组件 —— welcome-button 组件。在定义该组件时,我们通过 emits 属性定义了该组件上的自定义事件。当然用户点击 欢迎 按钮时,就会发出 welcome 事件,之后就会调用 sayHi 方法,接着控制台就会输出 你好,我是阿宝哥! 。
虽然该示例比较简单,但也存在以下 2 个问题:
$emit方法来自哪里?自定义事件的处理流程是什么?
下面我们将围绕这些问题来进一步分析自定义事件背后的机制,首先我们先来分析第一个问题。
一、$emit 方法来自哪里?
使用 Chrome 开发者工具,我们在 sayHi 方法内部加个断点,然后点击 欢迎 按钮,此时函数调用栈如下图所示:
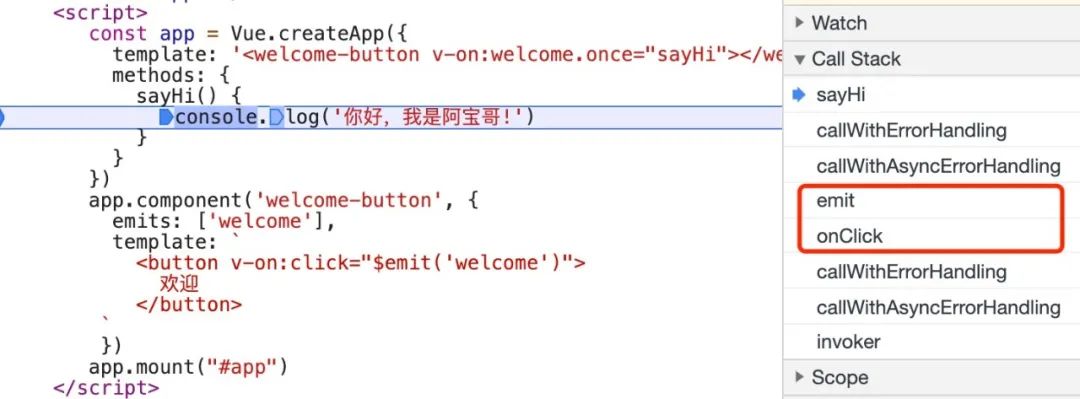
在上图右侧的调用栈,我们发现了一个存在于 componentEmits.ts 文件中的 emit 方法。但在模板中,我们使用的是 $emit 方法,为了搞清楚这个问题,我们来看一下 onClick 方法:
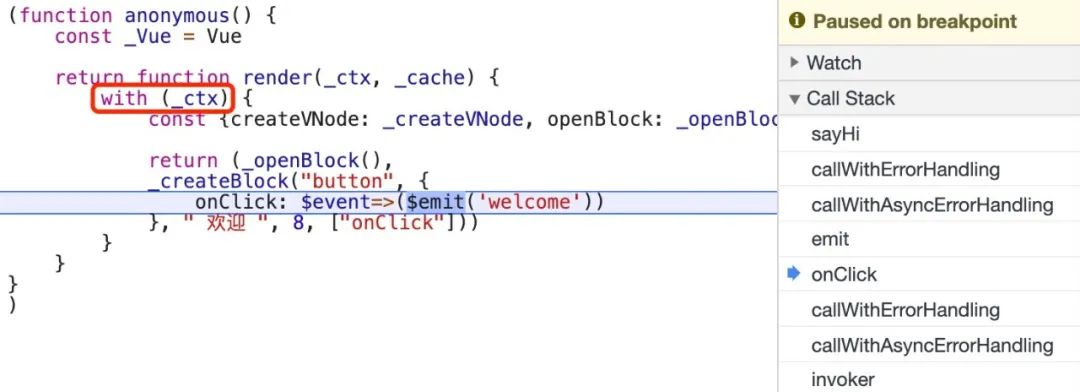
由上图可知,我们的 $emit 方法来自 _ctx 对象,那么该对象是什么对象呢?同样,利用断点我们可以看到 _ctx 对象的内部结构:
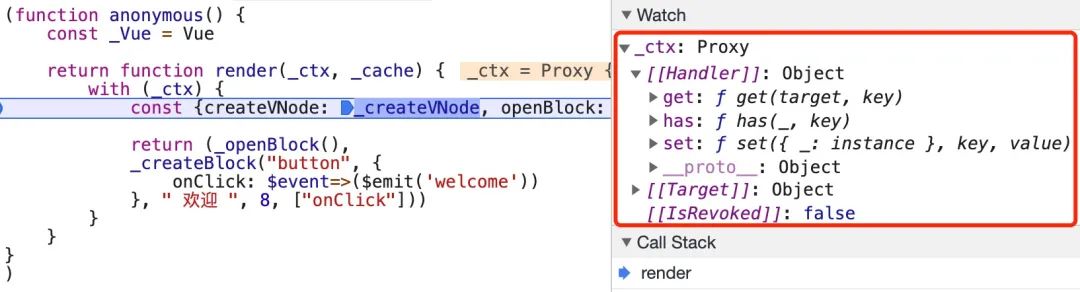
很明显 _ctx 对象是一个 Proxy 对象,如果你对 Proxy 对象还不了解,可以阅读 你不知道的 Proxy 这篇文章。当访问 _ctx 对象的 $emit 属性时,将会进入 get 捕获器,所以接下来我们来分析 get 捕获器:
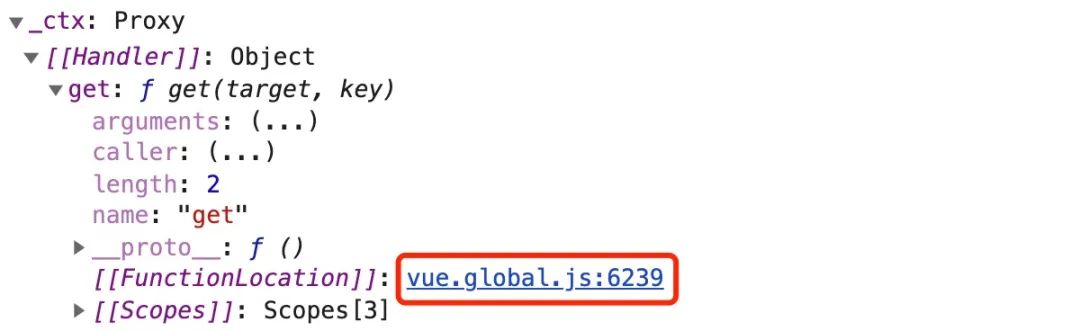
通过 [[FunctionLocation]] 属性,我们找到了 get 捕获器的定义,具体如下所示:
// packages/runtime-core/src/componentPublicInstance.ts
export const RuntimeCompiledPublicInstanceProxyHandlers = extend(
  {},
  PublicInstanceProxyHandlers,
  {
    get(target: ComponentRenderContext, key: string) {
      // fast path for unscopables when using `with` block
      if ((key as any) === Symbol.unscopables) {
        return
      }
      return PublicInstanceProxyHandlers.get!(target, key, target)
    },
    has(_: ComponentRenderContext, key: string) {
      const has = key[0] !== '_' && !isGloballyWhitelisted(key)
      // 省略部分代码
      return has
    }
  }
)
观察以上代码可知,在 get 捕获器内部会继续调用 PublicInstanceProxyHandlers 对象的 get 方法来获取 key 对应的值。由于 PublicInstanceProxyHandlers 内部的代码相对比较复杂,这里我们只分析与示例相关的代码:
// packages/runtime-core/src/componentPublicInstance.ts
export const PublicInstanceProxyHandlers: ProxyHandler<any> = {
  get({ _: instance }: ComponentRenderContext, key: string) {
    const { ctx, setupState, data, props, accessCache, type, appContext } = instance

    // 省略大部分内容
    const publicGetter = publicPropertiesMap[key]
    // public $xxx properties
    if (publicGetter) {
      if (key === '$attrs') {
        track(instance, TrackOpTypes.GET, key)
        __DEV__ && markAttrsAccessed()
      }
      return publicGetter(instance)
    },
    // 省略set和has捕获器
}
在上面代码中,我们看到了 publicPropertiesMap 对象,该对象被定义在 componentPublicInstance.ts 文件中:
// packages/runtime-core/src/componentPublicInstance.ts
const publicPropertiesMap: PublicPropertiesMap = extend(Object.create(null), {
  $: i => i,
  $el: i => i.vnode.el,
  $data: i => i.data,
  $props: i => (__DEV__ ? shallowReadonly(i.props) : i.props),
  $attrs: i => (__DEV__ ? shallowReadonly(i.attrs) : i.attrs),
  $slots: i => (__DEV__ ? shallowReadonly(i.slots) : i.slots),
  $refs: i => (__DEV__ ? shallowReadonly(i.refs) : i.refs),
  $parent: i => getPublicInstance(i.parent),
  $root: i => getPublicInstance(i.root),
  $emit: i => i.emit,
  $options: i => (__FEATURE_OPTIONS_API__ ? resolveMergedOptions(i) : i.type),
  $forceUpdate: i => () => queueJob(i.update),
  $nextTick: i => nextTick.bind(i.proxy!),
  $watch: i => (__FEATURE_OPTIONS_API__ ? instanceWatch.bind(i) : NOOP)
} as PublicPropertiesMap)
在 publicPropertiesMap 对象中,我们找到了 $emit 属性,该属性的值为 $emit: i => i.emit,即 $emit 指向的是参数 i 对象的 emit 属性。下面我们来看一下,当获取 $emit 属性时,target 对象是什么:

由上图可知 target 对象有一个 _ 属性,该属性的值是一个对象,且该对象含有 vnode、type 和 parent 等属性。因此我们猜测 _ 属性的值是组件实例。为了证实这个猜测,利用 Chrome 开发者工具,我们就可以轻易地分析出组件挂载过程中调用了哪些函数:

在上图中,我们看到了在组件挂载阶段,调用了 createComponentInstance 函数。顾名思义,该函数用于创建组件实例,其具体实现如下所示:
// packages/runtime-core/src/component.ts
export function createComponentInstance(
  vnode: VNode,
  parent: ComponentInternalInstance | null,
  suspense: SuspenseBoundary | null
) {
  const type = vnode.type as ConcreteComponent
  const appContext =
    (parent ? parent.appContext : vnode.appContext) || emptyAppContext

  const instance: ComponentInternalInstance = {
    uid: uid++,
    vnode,
    type,
    parent,
    appContext,
    // 省略大部分属性
    emit: null as any,
    emitted: null,
  }
  if (__DEV__) { // 开发模式
    instance.ctx = createRenderContext(instance)
  } else { // 生产模式
    instance.ctx = { _: instance }
  }
  instance.root = parent ? parent.root : instance
  instance.emit = emit.bind(null, instance)

  return instance
}
在以上代码中,我们除了发现 instance 对象之外,还看到了 instance.emit = emit.bind(null, instance) 这个语句。这时我们就找到了 $emit 方法来自哪里的答案。弄清楚第一个问题之后,接下来我们来分析自定义事件的处理流程。
二、自定义事件的处理流程是什么?
要搞清楚,为什么点击 欢迎 按钮派发 welcome 事件之后,就会自动调用 sayHi 方法的原因。我们就必须分析 emit 函数的内部处理逻辑,该函数被定义在 runtime-core/src/componentEmits.t 文件中:
// packages/runtime-core/src/componentEmits.ts
export function emit(
  instance: ComponentInternalInstance,
  event: string,
  ...rawArgs: any[]
) {
  const props = instance.vnode.props || EMPTY_OBJ
 // 省略大部分代码
  let args = rawArgs

  // convert handler name to camelCase. See issue #2249
  let handlerName = toHandlerKey(camelize(event))
  let handler = props[handlerName]

  if (handler) {
    callWithAsyncErrorHandling(
      handler,
      instance,
      ErrorCodes.COMPONENT_EVENT_HANDLER,
      args
    )
  }
}
其实在 emit 函数内部还会涉及 v-model update:xxx 事件的处理,关于 v-model 指令的内部原理,阿宝哥会写单独的文章来介绍。这里我们只分析与当前示例相关的处理逻辑。
在 emit 函数中,会使用 toHandlerKey 函数把事件名转换为驼峰式的 handlerName:
// packages/shared/src/index.ts
export const toHandlerKey = cacheStringFunction(
  (str: string) => (str ? `on${capitalize(str)}` : ``)
)
在获取 handlerName 之后,就会从 props 对象上获取该 handlerName 对应的 handler 对象。如果该 handler 对象存在,则会调用 callWithAsyncErrorHandling 函数,来执行当前自定义事件对应的事件处理函数。callWithAsyncErrorHandling 函数的定义如下:
// packages/runtime-core/src/errorHandling.ts
export function callWithAsyncErrorHandling(
  fn: Function | Function[],
  instance: ComponentInternalInstance | null,
  type: ErrorTypes,
  args?: unknown[]
): any[] {
  if (isFunction(fn)) {
    const res = callWithErrorHandling(fn, instance, type, args)
    if (res && isPromise(res)) {
      res.catch(err => {
        handleError(err, instance, type)
      })
    }
    return res
  }

  // 处理多个事件处理器
  const values = []
  for (let i = 0; i < fn.length; i++) {
    values.push(callWithAsyncErrorHandling(fn[i], instance, type, args))
  }
  return values
}
通过以上代码可知,如果 fn 参数是函数对象的话,在 callWithAsyncErrorHandling 函数内部还会继续调用 callWithErrorHandling 函数来最终执行事件处理函数:
// packages/runtime-core/src/errorHandling.ts
export function callWithErrorHandling(
  fn: Function,
  instance: ComponentInternalInstance | null,
  type: ErrorTypes,
  args?: unknown[]
) {
  let res
  try {
    res = args ? fn(...args) : fn()
  } catch (err) {
    handleError(err, instance, type)
  }
  return res
}
在 callWithErrorHandling 函数内部,使用 try catch 语句来捕获异常并进行异常处理。如果调用 fn 事件处理函数之后,返回的是一个 Promise 对象的话,则会通过 Promise 对象上的 catch 方法来处理异常。了解完上面的内容,再回顾一下前面见过的函数调用栈,相信此时你就不会再陌生了。

现在前面提到的 2 个问题,我们都已经找到答案了。为了能更好地掌握自定义事件的相关内容,阿宝哥将使用 Vue 3 Template Explorer 这个在线工具,来分析一下示例中模板编译的结果:
App 组件模板
"sayHi"></welcome-button>

const _Vue = Vue
return function render(_ctx, _cache, $props, $setup, $data, $options) {
  with (_ctx) {
    const { resolveComponent: _resolveComponent, createVNode: _createVNode,
      openBlock: _openBlock, createBlock: _createBlock } = _Vue
    const _component_welcome_button = _resolveComponent("welcome-button")

    return (_openBlock(), _createBlock(_component_welcome_button,
     { onWelcome: sayHi }, null, 8 /* PROPS */, ["onWelcome"]))
  }
}
welcome-button 组件模板
"$emit('welcome')">欢迎</button>

const _Vue = Vue
return function render(_ctx, _cache, $props, $setup, $data, $options) {
  with (_ctx) {
    const { createVNode: _createVNode, openBlock: _openBlock,
      createBlock: _createBlock } = _Vue

    return (_openBlock(), _createBlock("button", {
      onClick: $event => ($emit('welcome'))
    }, "欢迎", 8 /* PROPS */, ["onClick"]))
  }
}
观察以上结果,我们可知通过 v-on: 绑定的事件,都会转换为以 on 开头的属性,比如 onWelcome 和 onClick。为什么要转换成这种形式呢?这是因为在 emit 函数内部会通过 toHandlerKey 和 camelize 这两个函数对事件名进行转换:
// packages/runtime-core/src/componentEmits.ts
export function emit(
  instance: ComponentInternalInstance,
  event: string,
  ...rawArgs: any[]
) {
 // 省略大部分代码
  // convert handler name to camelCase. See issue #2249
  let handlerName = toHandlerKey(camelize(event))
  let handler = props[handlerName]
}
为了搞清楚转换规则,我们先来看一下 camelize 函数:
// packages/shared/src/index.ts
const camelizeRE = /-(\w)/g

export const camelize = cacheStringFunction(
  (str: string): string => {
    return str.replace(camelizeRE, (_, c) => (c ? c.toUpperCase() : ''))
  }
)
观察以上代码,我们可以知道 camelize 函数的作用,用于把 kebab-case (短横线分隔命名) 命名的事件名转换为 camelCase (驼峰命名法) 的事件名,比如 "test-event" 事件名经过 camelize 函数处理后,将被转换为 "testEvent"。该转换后的结果,还会通过 toHandlerKey 函数进行进一步处理,toHandlerKey 函数被定义在 shared/src/index.ts 文件中:
// packages/shared/src/index.ts
export const toHandlerKey = cacheStringFunction(
  (str: string) => (str ? `on${capitalize(str)}` : ``)
)

export const capitalize = cacheStringFunction(
  (str: string) => str.charAt(0).toUpperCase() + str.slice(1)
)
对于前面使用的 "testEvent" 事件名经过 toHandlerKey 函数处理后,将被最终转换为 "onTestEvent" 的形式。为了能够更直观地了解事件监听器的合法形式,我们来看一下 runtime-core 模块中的测试用例:
// packages/runtime-core/__tests__/componentEmits.spec.ts
test('isEmitListener', () => {
  const options = {
    click: null,
    'test-event': null,
    fooBar: null,
    FooBaz: null
  }
  expect(isEmitListener(options, 'onClick')).toBe(true)
  expect(isEmitListener(options, 'onclick')).toBe(false)
  expect(isEmitListener(options, 'onBlick')).toBe(false)
  // .once listeners
  expect(isEmitListener(options, 'onClickOnce')).toBe(true)
  expect(isEmitListener(options, 'onclickOnce')).toBe(false)
  // kebab-case option
  expect(isEmitListener(options, 'onTestEvent')).toBe(true)
  // camelCase option
  expect(isEmitListener(options, 'onFooBar')).toBe(true)
  // PascalCase option
  expect(isEmitListener(options, 'onFooBaz')).toBe(true)
})
了解完事件监听器的合法形式之后,我们再来看一下 cacheStringFunction 函数:
// packages/shared/src/index.ts
const cacheStringFunction = extends (str: string) => string>(fn: T): T => {
  const cache: Record<string, string> = Object.create(null)
  return ((str: string) => {
    const hit = cache[str]
    return hit || (cache[str] = fn(str))
  }) as any
}
以上代码也比较简单,cacheStringFunction 函数的作用是为了实现缓存功能。
三、阿宝哥有话说
3.1 如何在渲染函数中绑定事件?
在前面的示例中,我们通过 v-on 指令完成事件绑定,那么在渲染函数中如何绑定事件呢?
<div id="app">div>
<script>
  const { createApp, defineComponent, h } = Vue

  const Foo = defineComponent({
    emits: ["foo"],
    render() { return h("h3", "Vue 3 自定义事件")},
    created() {
      this.$emit('foo');
    }
  });
  const onFoo = () => {
    console.log("foo be called")
  };
  const Comp = () => h(Foo, { onFoo })
  const app = createApp(Comp);
  app.mount("#app")
script>
在以上示例中,我们通过 defineComponent 全局 API 定义了 Foo 组件,然后通过 h 函数创建了函数式组件 Comp,在创建 Comp 组件时,通过设置 onFoo 属性实现了自定义事件的绑定操作。
3.2 如何只执行一次事件处理器?
在模板中设置
"sayHi"></welcome-button>

const _Vue = Vue
return function render(_ctx, _cache, $props, $setup, $data, $options) {
  with (_ctx) {
    const { resolveComponent: _resolveComponent, createVNode: _createVNode,
      openBlock: _openBlock, createBlock: _createBlock } = _Vue
    const _component_welcome_button = _resolveComponent("welcome-button")

    return (_openBlock(), _createBlock(_component_welcome_button,
      { onWelcomeOnce: sayHi }, null, 8 /* PROPS */, ["onWelcomeOnce"]))
  }
}
在以上代码中,我们使用了 once 事件修饰符,来实现只执行一次事件处理器的功能。除了 once 修饰符之外,还有其他的修饰符,比如:
<a @click.stop="doThis">a>


<form @submit.prevent="onSubmit">form>


<a @click.stop.prevent="doThat">a>


<form @submit.prevent>form>


<div @click.capture="doThis">...div>


<div @click.self="doThat">...div>
在渲染函数中设置
"app"></div>