SpringBoot原理及源码剖析
共 9649字,需浏览 20分钟
· 2021-01-11
点击上方蓝色字体,选择“标星公众号”
优质文章,第一时间送达
前言
现在spring boot已成为主流的开发框架之一,相信不少读者项目都已使用了此框架,所以基于框架的使用就不再赘述,主要聊聊它的思想和原理。
基础介绍
核心思想
约定由于配置就是springboot的核心思想,又称按约定编程,本质上就死如果大家遵守其制定的规范,就无需提供额外的配置。举个栗子来讲比如项目中创建了user类,默认情况下数据库中就应该会存在一张user表,只有偏离这一约定,比如user表改成person表的时候,就需要写有关表名的映射配置。
springboot 的优点
再谈springboot的优点之前先谈谈之前的spring的优缺点
spring的优点:主要为ioc和aop两块
spring的缺点:1. 繁重的配置文件,最初的xml配置可算得上是重量级配置,2.5版本引入了基于注解的组件扫描,3.0的时候引入了基于java的配置,至今现在大多项目都已采用注解配置来代替xml配置。
2. 项目的依赖管理耗时耗力,各个引入的组件依赖还是版兼容性都容易引起很多问题。
而springboot就针对spring的局限性进行改良和优化:
起步依赖
本质上来讲是一个maven对象模型(pom),定义了其他库的传递依赖,这些东西加一起支持某项功能,简单来讲,起步依赖就是将某种功能的坐标打包一起,并提供一些默认功能。
自动配置
指的是springboot会自动将一些配置类的bean注入到容器里,我们需要使用的地方可以用@Autowired,@Resource注解来使用它。
“自动”的意思为我们想使用某个功能包,我们只需引用,相关的配置不必要管,springboot会自动注入这些配置bean,我们只需使用即可。
源码剖析
依赖管理
思考项目中引入pom依赖为何不需要标明版本号也可以正常运行。
无非是引入了spring-boot-starter-parent和spring-boot-starter-web核心依赖,所以接下来看下核心依赖
spring-boot-starter-parent
org.springframework.boot
spring-boot-starter-parent<11./artifactId>
2.2.2.RELEASE
点击这个父依赖进去后,发了里面还有一个父依赖spring-boot-dependencies
org.springframework.boot
spring-boot-dependencies
2.2.2.RELEASE
../../spring-boot-dependencies
继续查看spring-boot-dependencies底层源文件,核心代码如下:
5.15.11
...
8.2.0
8.0.18
2.3.1
2.2.2.RELEASE
2.0.4.RELEASE
1.2.4.RELEASE
5.2.1.RELEASE
Corn-RELEASE
3.0.8.RELEASE
3.28.0
${jakarta-mail.version}
9.0.29
3.0.11.RELEASE
2.0.1attribute.version>
...
可以发现该文件都常用的依赖组件进行统一的版本号管理,如activemq,spring,tomcat,都与Spring Boot 2.2.2版本一致,这也是为啥引入一些依赖无需填写版本号的原因。
spring-boot-starter-web
先查看pom源码,
org.springframework.boot
spring-boot-starter
2.2.2.RELEASE
compile


org.springframework.boot
spring-boot-starter-json
2.2.2.RELEASE
compile


org.springframework.boot
spring-boot-starter-tomcat
2.2.2.RELEASE
compile


org.springframework.boot
spring-boot-starter-validation
2.2.2.RELEASE
compile


tomcat-embed-el
org.apache.tomcat.embed


org.springframework
spring-web
5.2.2.RELEASE
compile


org.springframework
spring-webmvc
5.2.2.RELEASE
compile
可以看到web依赖中已提供web开发所需的所有底层依赖,所以引入这一个依赖就无需引入其他相关web开发依赖。
自动配置
springboot如何做到自动配置的,先看下启动类上的@SpringBootApplication注解
@SpringBootApplication
public class SpringbootDemoApplication {
public static void main(String[] args) {
SpringApplication.run(SpringbootDemoApplication.class, args);
}
}
@Target({ElementType.TYPE}) //注解的适用范围,Type表示注解可以在类,接口,枚举或注解中
@Retention(RetentionPolicy.RUNTIME) //表示注解的生命周期Runtime运行时
@Documented //表示注解可以记录在javadoc中
@Inherited //表示注解可以被子类继承
@SpringBootConfiguration // 标明该类为配置类
@EnableAutoConfiguration // 启动自动配置功能
@ComponentScan( // 包扫描器
excludeFilters = {@Filter(
type = FilterType.CUSTOM,
classes = {TypeExcludeFilter.class}
), @Filter(
type = FilterType.CUSTOM,
classes = {AutoConfigurationExcludeFilter.class}
)}
)
public @interface SpringBootApplication {
...
}
可以看出,@SpringBootApplicatio是一个组合注解,我们主要关注里面的三个注解@SpringBootConfiguration,@EnableAutoConfiguration,@ComponentScan
@SpringBootConfiguration注解
先看下注解源码
@Target({ElementType.TYPE})
@Retention(RetentionPolicy.RUNTIME)
@Documented
@Configuration //配置IOC容器
public @interface SpringBootConfiguration {
}
可以看到其中引入了@Configuration注解,即可以被Srping扫描到的配置注解,所以@SpringBootConfiguration与@Configuration作用相同,都是标志一个可以被扫描到的配置类,只不过@SpringBootConfiguration被springboot重新封装命名而已。
@EnableAutoConfiguration注解
@EnableAutoConfiguration注解表示开启自动配置功能,这是一个核心注解,先看下源码
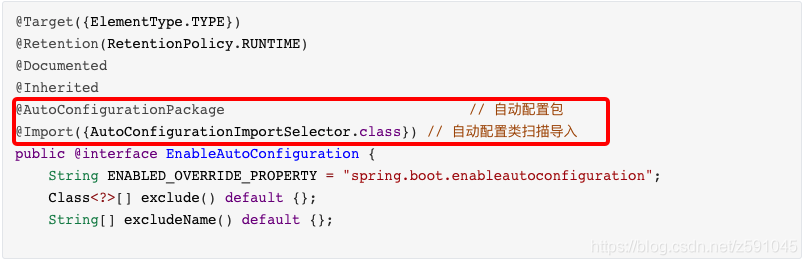
可以发现它也是一个组合注解,借助@Import来收集并注册特定场景的相关bean并加载到ioc容器中。
继续看下@AutoConfigurationPackage源码
@Target({ElementType.TYPE})
@Retention(RetentionPolicy.RUNTIME)
@Documented
@Inherited
@Import({Registrar.class}) // 导入Registrar中注册的组件
public @interface AutoConfigurationPackage {
}
可以看到借助@Import注解引入Registrar类到容器中,查看下Registrar这个类的源码。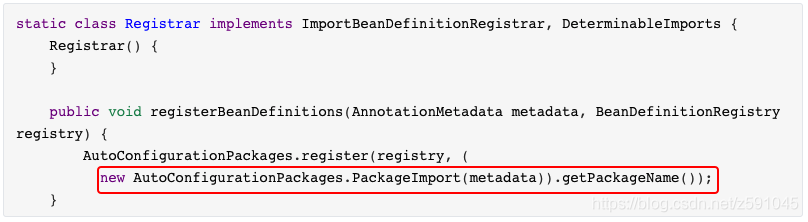
在Registrar类下的registerBeanDefinitions()方法,当调式的时候可以看到这里获取到注解的包名,说明@AutoConfigurationPackage作用就是将主程序类所在包和所有子包下的组件扫描到spring容器中。
这也是为啥要讲启动类放在最外层的包下的原因。
继续看下@Import({AutoConfigurationImportSelector.class})导入的这个AutoConfigurationImportSelector类。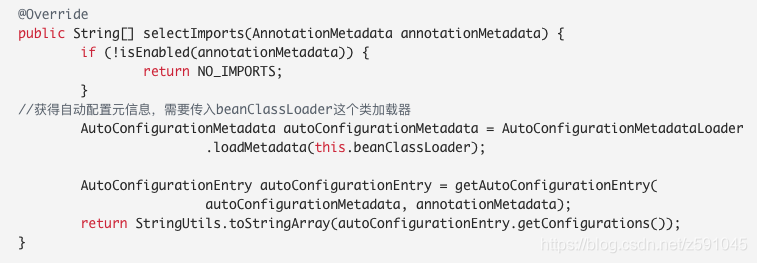
看下里面的loadMetadata方法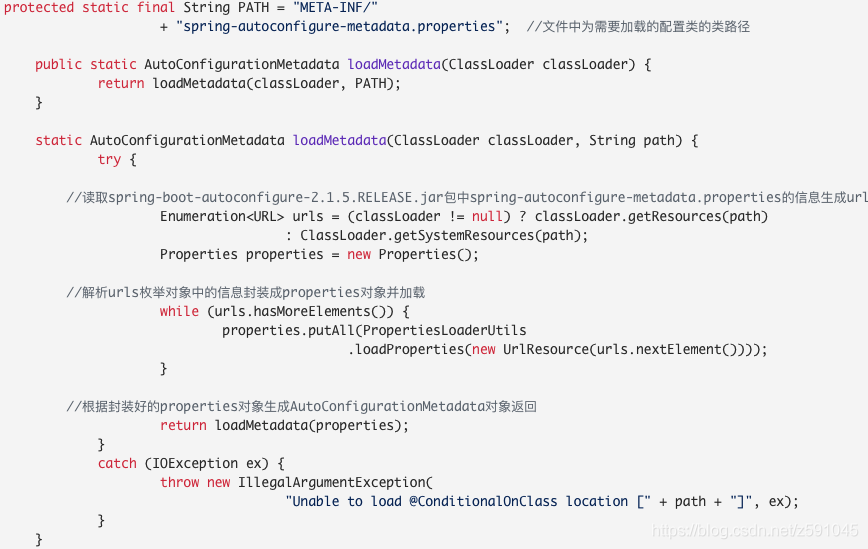
继续深入到里面的getCandidateConfigurations下的loadFactoryNames方法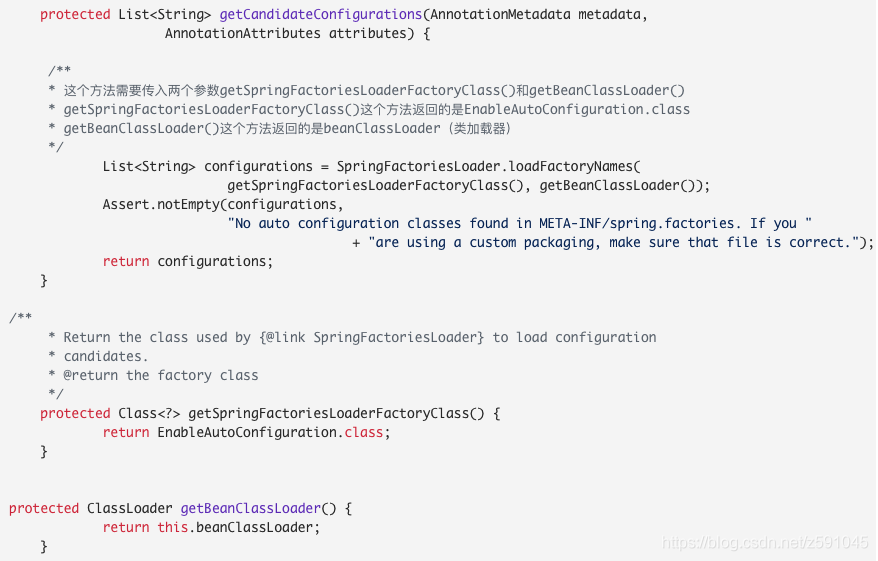
继续观察loadFactory方法
  public static List loadFactoryNames(Class factoryClass, @Nullable
            ClassLoader classLoader) {
  //获取出入的键
        String factoryClassName = factoryClass.getName();
        return
                (List)loadSpringFactories(classLoader).getOrDefault(factoryClassName,
                        Collections.emptyList());
    }
    private static Map> loadSpringFactories(@Nullable
                                                                         ClassLoader classLoader) {
        MultiValueMap result =
                (MultiValueMap)cache.get(classLoader);
        if (result != null) {
            return result;
        } else {
            try {
//如果类加载器不为null则加载类路径下的spring.factories,将其中设置的配置类全路径信息封装为类Enumeration对象
                Enumeration urls = classLoader != null ?
                        classLoader.getResources("META-INF/spring.factories") :
                        ClassLoader.getSystemResources("META-INF/spring.factories");
                LinkedMultiValueMap result = new LinkedMultiValueMap();
                //循环Enumeration类对象。根据相应的节点信息生成Properties对象,通过传入的键获取值,在将值切分一个个字符串转为array,方法result集合中
                while(urls.hasMoreElements()) {
                    URL url = (URL)urls.nextElement();
                    UrlResource resource = new UrlResource(url);
                    Properties properties =
                            PropertiesLoaderUtils.loadProperties(resource);
                    Iterator var6 = properties.entrySet().iterator();
                    while(var6.hasNext()) {
                        Entry entry = (Entry)var6.next();
                        String factoryClassName =
                                ((String)entry.getKey()).trim();
                        String[] var9 =
                                StringUtils.commaDelimitedListToStringArray((String)entry.getValue());
                        int var10 = var9.length;
                        for(int var11 = 0; var11 < var10; ++var11) {
                            String factoryName = var9[var11];
                            result.add(factoryClassName, factoryName.trim());
                        }
                    }
                }
                cache.put(classLoader, result);
                return result;
最终发现会去读取spring.factories这个文件
public final class SpringFactoriesLoader {
public static final String FACTORIES_RESOURCE_LOCATION = "META-
INF/spring.factories";
}
而这个文件其实在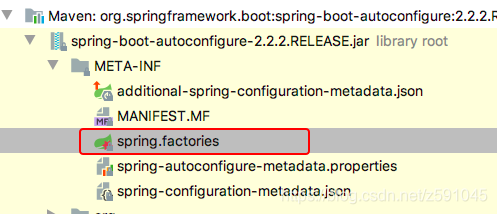
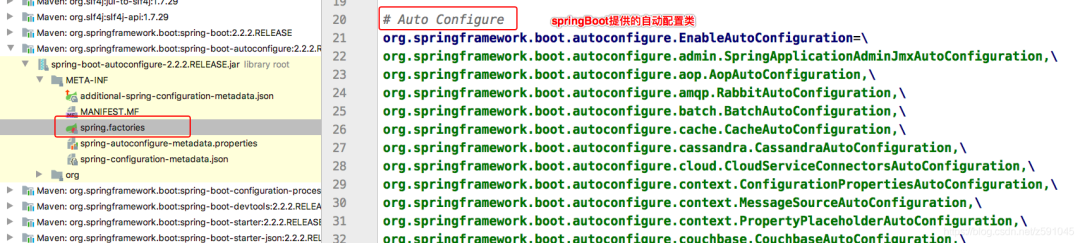
@EnableAutoConfiguration就是从classpath中搜索META-INF/spring.factories配置文件,并将其中的org.springframework.boot.autoconfigure.EnableutoConfiguration对应的配置项通过反射(Java
Refletion)实例化为对应的标注@Configuration的JavaConfig形式的配置类,并加载到IOC容器中。
所以总结一下,springboot底层自动配置实现步骤如下:
springboot启动
@SpringBootApplication起作用
@EnableAutoConfiguration
@AutoConfigurationPackage这个组合注解为
@Import(AutoConfigurationPackages.Registrar.class)将Registrar类导入到容器中,Registrar将主程序类所在包和所有子包下的组件扫描到springboot容器中@Import(AutoConfigurationImportSelector.class)它通过将AutoConfigurationImportSelector类导入到容器中,AutoConfigurationImportSelector作用是通过selectImports方法的执行过程中,使用内部类SpringFactoriesLoader,查找classpath上所有jar包中的META-INF/spring.factories进行加载,实现将配置信息交给SpringFactory进行一系列容器创建的过程中。
@ComponentScan注解
@ComponentScan注解具体扫描的包路径是由主程序文件所在的位置决定的,在扫描过程中通过上面介绍的@AutoConfigurationPackage进行解析,从而获取到项目主程序启动类所在的包的具体位置。
总的来说@SpringBootApplication的功能就是三个注解的组合使用。
|- @SpringBootConfiguration
|- @Configuration //通过javaConfig来添加组件到IOC中
|- @EnableAutoConfiguration
|- @AutoConfigurationPackage //自动配置包,与@ComponentScan扫描到的添加到IOC
|- @Import(AutoConfigurationImportSelector.class) //到META-INF/spring.factories中定义的bean添加到IOC容器中
|- @ComponentScan //包扫描
启动流程
先观察下启动类的main方法
@SpringBootApplication
public class SpringbootDemoApplication {
public static void main(String[] args) {
SpringApplication.run(SpringbootDemoApplication.class, args);
}
}
追进去
public static ConfigurableApplicationContext run(Class primarySource,
String... args) {
return run(new Class[]{primarySource}, args);
}
public static ConfigurableApplicationContext run(Class[] primarySources,
String[] args) {
return (new SpringApplication(primarySources)).run(args);
}
发现SpringApplication.run()方法主要分两步,SpringApplication实例的初始化和调用run启动项目。
查看SpringApplication的实例化
  public SpringApplication(ResourceLoader resourceLoader, Class...
            primarySources) {
        this.sources = new LinkedHashSet();
        this.bannerMode = Mode.CONSOLE;
        this.logStartupInfo = true;
        this.addCommandLineProperties = true;
        this.addConversionService = true;
        this.headless = true;
        this.registerShutdownHook = true;
        this.additionalProfiles = new HashSet();
        this.isCustomEnvironment = false;
        this.resourceLoader = resourceLoader;
        Assert.notNull(primarySources, "PrimarySources must not be null");
  //把项目起到呢类.class设置为属性存储起来
        this.primarySources = new LinkedHashSet(Arrays.asList(primarySources));
  //判断当前webApplicationType应用的类型
        this.webApplicationType = WebApplicationType.deduceFromClasspath();
  // 设置初始化器(Initializer),最后调用这些初始化器
        this.setInitializers(this.getSpringFactoriesInstances(
                ApplicationContextInitializer.class));
  // 设置监听器(Listener)
        this.setListeners(this.getSpringFactoriesInstances(ApplicationListener.class))
        ;
  // 用于推断并设置项目的main()方法启动的主程序启动类
        this.mainApplicationClass = this.deduceMainApplicationClass();

查看run方法
    public ConfigurableApplicationContext run(String... args) {
        StopWatch stopWatch = new StopWatch();
        stopWatch.start();
        ConfigurableApplicationContext context = null;
        Collection exceptionReporters = new
                ArrayList();
        this.configureHeadlessProperty();
  // 1.获取并监听容器
        SpringApplicationRunListeners listeners = this.getRunListeners(args);
        listeners.starting();
        Collection exceptionReporters;
        try {
            ApplicationArguments applicationArguments =
                    new DefaultApplicationArguments(args);
  // 2.根据SpringApplicationRunListeners以及参数来准备环境
            ConfigurableEnvironment environment =
                    this.prepareEnvironment(listeners, applicationArguments);
            this.configureIgnoreBeanInfo(environment);
  // 准备Banner打印器 - 就是启动Spring Boot时打印在console上的ASCII字体
            Banner printedBanner = this.printBanner(environment);
  // 3. 创建Spring容器
            context = this.createApplicationContext();
            exceptionReporters =
                    this.getSpringFactoriesInstances(SpringBootExceptionReporter.class,
                            new Class[]{ConfigurableApplicationContext.class}, new Object[]{context});
  // 4. Spring容器前置处理
            this.prepareContext(context, environment, listeners,
                    applicationArguments, printedBanner);
  // 5 刷新容器
            this.refreshContext(context);
  // 6.Spring容器后置处理
            this.afterRefresh(context, applicationArguments);
            stopWatch.stop();
            if(this.logStartupInfo) {
                (new StartupInfoLogger(this.mainApplicationClass))
                        .logStarted(this.getApplicationLog(), stopWatch);
            }
  // 7.发出结束执行的事件
            listeners.started(context);
  // 返回容器
            this.callRunners(context, applicationArguments);
        } catch (Throwable var10) {
            this.handleRunFailure(context, var10, exceptionReporters, listeners);
            throw new IllegalStateException(var10);
        }
        try {
            listeners.running(context);
            return context;
        } catch (Throwable var9) {
            this.handleRunFailure(context, var9, exceptionReporters,
                    (SpringApplicationRunListeners)null);
            throw new IllegalStateException(var9);
        }
    }
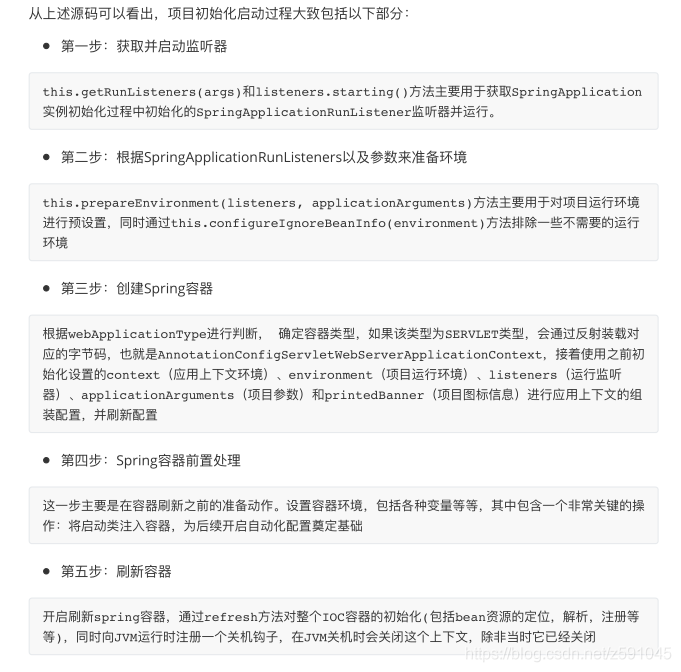

下面有一个详细的启动流程图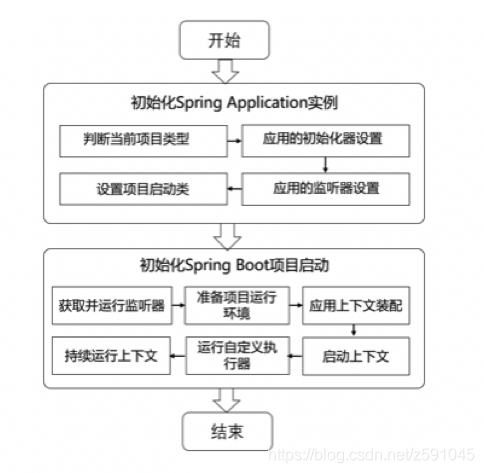
总结
本文介绍了springboot容器的优点以及版本控制和自动装配的思想和原理。
版权声明:本文为博主原创文章,遵循 CC 4.0 BY-SA 版权协议,转载请附上原文出处链接和本声明。
本文链接:
https://blog.csdn.net/z591045/article/details/112190401
粉丝福利:Java从入门到入土学习路线图
👇👇👇

👆长按上方微信二维码 2 秒
感谢点赞支持下哈