 软测小生
软测小生


环境搭建
1. 需要lib包
httpclient-4.2.5.jar         -- http请求
jettison.jar                 -- 组装解析Json
ojdbc7.jar                   -- 数据库操作
testng.jar                   -- 测试用例执行与结果断言,无需单独下载,安装eclipse插件即可
reportng-1.1.4.jar           -- testng测试报告美化插件
velocity-dep-1.4.jar         -- reportng-1.1.4.jar的依赖库
guice-4.0.jar                -- reportng-1.1.4.jar的依赖库
2. 相关配置安装
2.1 Eclipse安装testng插件:
安装:Eclipse --> Help --> Install NewSoftWare --> Add
2.2 美化测试报告插件Reportng配置:
配置:Eclipse --> Window --> Preferences --> testng
勾选Disable default listeners
PreDefinedListeners输入框中输入
org.uncommons.reportng.HTMLReporter
2.3 使用Reportng后测试报告结果路径:
test-output --> html
TestNG简介与实例
1. TestNG与Junit对比
1.1 Junit缺点:
● 最初的设计,使用于单元测试,现在只用于各种测试;
● 不能依赖测试;
● 配置控制欠佳(安装/拆卸);
● 侵入性(强制扩展类,并以某种方式命名方法);
● 静态编程模型(不必要的重新编译);
● 不适合管理复杂项目应用,JUnit复杂项目中测试非常棘手。
1.2 TestNG是什么?
TestNG按照其文档的定义是:
● TestNG是一个测试框架,其灵感来自Junit和NUnit的,但引入了一些新功能,使其功能更强大,使用更方便。
● TestNG是一个开源自动化测试框架,TestNG表示下一代。TestNG是类似于Junit(特别是Junit4),但它不是一个Junit扩展。它的灵感来源于Junit。它的目的是优于Junit的,尤其是当测试集成的类。
● TestNG消除了大部分的旧框架的限制,使开发人员能够编写更加灵活和强大的测试。因为它在很大程度上借鉴了Java注解(JDK5.0引入的)来定义的测试,它也可以告诉你如何使用这个新功能在真实的Java语言生产环境中。
1.3 TestNG特点
● 注解
● TestNG使用Java和面向对象的功能;
● 支持综合类测试(例如,默认情况下,不用创建一个新的测试每个测试方法的类的实例);
● 独立的编译时测试代码和运行时配置/数据信息
● 灵活的运行时配置;
● 主要介绍“测试组”。当编译测试,只要要求TestNG运行所有的“前端”的测试,或“快”,“慢”,“数据库”等;
● 支持依赖测试方法,并行测试,负载测试,局部故障;
● 灵活的插件API;
● 支持多线程测试。
2. TestNG注解与基础实例
2.1 注解
| 注解 | 描述 |
|---|---|
| @BeforeSuite | 注解的方法将只运行一次,运行所有测试前此套件中。 |
| @AfterSuite | 注解的方法将只运行一次此套件中的所有测试都运行之后。 |
| @BeforeClass | 注解的方法将只运行一次先行先试在当前类中的方法调用。 |
| @AfterClass | 注解的方法将只运行一次后已经运行在当前类中的所有测试方法。 |
| @BeforeTest | 注解的方法将被运行之前的任何测试方法属于内部类的标签的运行。 |
| @AfterTest | 注解的方法将被运行后,所有的测试方法,属于内部类的标签的运行。 |
| @BeforeGroups | 按组( @Test(groups= "findyou") )运行时,此注解在组(findyou组)执行之前运行,可做组(findyou组)执行之前,初始化数据准备类工作。 |
| @AfterGroups | 按组( @Test(groups= "findyou") )运行时,此注解在组(findyou组)执行之后运行,可做组(findyou)执行之后,数据还原类工作。 |
| @BeforeMethod | 注解的方法将每个测试方法之前运行。 |
| @AfterMethod | 被注释的方法将被运行后,每个测试方法。 |
| @DataProvider | 标志着一个方法,提供数据的一个测试方法。注解的方法必须返回一个Object[] [],其中每个对象[]的测试方法的参数列表中可以分配。该@Test 方法,希望从这个DataProvider的接收数据,需要使用一个dataProvider名称等于这个注解的名字。 |
| @Factory | 作为一个工厂,返回TestNG的测试类的对象将被用于标记的方法。该方法必须返回Object[]。 |
| @Listeners | 定义一个测试类的监听器。 |
| @Parameters | 介绍如何将参数传递给@Test方法。 |
| @Test | 标记一个类或方法作为测试的一部分。 |
2.2 基础实例-1
2.2.1 新建java工程
1.新建:NEW-->JAVA Project-->输入工程名称-->Finish
2.引入lib库
2.2.2 编写测试用例
package a.testcase;

import org.testng.annotataions.Test;
public class TestCaseStudy{
  //testcase1
  @Test
  public void testCase1(){
    System.out.println("in testcase1")}
}
2.2.3 执行用例
执行:右键java文件-->Run as-->TestNG
2.2.4 查看测试报告
在项目文件的test-output文件内查看测试报告
2.3 基础实例-2
2.3.1 编写测试用例
package a.testcase;

import org.testng.annotations.AfterClass;
import org.testng.annotations.AfterSuite;
import org.testng.annotations.AfterTest;
import org.testng.annotations.BeforeClass;
import org.testng.annotations.BeforeSuite;
import org.testng.annotations.BeforeTest;
import org.testng.annotations.Test;
import org.testng.annotations.AfterMethod;
import org.testng.annotations.BeforeMethod;

public class TestngStudy{
  //test case 1
  @Test
  public void testcase1(){
    System.out.println("This is a test case 1")}
  //test case 2
  @Test
  public void testcase2(){
    System.out.println("This is a test case 2")}}
  @BeforeMethod
  public void beforeMethod(){
    System.out.println("This is beforeMethod")}
  @AfterMethod
  public void afterMethod(){
    System.out.println("This is afterMethod")}
  @BeforeClass
  public void beforeClass(){
    System.out.println("This is beforeClass")}
  @AfterClass
  public void afterClass(){
    System.out.println("This is afterClass")}
  @BeforeTest
  public void beforeTest(){
    System.out.println("This is beforeTest")}
  @AfterTest
  public void afterTest(){
    System.out.println("This is afterTest")}
  @BeforeSuite
  public void beforeSuite(){
    System.out.println("This is beforeSuite")}
  @AfterSuite
  public void afterSuite(){
    System.out.println("This is afterSuite")}
}
2.3.2 执行用例结果

3. 实例应用
3.1 待测接口说明
例:北京市天气
1. 接口地址:http://www.weather.com.cn/data/cityinfo/101010100.html
2. 请求方式:get
3. 请求结果:
{
    "weatherinfo": {
    "city": "北京",
    "cityid": "101010100",
    "temp1": "18℃",
    "temp2": "31℃",
    "weather": "多云转阴",
    "img1": "n1.gif",
    "img2": "d2.gif",
    "ptime": "18:00"
    }
}
4. 请求对应cityid代码,返回城市是否为预期城市。
3.2 新建java工程
3.2.1 工程结构说明
--httpAPITest
    --src
        --m.Interface
           --Common.java               --公共方法:JSON解析
           --getCityWeather.java       --请求接口进行封装,根据传入CityID组装不同的请求地址,进行请求,并返回结果数据
           --URLConnection.java        --HTTP请求头封装
3.2 Common.java代码
package m.Interface

import org.codehaus.jettison.json.JSONException;
import org.codehaus.jettison.json.JSONObject;
public class Common{
    public static String getJsonValue(String JsonString, String JsonId){
    String JsonValue = "";
    if(JsonString == null || JsonString.trim().length() < 1){
      return null;
    }
    try{
        JSONObject obj1 = new JSONObject(JsonString);
        JsonValue = (String) object1.getString(JsonId);
        } catch(JSONException e){
          e.printStackTrace();
        }
    }
}
3.3 getCityWeather.java代码
package m.Interface;

import java.io.BufferedReader;
import java.io.IOException;
import java.io.InputStreamReader;
import java.net.HttpURLConnection;
public class getCityWeather{
    private String url = "";

    public String geturl(){
        return url;
    }
    public String getHttpResponse(String cityCode) thorws IOException{
        String line = "";
        String httpResults = "";
        url = ("http://www.weather.com.cn/data/cityinfo/" + cityCode + ".html");
        try{
            HttpURLConnection connection = URLConnection.getConnection(url);
            connection.connect();
            BufferedReader reader = new BufferedReader(new InputStreamReader(connection.getInputStream(),"UTF-8"));
            while((line = reader.readLine()) != null){
                httpResults = httpResults + line.toString();
            }
            reader.close();
            // 断开连接
            connection.disconnect();
        }catch(Execption e ){
            e.printStackTrace();
        }
        return httpResults;
    }
}
3.4 URLConnection.java代码
package m.Interface;

import java.net.HttpURLConnection;
import java.net.URL;
public class URLConnection{
    public static HttpURLConnection getConnection(String url){
        HttpURLConnection connection = null;
        try{
            //打开和URL之间的连续
            URL postUrl = new URL(url);
            connection = (HttpURLConnection) postUrl.openConnection();
            //设置通用的请求属性
            connection.setDoOutput(true);
            connection.setDoInput(true);
            connection.setRequestMethod("GET");
            connection.setUseCaches(false);
            connection.setInstanceFollowRedirets(true);
            connection.setRequestProperty("Content-Type", "application/json");
            connection.setRequestProperty("Charset","utf-8");
            connection.setRequestProperty("Accept-Charset", "utf-8");
        } catch(Exception e ){
            e.printStackTrace();
        }
        return connection;
    }
}
3.5 测试用例编写
package m.testcase;

import java.io.IOException;
import org.testng.Assert;
import org.testng.Reporter;
import org.testng.annotation.Test;
import m.Interface.Common;
import m.Interface.getCityWeather;
public class test{
    public String httpResult = null, weatherinfo = null, city = null, exp_city = null;
    public static String cityCode = "";
    getCityWeather weather = new getCityWeather();

    @Test(group = {"BaseCase"})
    public void getShenZhen_Succ() throws IOException{
        exp_city = "深圳";
        cityCode = "101280601"
        resultCheck(cityCode, exp_city);

    @Test(group = {"BaseCase"})
    public void getBeiJing_Succ() throws IOException{
        exp_city = "北京";
        cityCode = "101010100";
        resultCheck(cityCode, exp_city);
    }
    @Test(group = {"BaseCase"})
    public void getShangHai_Succ() throws IOException{
        exp_city = "上海";
        cityCode = "101020100";
        resultCheck(cityCode, exp_city);
    }
    public void resultCheck(String cityCode_str, String exp_city_str) throws IOException{
        Reporter.log("【正常用例】:获取" + exp_city_str + "天气成功!");
        httpResult = weather.getHttpResponse(cityCode_str);
        Reporter.log("请求地址:" + weather.geturl());
        Reporter.log("返回结果:" + httpResult);
        weatherinfo = Common.getJsonValue(httpResult, "weatherinfo");
        city = Common.getJsonValue(weatherinfo, "city");
        Reporter.log("用例结果:resultCode=>expected:" + exp_city_str + " ,actual:" + city);
        Assert.assertEquals(city,exp_city_str
    }
}
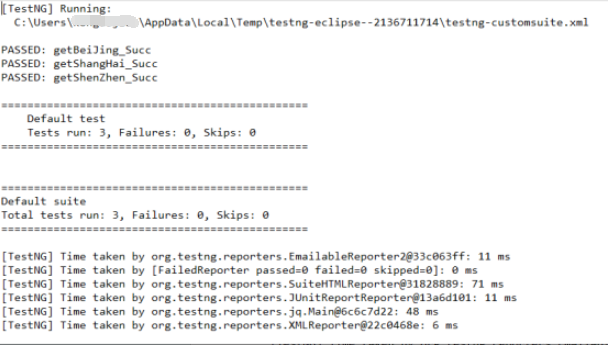
3.6 测试结果
留言主题:你用过TestNG吗?还用过哪些框架?
Appium移动端自动化测试--基础预热 Appium移动端自动化测试--搭建测试环境 Appium移动端自动化测试--录制测试用例并运行 Appium移动端自动化测试--使用IDE编辑并强化脚本 Appium移动端自动化测试--控件定位方法 Appium移动端自动化测试--元素操作与触摸动作 Appium移动端自动化测试--搭建模拟器和真机环境 Appium移动端自动化测试--测试用例改造 Appium移动端自动化测试--capability使用和常用设备交互命令
软件自动化测试交流群已创建,公号回复入群即可获取入群二维码。

