Java引导者


点击上方 web项目开发,选择 设为星标
优质文章,及时送达
效果图
前端初始叶绵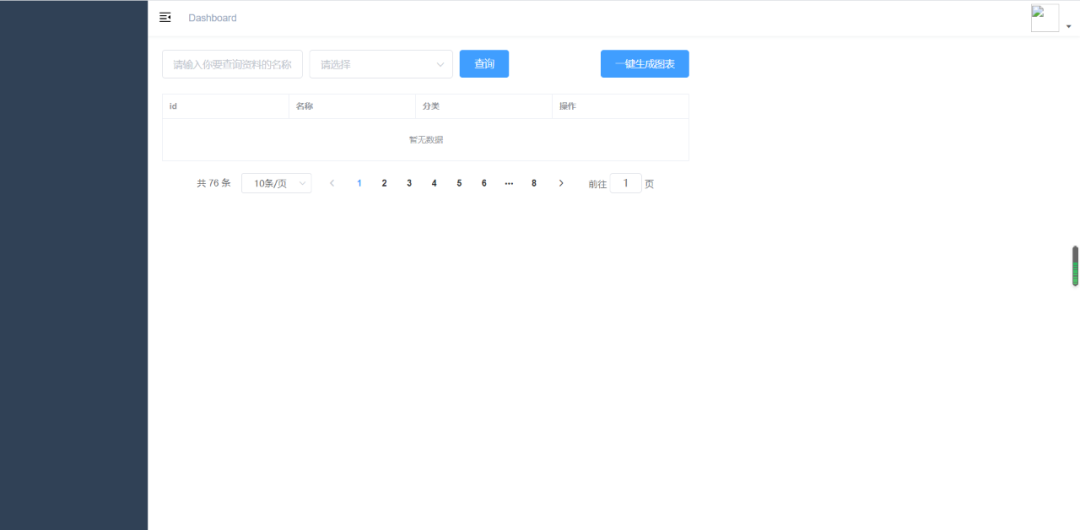
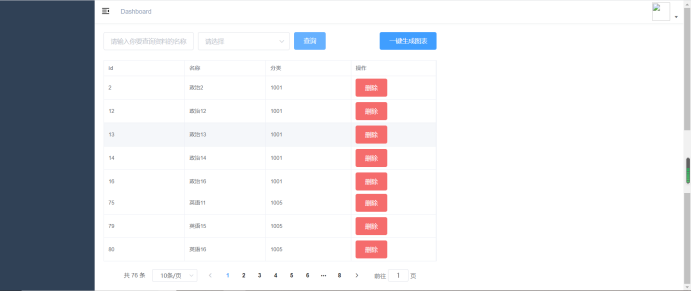
点击查询后页面
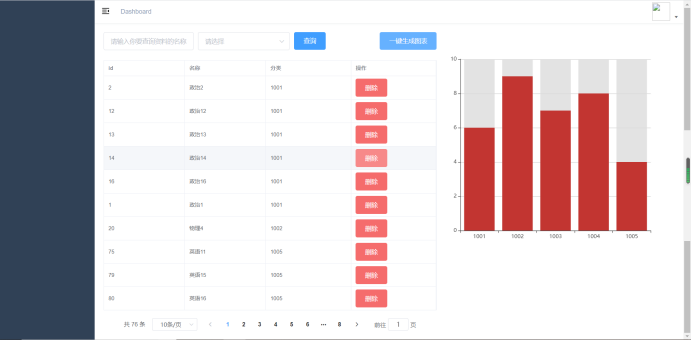
 点击一键生成图表按钮页面
环境介绍
JDK:1.8
数据库:Mysql5.6
前端:Vue
后端:SpringBoot
完整源码获取

扫码关注回复括号内文字【条形图】获取源码
如果你在运行这个代码的过程中有遇到问题,请加小编微信xxf960513,我拉你进对应微信学习群!!帮助你快速掌握这个功能代码!
核心代码介绍
TypeCtrler .class
package com.yxyz.ctrler;import com.yxyz.rest.CodeMsg;import com.yxyz.rest.Result;import com.yxyz.service.TypeService;import com.yxyz.vo.Type;import io.swagger.annotations.Api;import io.swagger.annotations.ApiOperation;import org.springframework.beans.factory.annotation.Autowired;import org.springframework.web.bind.annotation.CrossOrigin;import org.springframework.web.bind.annotation.PostMapping;import org.springframework.web.bind.annotation.RequestMapping;import org.springframework.web.bind.annotation.RestController;import java.util.List;public class TypeCtrler{private TypeService typeService;public Object findAll(){try{ListfindAll = typeService.findAll(); return Result.success(findAll);}catch(Exception e){return Result.error(CodeMsg.SERVER_ERROR);}}}
Result.class
package com.yxyz.rest;import com.fasterxml.jackson.databind.annotation.JsonSerialize;/*** @description rest工具* @author dcl* @date 2019/12/17**/public class Result<T>{private int code;private String msg;private T data;/*** 返回成功时调用* @param data* @return*/public staticResult success(T data) {return new Result(data); }/*** 返回失败时调用* @param data* @return*/public staticResult error(CodeMsg cm) {return new Result(cm); }private Result(T data){this.code = 0;this.msg = "操作成功";this.data = data;}private Result(CodeMsg cm){if(cm == null){return;}this.code = cm.getCode();this.msg = cm.getMsg();}public int getCode() {return code;}public void setCode(int code) {this.code = code;}public String getMsg() {return msg;}public void setMsg(String msg) {this.msg = msg;}public T getData() {return data;}public void setData(T data) {this.data = data;}}
index.vue
<template><div class="dashboard-container"><el-row type="flex" justify="center"><el-col :span="14"><div class="btn-wrap"><el-form :inline="true" class="demo-form-inline"><el-form-item><el-input placeholder="请输入你要查询资料的名称" class="input" />el-form-item><el-form-item><el-select placeholder="请选择" value=""><el-option :value="1">尚在开发中el-option>el-select>el-form-item><el-form-item><el-button type="primary" @click="getData">查询el-button>el-form-item>el-form><div><el-button type="primary" class="btn" @click="handleMap">一键生成图表el-button>div>div><el-table:data="tableData"size="mini"borderstyle="width: 100%"><el-table-columnprop="id"label="id"width="180"/><el-table-columnprop="name"label="名称"width="180"/><el-table-columnprop="category"label="分类"/><el-table-column label="操作"><template slot-scope><el-button type="danger" @click="handleGet">删除el-button>template>el-table-column>el-table><div class="pagination"><el-pagination:current-page="0":page-sizes="[10, 20, 30, 40]":page-size="10"layout="total, sizes, prev, pager, next, jumper":total="76"@size-change="handleGet"@current-change="handleGet"/>div>el-col><el-col :span="10"><div v-if="showFlag" id="bar" />el-col>el-row>div>template><script>import axios from 'axios'const echarts = require('echarts/lib/echarts')require('echarts/lib/chart/bar')require('echarts/lib/component/tooltip')require('echarts/lib/component/legend')require('echarts/lib/component/visualMap')require('echarts/lib/component/title')export default {name: 'Dashboard',data() {return {echartsData: [],tableData: [],showFlag: false}},computed: {},created() {},mounted() {},methods: {getData() {axios({method: 'post',url: 'http://139.159.147.237:8080/yxyz/type/findAll'}).then(res => {this.tableData = res.data.datathis.handleData(res.data.data)})},handleData(data) {const catArr = []// const Stragety = {// '1001': '政治',// '1002': '物理',// '1003': '语文',// '1004': '数学',// '1005': '英语'// }data.forEach(item => {const flag = catArr.some(catItem => catItem.name === item.category)if (flag) {const index = catArr.findIndex(catItem => catItem.name === item.category)catArr[index].value += 1} else {catArr.push({name: item.category,value: 1})}})this.echartsData = catArrconsole.log(catArr)},handleMap() {this.showFlag = falsethis.$nextTick(() => {this.showFlag = truethis.$nextTick(() => {this._drawMap()})})},handleGet() {this.$message('正在开发中')},_drawMap() {var dom = document.getElementById('bar')var myChart = echarts.init(dom)const xData = this.echartsData.map(item => item.name)const yData = this.echartsData.map(item => item.value)console.log(xData, yData)const option = {xAxis: {type: 'category',data: xData},yAxis: {type: 'value'},tooltip: {// 提示trigger: 'item', // 触发方式textStyle: {fontWeight: 'bold'},triggerOn: 'click',enterable: true,extraCssText: 'text-align:left;z-index:99',showDelay: 0},series: [{data: yData,type: 'bar',showBackground: true,backgroundStyle: {color: 'rgba(220, 220, 220, 0.8)'}}]}console.log(myChart, option)myChart.setOption(option)}}}script><style lang="scss" scoped>.dashboard-container {.btn-wrap{display:flex;flex-direction: row;justify-content: space-between;.btn{margin-left:40px;}}.input-wrap{display:flex;flex-direction: row;flex:1;justify-content: space-between;}.input{width:200px;}.pagination{margin-top:15px;display:flex;justify-content: center;}#bar{height:500px;}}style>
main.js
import Vue from 'vue'import 'normalize.css/normalize.css' // A modern alternative to CSS resetsimport ElementUI from 'element-ui'import 'element-ui/lib/theme-chalk/index.css'// import locale from 'element-ui/lib/locale/lang/en' // lang i18nimport '@/styles/index.scss' // global cssimport App from './App'import store from './store'import router from './router'import '@/icons' // iconimport '@/permission' // permission control/*** If you don't want to use mock-server* you want to use MockJs for mock api* you can execute: mockXHR()** Currently MockJs will be used in the production environment,* please remove it before going online ! ! !*/if (process.env.NODE_ENV === 'production') {const { mockXHR } = require('../mock')mockXHR()}// set ElementUI lang to ENVue.use(ElementUI)// 如果想要中文版 element-ui,按如下方式声明// Vue.use(ElementUI)Vue.config.productionTip = falsenew Vue({el: '#app',router,store,render: h => h(App)})
t_type.sql
SET FOREIGN_KEY_CHECKS=0;-- ------------------------------ Table structure for t_type-- ----------------------------DROPTABLE IF EXISTS `t_type`;CREATE TABLE `t_type` (`id` int(11) NOT NULL AUTO_INCREMENT,`name` varchar(255) NOT NULL,`category` varchar(16) NOT NULL,PRIMARY KEY (`id`)) ENGINE=InnoDB AUTO_INCREMENT=81 DEFAULT CHARSET=utf8;-- ------------------------------ Records of t_type-- ----------------------------INSERT INTO `t_type` VALUES ('1', '政治1', '1001');INSERT INTO `t_type` VALUES ('2', '政治2', '1001');INSERT INTO `t_type` VALUES ('12', '政治12', '1001');INSERT INTO `t_type` VALUES ('13', '政治13', '1001');INSERT INTO `t_type` VALUES ('14', '政治14', '1001');INSERT INTO `t_type` VALUES ('16', '政治16', '1001');INSERT INTO `t_type` VALUES ('17', '物理1', '1002');INSERT INTO `t_type` VALUES ('18', '物理2', '1002');INSERT INTO `t_type` VALUES ('19', '物理3', '1002');INSERT INTO `t_type` VALUES ('20', '物理4', '1002');INSERT INTO `t_type` VALUES ('22', '物理6', '1002');INSERT INTO `t_type` VALUES ('23', '物理7', '1002');INSERT INTO `t_type` VALUES ('30', '物理14', '1002');INSERT INTO `t_type` VALUES ('31', '物理15', '1002');INSERT INTO `t_type` VALUES ('32', '物理16', '1002');INSERT INTO `t_type` VALUES ('33', '语文1', '1003');INSERT INTO `t_type` VALUES ('34', '语文2', '1003');INSERT INTO `t_type` VALUES ('44', '语文12', '1003');INSERT INTO `t_type` VALUES ('45', '语文13', '1003');INSERT INTO `t_type` VALUES ('46', '语文14', '1003');INSERT INTO `t_type` VALUES ('47', '语文15', '1003');INSERT INTO `t_type` VALUES ('48', '语文16', '1003');INSERT INTO `t_type` VALUES ('49', '数学1', '1004');INSERT INTO `t_type` VALUES ('50', '数学2', '1004');INSERT INTO `t_type` VALUES ('57', '数学9', '1004');INSERT INTO `t_type` VALUES ('58', '数学10', '1004');INSERT INTO `t_type` VALUES ('59', '数学11', '1004');INSERT INTO `t_type` VALUES ('60', '数学12', '1004');INSERT INTO `t_type` VALUES ('62', '数学14', '1004');INSERT INTO `t_type` VALUES ('63', '数学15', '1004');INSERT INTO `t_type` VALUES ('74', '英语10', '1005');INSERT INTO `t_type` VALUES ('75', '英语11', '1005');INSERT INTO `t_type` VALUES ('79', '英语15', '1005');INSERT INTO `t_type` VALUES ('80', '英语16', '1005');
--完--
如果你觉得这个案例以及我们的分享思路不错,对你有帮助,请分享给身边更多需要学习的朋友。别忘了《留言+点在看》给作者一个鼓励哦!
1、springboot+mybatis+vue前后端分离实现用户登陆注册功能
3、SpringBoot+Spring Data JPA+Vue前后端分离实现分页功能
4、SpringBoot+Spring Data JPA+Vue前后端分离实现Excel导出功能
5、Spring Boot + Vue前后端分离实现图片上传功能
6、springboot+jpa+tymeleaf实现分页功能
7、springboot+jpa+thymeleaf实现信息修改功能
10、springboot+jpa+thymeleaf实现信息增删改查功能
12、Springboot+layui前后端分离实现word转pdf功能
13、用java将本地图片转base64格式, 再转图片!你用过这个功能?
14、springboot+layui+thymelefe实现用户批量添加功能
15、springboot+Tymeleaf实现用户密码MD5加盐解密登录
16、springboot+vue实现用户注册后必须通过邮箱激活才能登录激活才能登录
19、springboot+vue实现不同管理权限的用户登陆展示的菜单栏目不同功能
20、Springboot+vue实现上传视频并在线播放功能
21、SpringBoot+Vue前后端分离实现邮件定时发送功能
23、Springboot+Vue前后端分离实现Excle文件导入并在前端页面回显功能
为了方便大家更好的学习,本公众号经常分享一些完整的单个功能案例代码给大家去练习,如果本公众号没有你要学习的功能案例,你可以联系小编(微信:xxf960513)提供你的小需求给我,我安排我们这边的开发团队免费帮你完成你的案例。
注意:只能提单个功能的需求不能要求功能太多,比如要求用什么技术,有几个页面,页面要求怎么样?